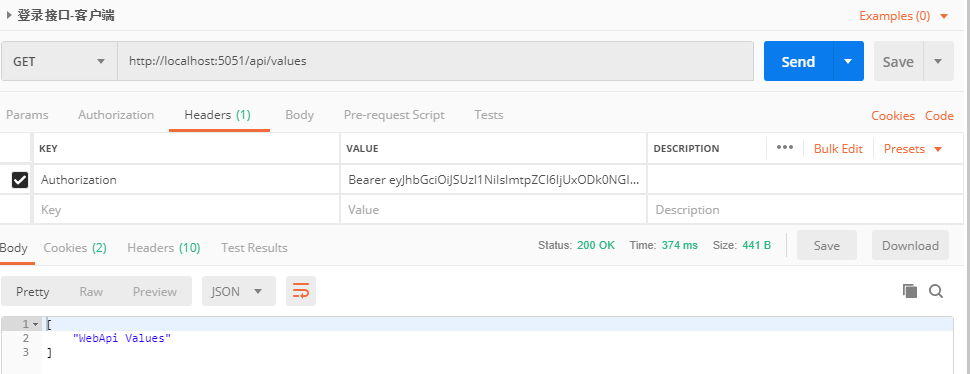
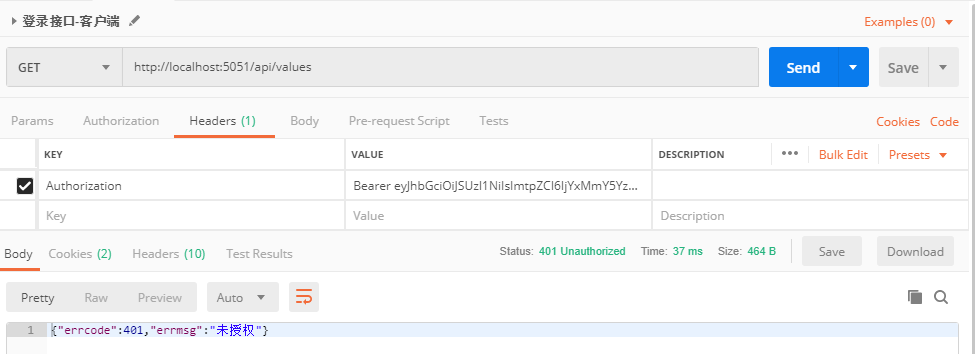
来源: 【.NET Core项目实战-统一认证平台】第十三章 授权篇-如何强制有效令牌过期 – 金焰的世界 – 博客园
上一篇我介绍了JWT的生成验证及流程内容,相信大家也对JWT非常熟悉了,今天将从一个小众的需求出发,介绍如何强制令牌过期的思路和实现过程。
.netcore项目实战交流群(637326624),有兴趣的朋友可以在群里交流讨论。
一、前言
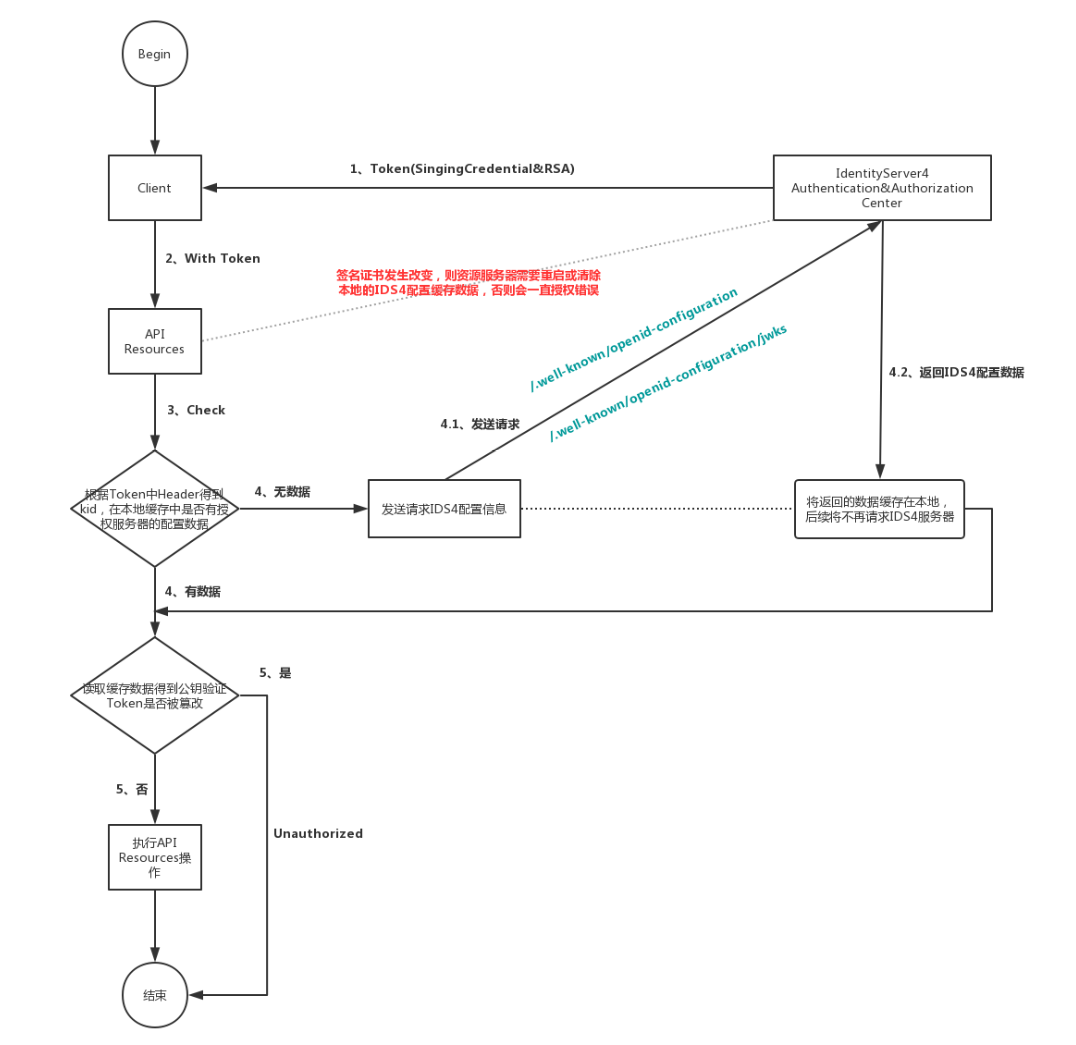
众所周知,IdentityServer4 默认支持两种类型的 Token,一种是 Reference Token,一种是 JWT Token 。前者的特点是 Token 的有效与否是由 Token 颁发服务集中化控制的,颁发的时候会持久化 Token,然后每次验证都需要将 Token 传递到颁发服务进行验证,是一种中心化的验证方式。JWT Token的特点与前者相反,每个资源服务不需要每次都要都去颁发服务进行验证 Token 的有效性验证,上一篇也介绍了,该 Token 由三部分组成,其中最后一部分包含了一个签名,是在颁发的时候采用非对称加密算法进行数据的签名,保证了 Token 的不可篡改性,校验时与颁发服务的交互,仅仅是获取公钥用于验证签名,且该公钥获取以后可以自己缓存,持续使用,不用再去交互获得,除非数字证书发生变化。
二、Reference Token的用法
上一篇已经介绍了JWT Token的整个生成过程,为了演示强制过期策略,这里需要了解下Reference Token是如何生成和存储的,这样可以帮助掌握IdentityServer4所有的工作方式。
1、新增测试客户端
由于我们已有数据库,为了方便演示,我直接使用SQL脚本新增。
INSERT INTO Clients(AccessTokenType,AccessTokenLifetime,ClientId,ClientName,Enabled) VALUES(1,3600,'clientref','测试Ref客户端',1);
INSERT INTO ClientSecrets VALUES(23,'',null,'SharedSecret','2tytAAysa0zaDuNthsfLdjeEtZSyWw8WzbzM8pfTGNI=');
INSERT INTO ClientGrantTypes VALUES(23,'client_credentials');
INSERT INTO ClientScopes VALUES(23,'mpc_gateway');
这里添加了认证类型为Reference Token客户端为clientref,并分配了客户端授权和能访问的scope,然后我们使用PostMan测试下客户端。
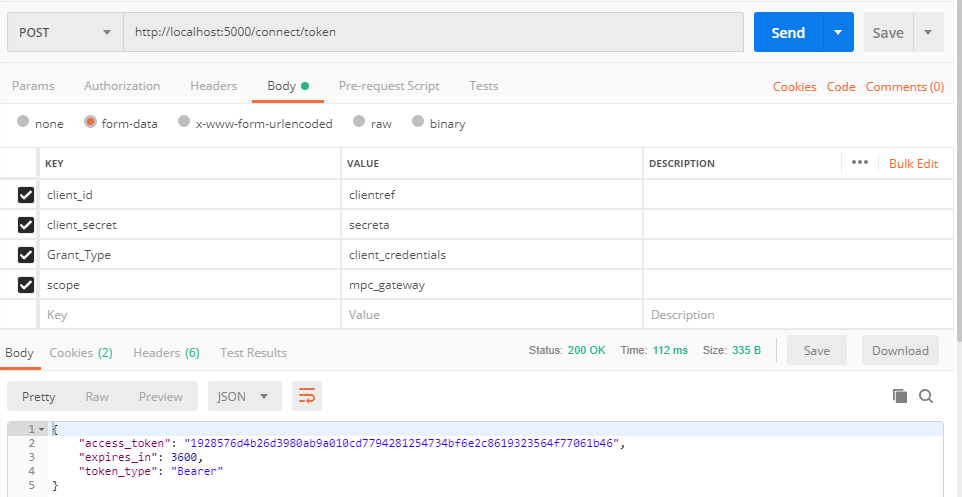
如上图所示,可以正确的返回access_token,且有标记的过期时间。
2、如何校验token的有效性?
IdentityServer4给已经提供了Token的校验地址http://xxxxxx/connect/introspect,可以通过访问此地址来校验Token的有效性,使用前需要了解传输的参数和校验方式。
在授权篇开始时我介绍了IdentityServer4的源码剖析,相信都掌握了看源码的方式,这里就不详细介绍了。
核心代码为IntrospectionEndpoint,标注出校验的核心代码,用到的几个校验方式已经注释出来了。
private async Task<IEndpointResult> ProcessIntrospectionRequestAsync(HttpContext context)
{
_logger.LogDebug("Starting introspection request.");
var apiResult = await _apiSecretValidator.ValidateAsync(context);
if (apiResult.Resource == null)
{
_logger.LogError("API unauthorized to call introspection endpoint. aborting.");
return new StatusCodeResult(HttpStatusCode.Unauthorized);
}
var body = await context.Request.ReadFormAsync();
if (body == null)
{
_logger.LogError("Malformed request body. aborting.");
await _events.RaiseAsync(new TokenIntrospectionFailureEvent(apiResult.Resource.Name, "Malformed request body"));
return new StatusCodeResult(HttpStatusCode.BadRequest);
}
_logger.LogTrace("Calling into introspection request validator: {type}", _requestValidator.GetType().FullName);
var validationResult = await _requestValidator.ValidateAsync(body.AsNameValueCollection(), apiResult.Resource);
if (validationResult.IsError)
{
LogFailure(validationResult.Error, apiResult.Resource.Name);
await _events.RaiseAsync(new TokenIntrospectionFailureEvent(apiResult.Resource.Name, validationResult.Error));
return new BadRequestResult(validationResult.Error);
}
_logger.LogTrace("Calling into introspection response generator: {type}", _responseGenerator.GetType().FullName);
var response = await _responseGenerator.ProcessAsync(validationResult);
LogSuccess(validationResult.IsActive, validationResult.Api.Name);
return new IntrospectionResult(response);
}
public async Task<TokenValidationResult> ValidateAccessTokenAsync(string token, string expectedScope = null)
{
_logger.LogTrace("Start access token validation");
_log.ExpectedScope = expectedScope;
_log.ValidateLifetime = true;
TokenValidationResult result;
if (token.Contains("."))
{
if (token.Length > _options.InputLengthRestrictions.Jwt)
{
_logger.LogError("JWT too long");
return new TokenValidationResult
{
IsError = true,
Error = OidcConstants.ProtectedResourceErrors.InvalidToken,
ErrorDescription = "Token too long"
};
}
_log.AccessTokenType = AccessTokenType.Jwt.ToString();
result = await ValidateJwtAsync(
token,
string.Format(Constants.AccessTokenAudience, _context.HttpContext.GetIdentityServerIssuerUri().EnsureTrailingSlash()),
await _keys.GetValidationKeysAsync());
}
else
{
if (token.Length > _options.InputLengthRestrictions.TokenHandle)
{
_logger.LogError("token handle too long");
return new TokenValidationResult
{
IsError = true,
Error = OidcConstants.ProtectedResourceErrors.InvalidToken,
ErrorDescription = "Token too long"
};
}
_log.AccessTokenType = AccessTokenType.Reference.ToString();
result = await ValidateReferenceAccessTokenAsync(token);
}
_log.Claims = result.Claims.ToClaimsDictionary();
if (result.IsError)
{
return result;
}
var clientClaim = result.Claims.FirstOrDefault(c => c.Type == JwtClaimTypes.ClientId);
if (clientClaim != null)
{
var client = await _clients.FindEnabledClientByIdAsync(clientClaim.Value);
if (client == null)
{
_logger.LogError("Client deleted or disabled: {clientId}", clientClaim.Value);
result.IsError = true;
result.Error = OidcConstants.ProtectedResourceErrors.InvalidToken;
result.Claims = null;
return result;
}
}
var subClaim = result.Claims.FirstOrDefault(c => c.Type == JwtClaimTypes.Subject);
if (subClaim != null)
{
var principal = Principal.Create("tokenvalidator", result.Claims.ToArray());
if (result.ReferenceTokenId.IsPresent())
{
principal.Identities.First().AddClaim(new Claim(JwtClaimTypes.ReferenceTokenId, result.ReferenceTokenId));
}
var isActiveCtx = new IsActiveContext(principal, result.Client, IdentityServerConstants.ProfileIsActiveCallers.AccessTokenValidation);
await _profile.IsActiveAsync(isActiveCtx);
if (isActiveCtx.IsActive == false)
{
_logger.LogError("User marked as not active: {subject}", subClaim.Value);
result.IsError = true;
result.Error = OidcConstants.ProtectedResourceErrors.InvalidToken;
result.Claims = null;
return result;
}
}
if (expectedScope.IsPresent())
{
var scope = result.Claims.FirstOrDefault(c => c.Type == JwtClaimTypes.Scope && c.Value == expectedScope);
if (scope == null)
{
LogError(string.Format("Checking for expected scope {0} failed", expectedScope));
return Invalid(OidcConstants.ProtectedResourceErrors.InsufficientScope);
}
}
_logger.LogDebug("Calling into custom token validator: {type}", _customValidator.GetType().FullName);
var customResult = await _customValidator.ValidateAccessTokenAsync(result);
if (customResult.IsError)
{
LogError("Custom validator failed: " + (customResult.Error ?? "unknown"));
return customResult;
}
_log.Claims = customResult.Claims.ToClaimsDictionary();
LogSuccess();
return customResult;
}
有了上面的校验代码,就可以很容易掌握使用的参数和校验的方式,现在我们就分别演示JWT Token和Reference token两个校验方式及返回的值。
首先需要新增资源端的授权记录,因为校验时需要,我们就以mpc_gateway为例新增授权记录,为了方便演示,直接使用SQL语句。
INSERT INTO dbo.ApiSecrets VALUES(28,NULL,NULL,'SharedSecret','2tytAAysa0zaDuNthsfLdjeEtZSyWw8WzbzM8pfTGNI=');
首先我们测试刚才使用Reference token生成的access_token,参数如下图所示。
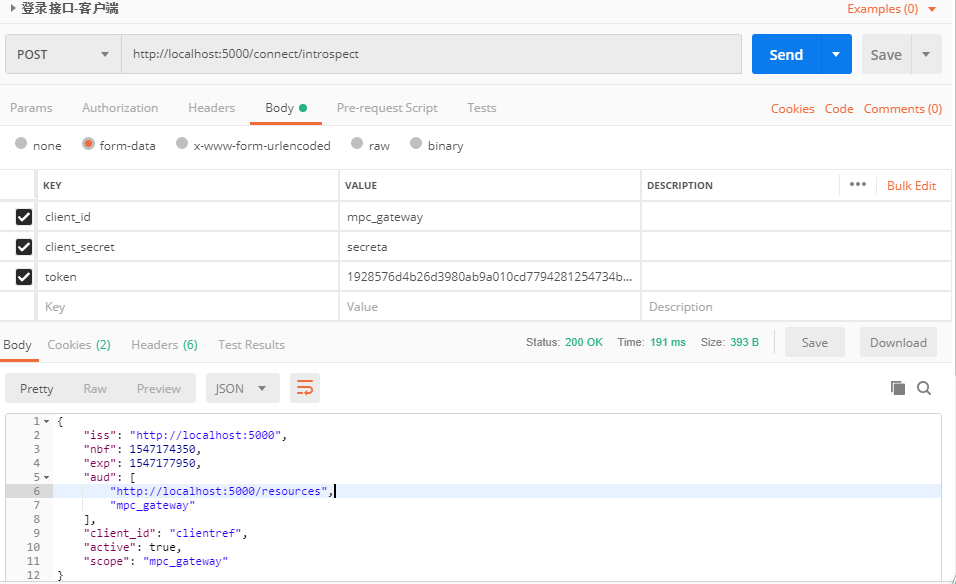
查看是否校验成功,从返回的状态码和active结果判断,如果为true校验成功,如果为false或者401校验失败。
我们直接从数据库里删除刚才授权的记录,然后再次提交查看结果,返回结果校验失败。
DELETE FROM PersistedGrants WHERE ClientId='clientref'
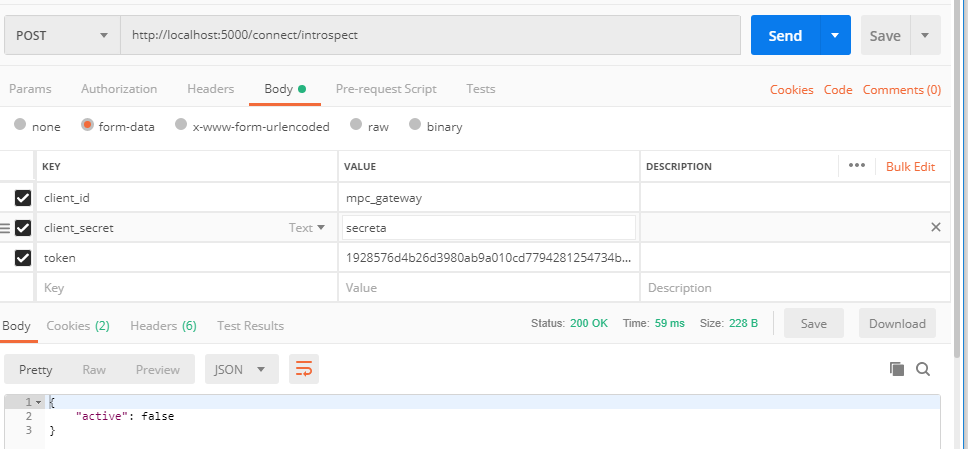
然后我们校验下Jwt Token,同样的方式,先生成jwt token,然后进行校验,结果如下图所示。
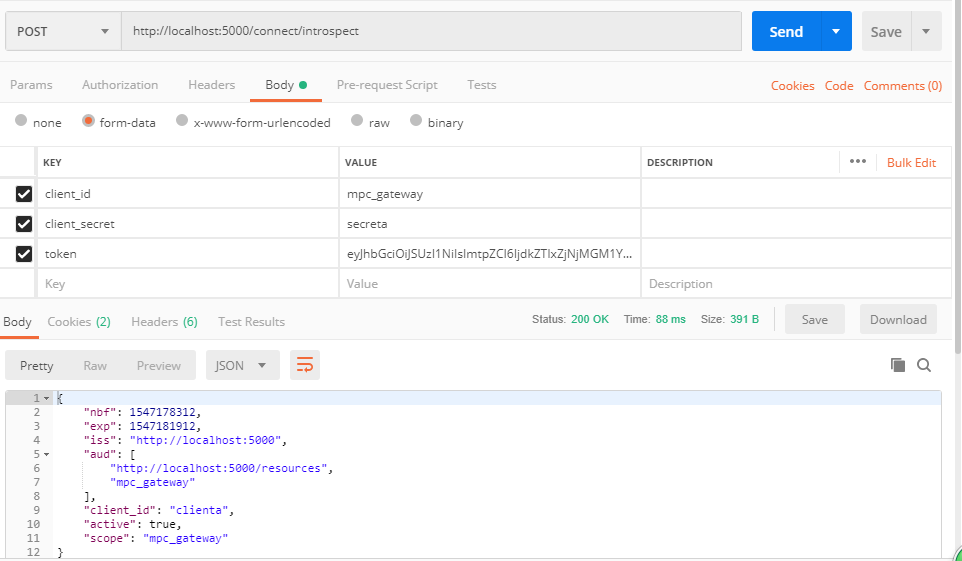
可以得到预期结果。
三、强制过期的方式
1、简易黑名单模式
在每次有Token请求时,资源服务器对请求的Token进行校验,在校验有效性校验通过后,再在黑名单里校验是否强制过期,如果存在黑名单里,返回授权过期提醒。资源服务器提示Token无效。注意由于每次请求都会校验Token的有效性,因此黑名单最好使用比如Redis缓存进行保存。
实现方式:
此种方式只需要重写Token验证方式即可实现。
优点
实现简单,改造少。
缺点
1、不好维护黑名单列表
2、对认证服务器请求压力太大
2、策略黑名单模式
建议黑名单有一个最大的弊端是每次请求都需要对服务器进行访问,会对服务器端造成很大的请求压力,而实际请求数据中99%都是正常访问,对于可疑的请求我们才需要进行服务器端验证,所以我们要在客户端校验出可疑的请求再提交到服务器校验,可以在Claim里增加客户端IP信息,当请求的客户端IP和Token里的客户端IP不一致时,我们标记为可疑Token,这时候再发起Token校验请求,校验Token是否过期,后续流程和简易黑名单模式完成一致。
实现方式
此种方式需要增加Token生成的Claim,增加自定义的ip的Claim字段,然后再重写验证方式。
优点
可以有效的减少服务器端压力
缺点
不好维护黑名单列表
3、强化白名单模式
通常不管使用客户端、密码、混合模式等方式登录,都可以获取到有效的Token,这样会造成签发的不同Token可以重复使用,且很难把这些历史的Token手工加入黑名单里,防止被其他人利用。那如何保证一个客户端同一时间点只有一个有效Token呢?我们只需要把最新的Token加入白名单,然后验证时直接验证白名单,未命中白名单校验失败。校验时使用策略黑名单模式,满足条件再请求验证,为了减轻认证服务器的压力,可以根据需求在本地缓存一定时间(比如10分钟)。
实现方式
此种方式需要重写Token生成方式,重写自定义验证方式。
优点
服务器端请求不频繁,验证块,自动管理黑名单。
缺点
实现起来比较改造的东西较多
综上分析后,为了网关的功能全面和性能,建议采用强化白名单模式来实现强制过期策略。
四、强制过期的实现
1.增加白名单功能
为了增加强制过期功能,我们需要在配置文件里标记是否开启此功能,默认设置为不开启。
public class DapperStoreOptions
{
public bool EnableTokenCleanup { get; set; } = false;
public int TokenCleanupInterval { get; set; } = 3600;
public string DbConnectionStrings { get; set; }
public bool EnableForceExpire { get; set; } = false;
public List<string> RedisConnectionStrings { get; set; }
}
然后重写Token生成策略,增加白名单功能,并使用Redis存储白名单。白名单的存储的Key格式为clientId+sub+amr,详细实现代码如下。
using Czar.IdentityServer4.Options;
using IdentityModel;
using IdentityServer4.ResponseHandling;
using IdentityServer4.Services;
using IdentityServer4.Stores;
using IdentityServer4.Validation;
using Microsoft.AspNetCore.Authentication;
using Microsoft.Extensions.Logging;
using System;
using System.Threading.Tasks;
namespace Czar.IdentityServer4.ResponseHandling
{
public class CzarTokenResponseGenerator : TokenResponseGenerator
{
private readonly DapperStoreOptions _config;
private readonly ICache<CzarToken> _cache;
public CzarTokenResponseGenerator(ISystemClock clock, ITokenService tokenService, IRefreshTokenService refreshTokenService, IResourceStore resources, IClientStore clients, ILogger<TokenResponseGenerator> logger, DapperStoreOptions config, ICache<CzarToken> cache) : base(clock, tokenService, refreshTokenService, resources, clients, logger)
{
_config = config;
_cache = cache;
}
public override async Task<TokenResponse> ProcessAsync(TokenRequestValidationResult request)
{
var result = new TokenResponse();
switch (request.ValidatedRequest.GrantType)
{
case OidcConstants.GrantTypes.ClientCredentials:
result = await ProcessClientCredentialsRequestAsync(request);
break;
case OidcConstants.GrantTypes.Password:
result = await ProcessPasswordRequestAsync(request);
break;
case OidcConstants.GrantTypes.AuthorizationCode:
result = await ProcessAuthorizationCodeRequestAsync(request);
break;
case OidcConstants.GrantTypes.RefreshToken:
result = await ProcessRefreshTokenRequestAsync(request);
break;
default:
result = await ProcessExtensionGrantRequestAsync(request);
break;
}
if (_config.EnableForceExpire)
{
var token = new CzarToken();
string key = request.ValidatedRequest.Client.ClientId;
var _claim = request.ValidatedRequest.Subject?.FindFirst(e => e.Type == "sub");
if (_claim != null)
{
var amrval = request.ValidatedRequest.Subject.FindFirst(p => p.Type == "amr");
if (amrval != null)
{
key += amrval.Value;
}
key += _claim.Value;
}
if (!String.IsNullOrEmpty(result.AccessToken))
{
token.Token = result.AccessToken;
await _cache.SetAsync(key, token, TimeSpan.FromSeconds(result.AccessTokenLifetime));
}
}
return result;
}
}
}
然后定一个通用缓存方法,默认使用Redis实现。
using Czar.IdentityServer4.Options;
using IdentityServer4.Services;
using System;
using System.Threading.Tasks;
namespace Czar.IdentityServer4.Caches
{
public class CzarRedisCache<T> : ICache<T>
where T : class
{
private const string KeySeparator = ":";
public CzarRedisCache(DapperStoreOptions configurationStoreOptions)
{
CSRedis.CSRedisClient csredis;
if (configurationStoreOptions.RedisConnectionStrings.Count == 1)
{
csredis = new CSRedis.CSRedisClient(configurationStoreOptions.RedisConnectionStrings[0]);
}
else
{
csredis = new CSRedis.CSRedisClient(null, configurationStoreOptions.RedisConnectionStrings.ToArray());
}
RedisHelper.Initialization(csredis);
}
private string GetKey(string key)
{
return typeof(T).FullName + KeySeparator + key;
}
public async Task<T> GetAsync(string key)
{
key = GetKey(key);
var result = await RedisHelper.GetAsync<T>(key);
return result;
}
public async Task SetAsync(string key, T item, TimeSpan expiration)
{
key = GetKey(key);
await RedisHelper.SetAsync(key, item, (int)expiration.TotalSeconds);
}
}
}
然后重新注入下ITokenResponseGenerator实现。
builder.Services.AddSingleton<ITokenResponseGenerator, CzarTokenResponseGenerator>();
builder.Services.AddTransient(typeof(ICache<>), typeof(CzarRedisCache<>));
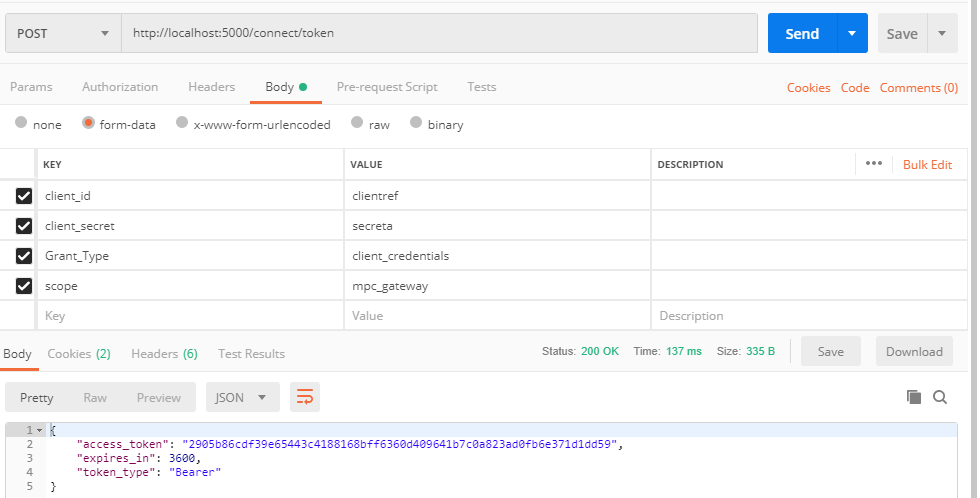
现在我们来测试下生成Token,查看Redis里是否生成了白名单?
Reference Token生成

客户端模式生成
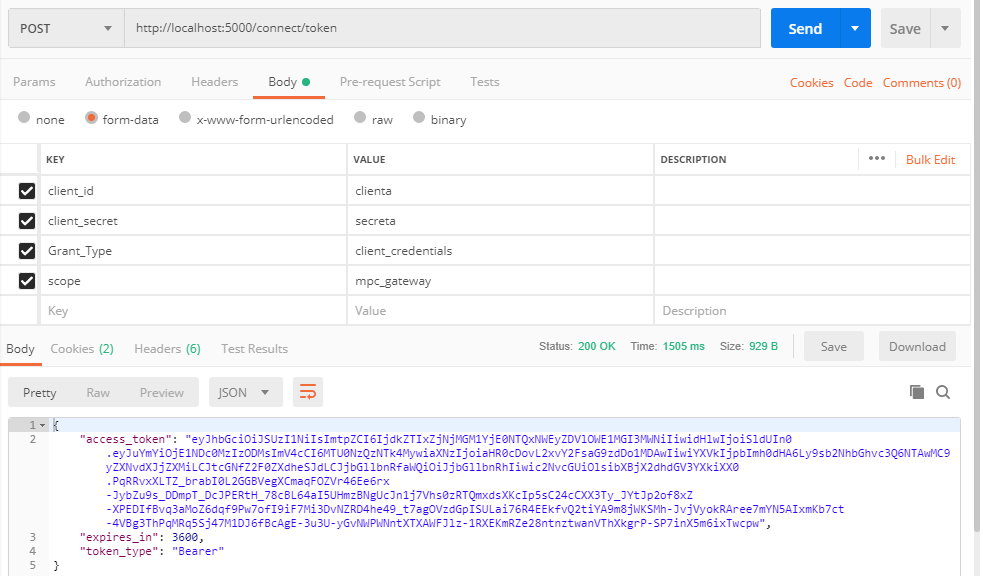
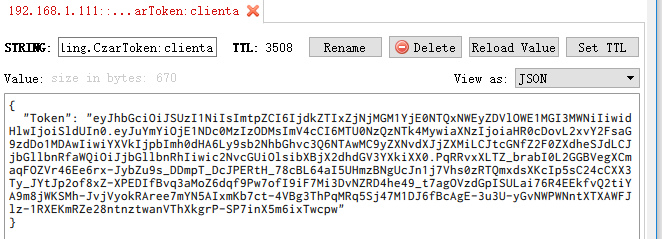
密码模式生成
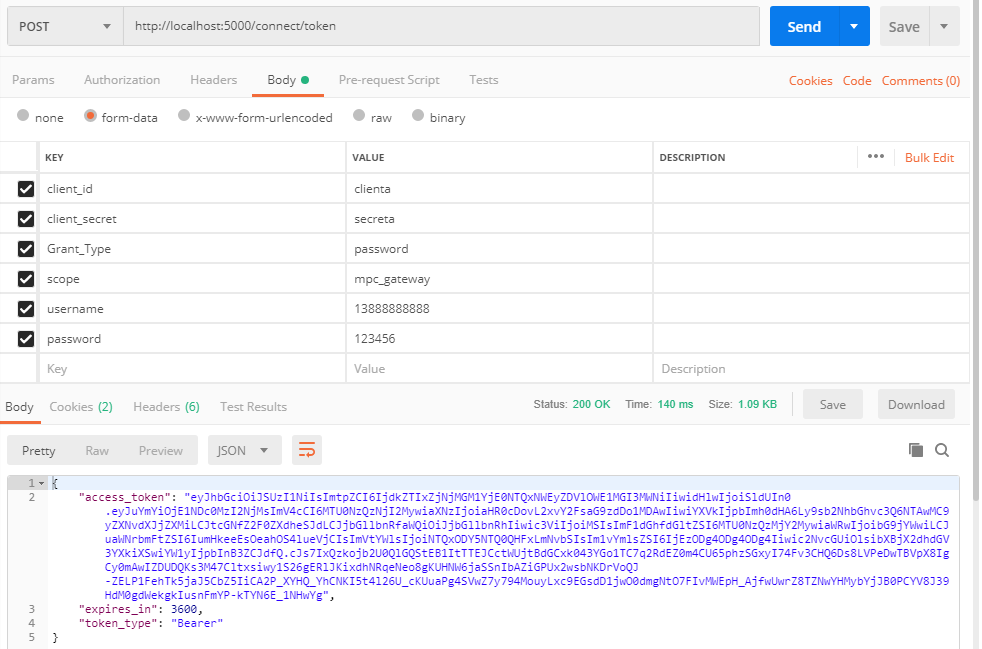
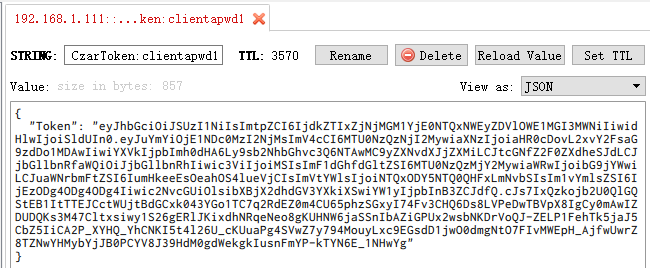
从结果中可以看出来,无论那种认证方式,都可以生成白名单,且只保留最新的报名单记录。
2.改造校验接口来适配白名单校验
前面介绍了认证原理后,实现校验非常简单,只需要重写下IIntrospectionRequestValidator接口即可,增加白名单校验策略,详细实现代码如下。
using Czar.IdentityServer4.Options;
using Czar.IdentityServer4.ResponseHandling;
using IdentityServer4.Models;
using IdentityServer4.Services;
using IdentityServer4.Validation;
using Microsoft.Extensions.Logging;
using System.Collections.Specialized;
using System.Linq;
using System.Threading.Tasks;
namespace Czar.IdentityServer4.Validation
{
public class CzarIntrospectionRequestValidator : IIntrospectionRequestValidator
{
private readonly ILogger _logger;
private readonly ITokenValidator _tokenValidator;
private readonly DapperStoreOptions _config;
private readonly ICache<CzarToken> _cache;
public CzarIntrospectionRequestValidator(ITokenValidator tokenValidator, DapperStoreOptions config, ICache<CzarToken> cache, ILogger<CzarIntrospectionRequestValidator> logger)
{
_tokenValidator = tokenValidator;
_config = config;
_cache = cache;
_logger = logger;
}
public async Task<IntrospectionRequestValidationResult> ValidateAsync(NameValueCollection parameters, ApiResource api)
{
_logger.LogDebug("Introspection request validation started.");
var token = parameters.Get("token");
if (token == null)
{
_logger.LogError("Token is missing");
return new IntrospectionRequestValidationResult
{
IsError = true,
Api = api,
Error = "missing_token",
Parameters = parameters
};
}
var tokenValidationResult = await _tokenValidator.ValidateAccessTokenAsync(token);
if (tokenValidationResult.IsError)
{
_logger.LogDebug("Token is invalid.");
return new IntrospectionRequestValidationResult
{
IsActive = false,
IsError = false,
Token = token,
Api = api,
Parameters = parameters
};
}
_logger.LogDebug("Introspection request validation successful.");
if (_config.EnableForceExpire)
{
var _key = tokenValidationResult.Claims.FirstOrDefault(t => t.Type == "client_id").Value;
var _amr = tokenValidationResult.Claims.FirstOrDefault(t => t.Type == "amr");
if (_amr != null)
{
_key += _amr.Value;
}
var _sub = tokenValidationResult.Claims.FirstOrDefault(t => t.Type == "sub");
if (_sub != null)
{
_key += _sub.Value;
}
var _token = await _cache.GetAsync(_key);
if (_token == null || _token.Token != token)
{
_logger.LogDebug("Token已经强制失效");
return new IntrospectionRequestValidationResult
{
IsActive = false,
IsError = false,
Token = token,
Api = api,
Parameters = parameters
};
}
}
return new IntrospectionRequestValidationResult
{
IsActive = true,
IsError = false,
Token = token,
Claims = tokenValidationResult.Claims,
Api = api,
Parameters = parameters
};
}
}
}
然后把接口重新注入,即可实现白名单的校验功能。
builder.Services.AddTransient<IIntrospectionRequestValidator, CzarIntrospectionRequestValidator>();
只要几句代码就完成了功能校验,现在可以使用PostMan测试白名单功能。首先使用刚生成的Token测试,可以正确的返回结果。
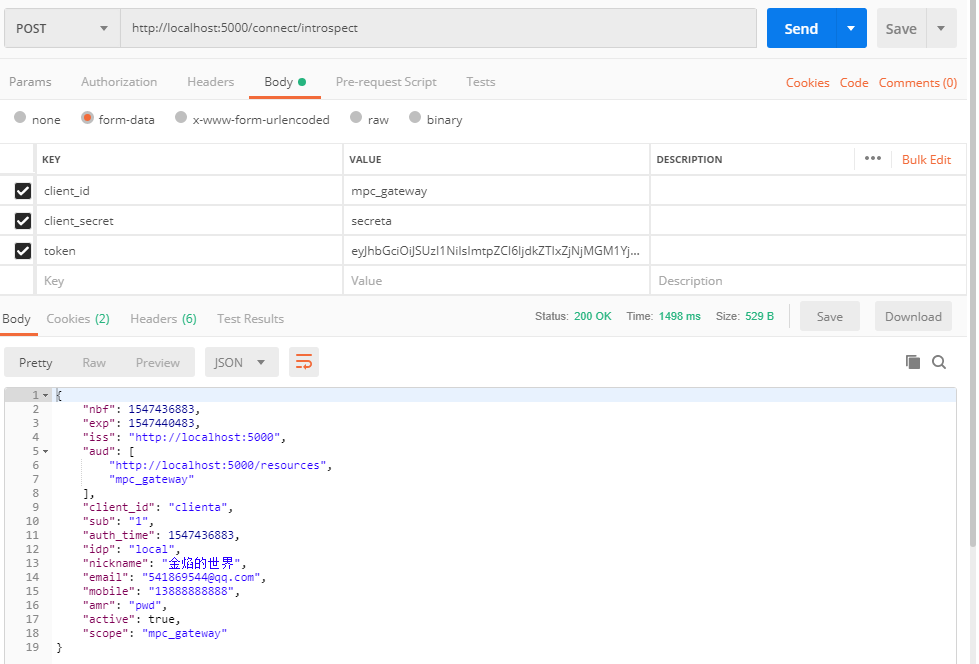
紧接着,我从新生成Token,然后再次请求,结果如下图所示。
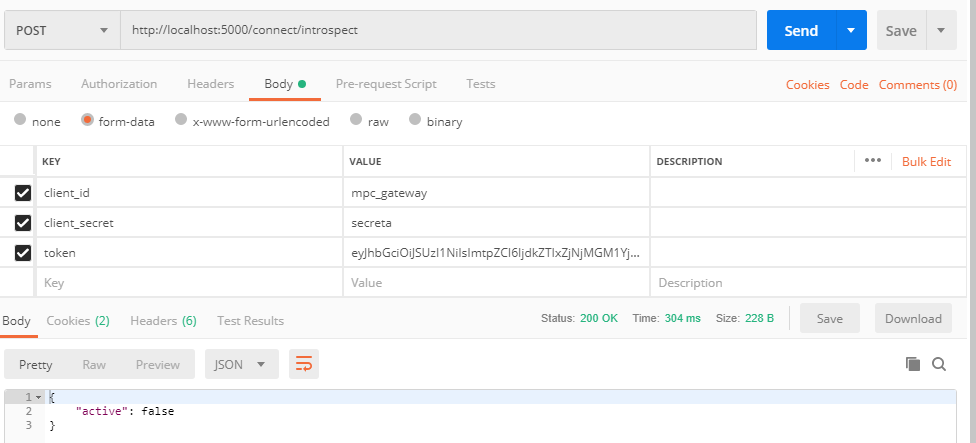

发现校验失败,提示Token已经失效,和我们预期的结果完全一致。
现在获取的Token只有最新的是白名单,其他的有效信息自动加入认定为黑名单,如果想要强制token失效,只要删除或修改Redis值即可。
有了这个认证结果,现在只需要在认证策略里增加合理的校验规则即可,比如5分钟请求一次验证或者使用ip策略发起校验等,这里就比较简单了,就不一一实现了,如果在使用中遇到问题可以联系我。
五、总结与思考
本篇我介绍了IdentityServer4里Token认证的接口及实现过程,然后介绍强制有效Token过期的实现思路,并使用了白名单模式实现了强制过期策略。但是这种实现方式不一定是非常合理的实现方式,也希望有更好实现的朋友批评指正并告知本人。
实际生产环境中如果使用JWT Token,建议还是使用Token颁发的过期策略来强制Token过期,比如对安全要求较高的设置几分钟或者几十分钟过期等,避免Token泄漏造成的安全问题。
至于单机登录,其实只要开启强制过期策略就基本实现了,因为只要最新的登录会自动把之前的登录Token强制失效,如果再配合signalr强制下线即可。
项目源代码地址:https://github.com/jinyancao/Czar.IdentityServer4
 Mikel
Mikel
