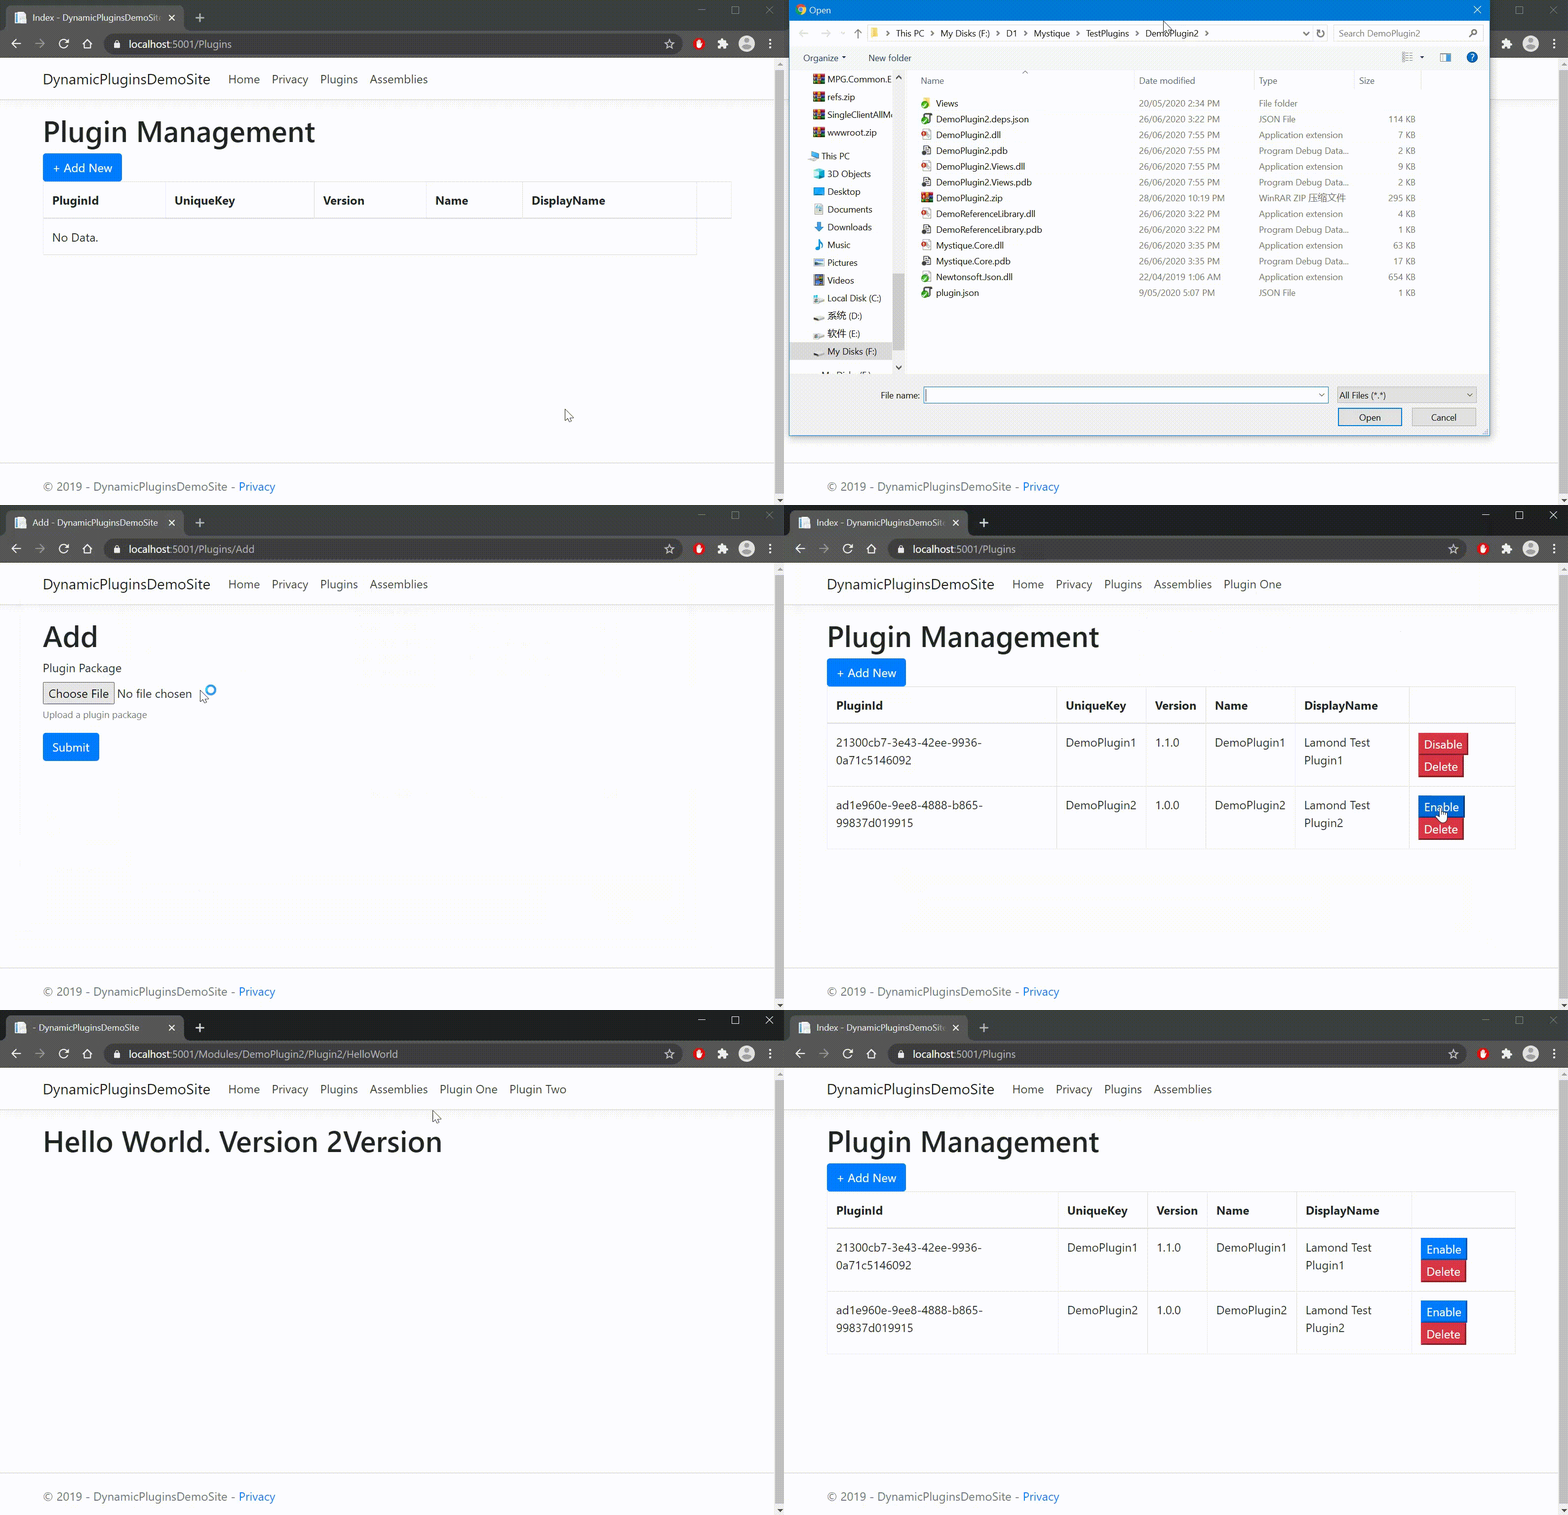
css文字重叠解决_zengyonglan的博客-CSDN博客_css文字重叠

mikel阅读(613)

来源: (1条消息) css文字重叠解决_zengyonglan的博客-CSDN博客_css文字重叠

DIV+CSS布局文字较多时候重叠下一行文字内容如何解决?

出现原因是因为对li设置了css高度和宽度,当内容比较多是内容会自动换行,而又有高度,这样就造成内容溢出而与下一排内容重叠覆盖现象。

解决方法如下:

第一种,取消高度height样式设置 即可实现不重叠,但内容会换行占位。


第二种,使用隐藏溢出样式单词overflow:hidden

此方法是使用overflow隐藏超出对象设置宽度高度的内容,推荐使用。


示例代码如下:

<!DOCTYPE html>
<html xmlns=”http://www.w3.org/1999/xhtml”>
<head>
<meta http-equiv=”Content-Type” content=”text/html; charset=utf-8″ />
<title>内容重叠解决 www.divcss5.com</title>
<style>
ul,li{ list-style:none}
ul{ width:100px}
ul li{ float:left;width:100px; height:22px;line-height:22px;
text-align:left; overflow:hidden}
/* css注释:为了便于截图,将CSS代码换行排版 */
</style>
</head>
<body>
<ul>
<li>标题一内容</li>
<li>测试文字多重叠标题二内容</li>
<li>标题三内容</li>
</ul>
</body>
</html>
————————————————
版权声明:本文为CSDN博主「时光默」的原创文章,遵循CC 4.0 BY-SA版权协议,转载请附上原文出处链接及本声明。
原文链接:https://blog.csdn.net/zengyonglan/article/details/52797445

钉钉企业应用C#开发笔记之一(免登) - Pleiades - 博客园

mikel阅读(1038)

来源: 钉钉企业应用C#开发笔记之一(免登) – Pleiades – 博客园

关于钉钉

钉钉是阿里推出的企业移动OA平台,本身提供了丰富的通用应用,同时其强大的后台API接入能力让企业接入自主开发的应用成为可能,可以让开发者实现几乎任何需要的功能。

近期因为工作需要研究了一下钉钉的接入,发现其接入文档、SDK都是基于java编写的,而我们的企业网站使用ASP.NET MVC(C#)开发,所以接入只能从头自己做SDK。

接入主要包括免登、获取数据、修改数据等接口。

免登流程

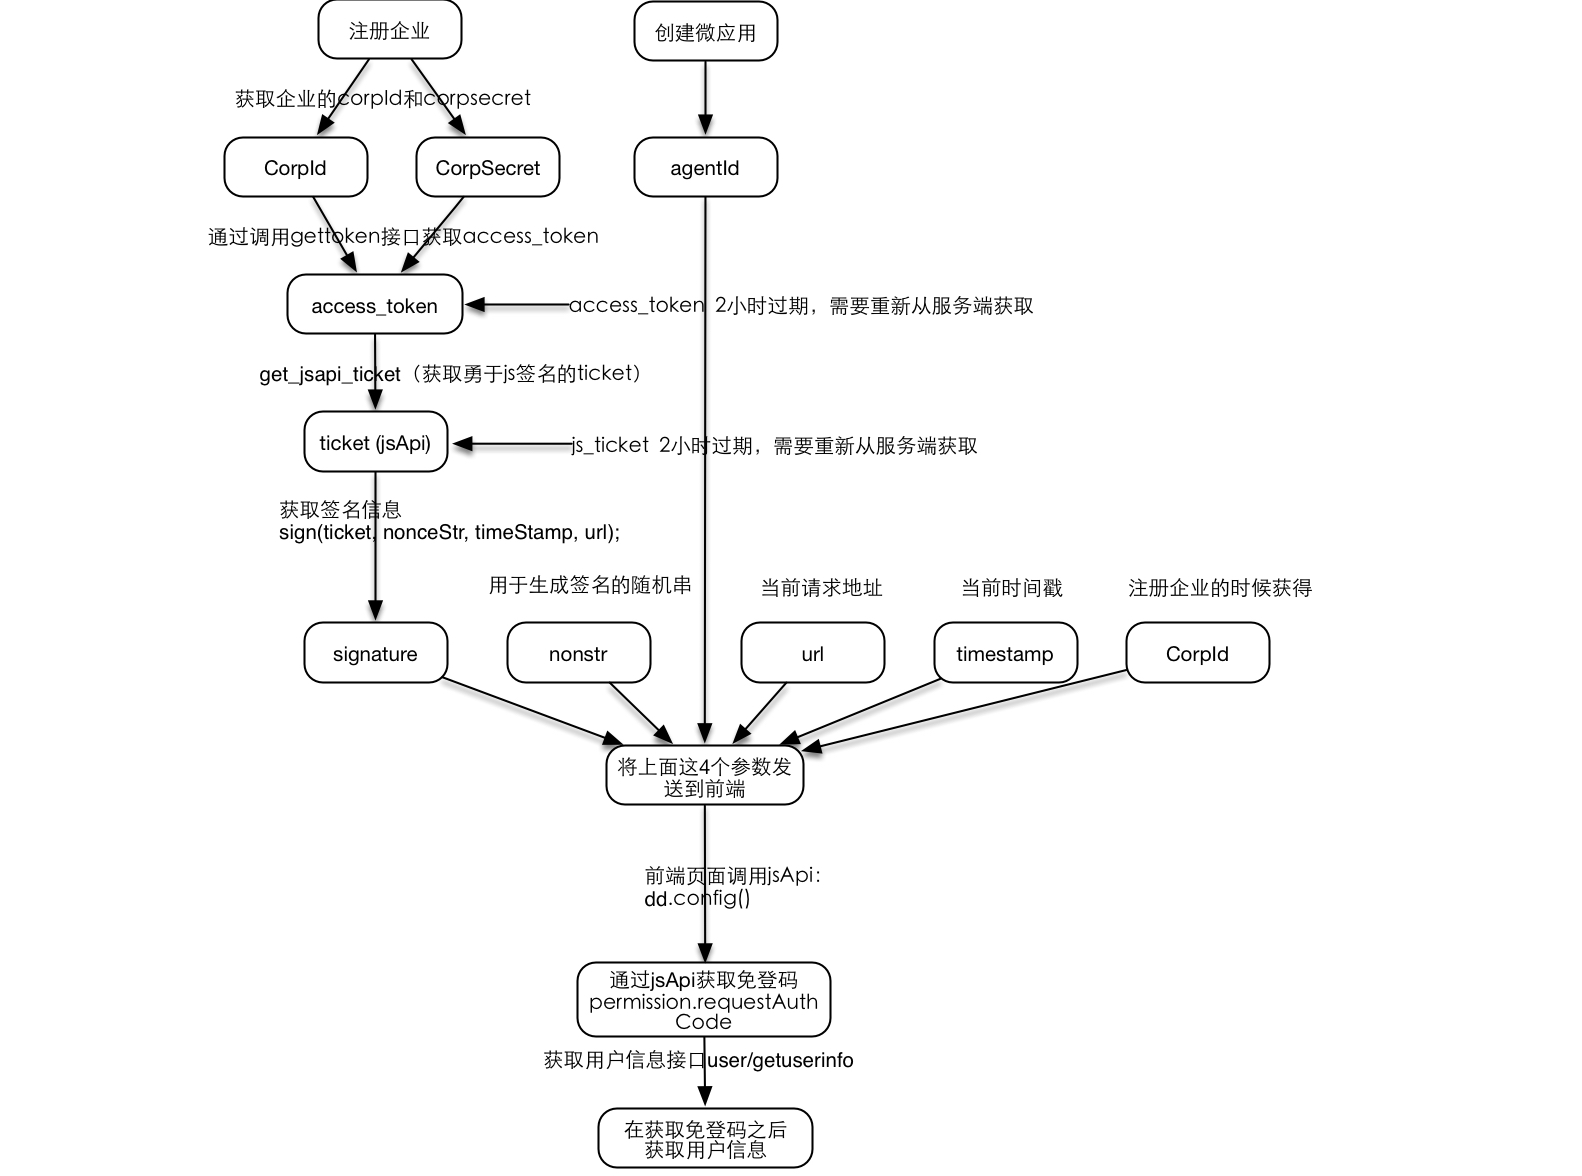
首先需要理解一下钉钉的免登流程,借用官方文档的图片:

钉钉免登流程图

是不是很熟悉?是的,基本是按照OAUTH的原理来的,版本嘛,里面有计算签名的部分,我觉得应该是OAUTH1.0。

有的读者会问,那第一步是不是应该跳转到第三方认证页面啊。我觉得“魔法”就藏在用来打开页面的钉钉内置浏览器里,在dd.config()这一步里,“魔法”就生效了。


其实简单来说,主要分为五步:

  1. 在你的Web服务器端调用api,传入CorpId和CorpSecret,获取accessToken,即访问令牌。
  2. 在服务器端调用api,传入accessToken,获取JsApiTicket,即JsApi的访问许可(门票)。
  3. 按照既定规则,在后台由JsApiTicket、NonceStr、Timestamp、本页面Url生成字符串,计算SHA1消息摘要,即签名Signature。
  4. 将AgentId、CorpId、Timestamp、NonceStr、Signature等参数传递到前台,在前台调用api,得到authCode,即授权码。
  5. 根据授权码,在前台或后台调用api,获得userId,进而再根据userId,调用api获取用户详细信息。

PS:为什么需要在后台完成一些api的调用呢?应该是因为js跨域调用的问题,我具体没有深究。

实践方法

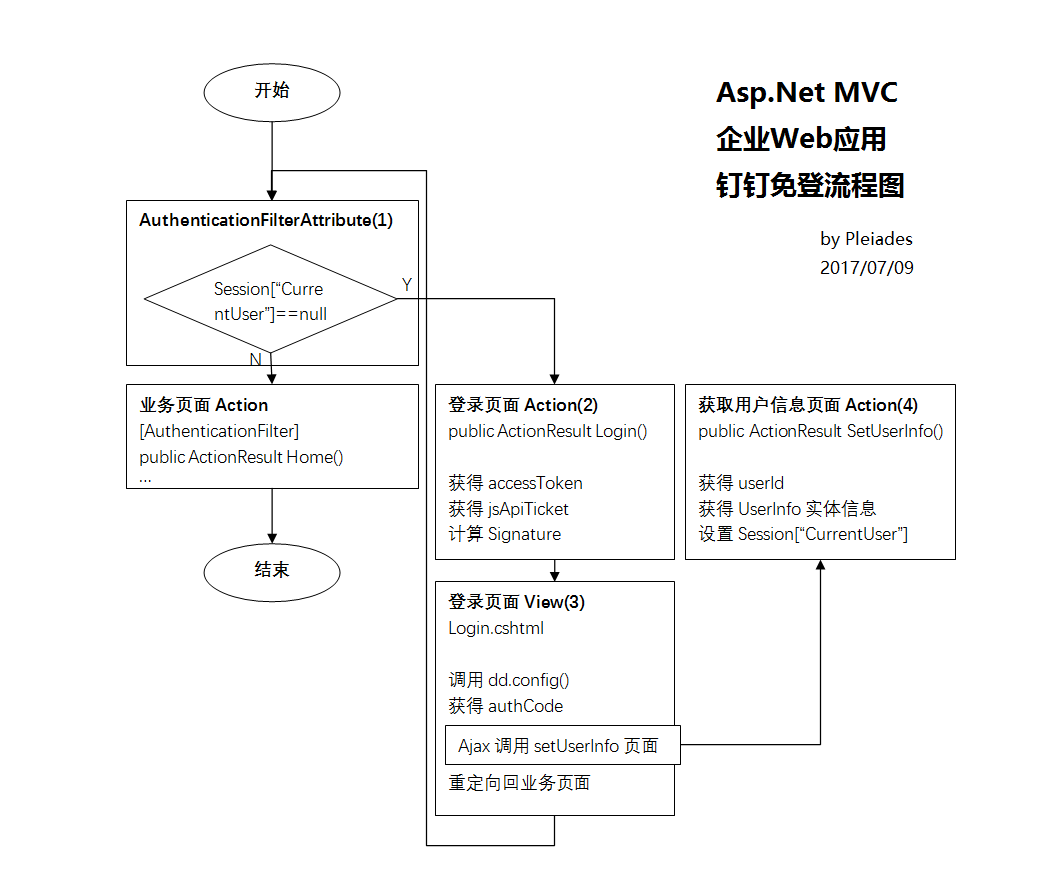
理解了上述步骤,我对登陆过程的实现也大致有了一个设想,既然免登需要前后端一起来完成,那就添加一个专门的登陆页面,将登陆过程都在里面实现,将登陆结果写入到Session,并重定向回业务页面,即算完成。图示如下:

其中每个api的调用方式,在官方文档中都有说明。同时,我在阿里云开发者论坛找到了网友提供的SDK,有兴趣可以下载:钉钉非官方.Net SDK

另外,GitHub上还有官方的JQuery版免登开发Demo,可以参考:GitHub JQuery免登

我参考的是.Net SDK,将其中的代码,提取出了我所需要的部分,做了简化处理。基本原理就是每次调用API都是发起HttpRequest,将结果做JSON反序列化。

核心代码如下:

复制代码
  1 using System;
  2 using System.Collections.Generic;
  3 using System.Linq;
  4 using System.Web;
  5 using System.IO;
  6 using Newtonsoft.Json;
  7 using Newtonsoft.Json.Linq;
  8 using DDApi.Model;
  9 
 10 namespace DDApi
 11 {
 12     public static class DDHelper
 13     {
 14         public static string GetAccessToken(string corpId, string corpSecret)
 15         {
 16             string url = string.Format("https://oapi.dingtalk.com/gettoken?corpid={0}&corpsecret={1}", corpId, corpSecret);
 17             try
 18             {
 19                 string response = HttpRequestHelper.Get(url);
 20                 AccessTokenModel oat = Newtonsoft.Json.JsonConvert.DeserializeObject<AccessTokenModel>(response);
 21 
 22                 if (oat != null)
 23                 {
 24                     if (oat.errcode == 0)
 25                     {
 26                         return oat.access_token;
 27                     }
 28                 }
 29             }
 30             catch (Exception ex)
 31             {
 32                 throw;
 33             }
 34             return string.Empty;
 35         }
 36 
 37         /* https://oapi.dingtalk.com/get_jsapi_ticket?access_token=79721ed2fc46317197e27d9bedec0425
 38          * 
 39          * errmsg    "ok"
 40          * ticket    "KJWkoWOZ0BMYaQzWFDF5AUclJOHgO6WvzmNNJTswpAMPh3S2Z98PaaJkRzkjsmT5HaYFfNkMdg8lFkvxSy9X01"
 41          * expires_in    7200
 42          * errcode    0
 43          */
 44         public static string GetJsApiTicket(string accessToken)
 45         {
 46             string url = string.Format("https://oapi.dingtalk.com/get_jsapi_ticket?access_token={0}", accessToken);
 47             try
 48             {
 49                 string response = HttpRequestHelper.Get(url);
 50                 JsApiTicketModel model = Newtonsoft.Json.JsonConvert.DeserializeObject<JsApiTicketModel>(response);
 51 
 52                 if (model != null)
 53                 {
 54                     if (model.errcode == 0)
 55                     {
 56                         return model.ticket;
 57                     }
 58                 }
 59             }
 60             catch (Exception ex)
 61             {
 62                 throw;
 63             }
 64             return string.Empty;
 65         }
 66 
 67         public static long GetTimeStamp()
 68         {
 69             TimeSpan ts = DateTime.UtcNow - new DateTime(1970, 1, 1, 0, 0, 0, 0);
 70             return Convert.ToInt64(ts.TotalSeconds);
 71         }
 72 
 73         public static string GetUserId(string accessToken, string code)
 74         {
 75             string url = string.Format("https://oapi.dingtalk.com/user/getuserinfo?access_token={0}&code={1}", accessToken, code);
 76             try
 77             {
 78                 string response = HttpRequestHelper.Get(url);
 79                 GetUserInfoModel model = Newtonsoft.Json.JsonConvert.DeserializeObject<GetUserInfoModel>(response);
 80 
 81                 if (model != null)
 82                 {
 83                     if (model.errcode == 0)
 84                     {
 85                         return model.userid;
 86                     }
 87                     else
 88                     {
 89                         throw new Exception(model.errmsg);
 90                     }
 91                 }
 92             }
 93             catch (Exception ex)
 94             {
 95                 throw;
 96             }
 97             return string.Empty;
 98         }
 99 
100         public static string GetUserDetailJson(string accessToken, string userId)
101         {
102             string url = string.Format("https://oapi.dingtalk.com/user/get?access_token={0}&userid={1}", accessToken, userId);
103             try
104             {
105                 string response = HttpRequestHelper.Get(url);
106                 return response;
107             }
108             catch (Exception ex)
109             {
110                 throw;
111             }
112             return null;
113         }
114 
115         public static UserDetailInfo GetUserDetail(string accessToken, string userId)
116         {
117             string url = string.Format("https://oapi.dingtalk.com/user/get?access_token={0}&userid={1}", accessToken, userId);
118             try
119             {
120                 string response = HttpRequestHelper.Get(url);
121                 UserDetailInfo model = Newtonsoft.Json.JsonConvert.DeserializeObject<UserDetailInfo>(response);
122 
123                 if (model != null)
124                 {
125                     if (model.errcode == 0)
126                     {
127                         return model;
128                     }
129                 }
130             }
131             catch (Exception ex)
132             {
133                 throw;
134             }
135             return null;
136         }
137 
138         public static List<DepartmentInfo> GetDepartmentList(string accessToken, int parentId = 1)
139         {
140             string url = string.Format("https://oapi.dingtalk.com/department/list?access_token={0}", accessToken);
141             if (parentId >= 0)
142             {
143                 url += string.Format("&id={0}", parentId);
144             }
145             try
146             {
147                 string response = HttpRequestHelper.Get(url);
148                 GetDepartmentListModel model = Newtonsoft.Json.JsonConvert.DeserializeObject<GetDepartmentListModel>(response);
149 
150                 if (model != null)
151                 {
152                     if (model.errcode == 0)
153                     {
154                         return model.department.ToList();
155                     }
156                 }
157             }
158             catch (Exception ex)
159             {
160                 throw;
161             }
162             return null;
163         }
164     }
165 }
复制代码
 HttpRequestHelper View Code

其中的Model,就不再一一贴出来了,大家可以根据官方文档自己建立,这里只举一个例子,即GetAccessToken的返回结果:

复制代码
    public class AccessTokenModel
    {
        public string access_token { get; set; }

        public int errcode { get; set; }

        public string errmsg { get; set; }
    }
复制代码

我创建了一个类DDApiService,将上述方法做了封装:

 DDApiService View Code

以上是底层核心部分。登录页面的实现在控制器DDController中,代码如下:

 DDController View Code

视图View的代码:

 Login.cshtml View Code

其中nonstr理论上最好应该每次都随机,留待读者去完成吧:-)

钉钉免登就是这样,只要弄懂了就会觉得其实不难,还顺便理解了OAUTH。

后续改进

这个流程没有考虑到AccessToken、JsApiTicket的有效期时间(2小时),因为整个过程就在一个页面中都完成了。如果想要进一步扩展,多次调用api的话,需要考虑到上述有效期。

如果为了图简便每都去获取AccessToken也是可以的,但是会增加服务器负担,而且api的调用频率是有限制的(1500次/s好像),所以应当采取措施控制。例如可以将AccessToken、JsApiTicket存放在this.HttpContext.Application[“accessToken”]中,每次判断有效期是否过期,如果过期就调用api重新申请一个。

以上就是这样,感谢阅读。


20170710编辑,更新mvc免登流程图片,修正一处错误。

如何在 ASP.NET MVC 中集成 AngularJS(1) - 葡萄城技术团队 - 博客园

mikel阅读(592)

来源: 如何在 ASP.NET MVC 中集成 AngularJS(1) – 葡萄城技术团队 – 博客园

介绍

当涉及到计算机软件的开发时,我想运用所有的最新技术。例如,前端使用最新的 JavaScript 技术,服务器端使用最新的基于 REST 的 Web API 服务。另外,还有最新的数据库技术、最新的设计模式和技术。

当选择最新的软件技术时,有几个因素在起作用,其中包括如何将这些技术整合起来。过去两年中,我最喜欢的一项技术就是设计单页面应用(SPA)的 AngularJS。作为一个微软stack开发者,我也是使用 ASP.NET MVC 平台实现 MVC 设计模式和并进行研究的粉丝,包括它的捆绑和压缩功能以及实现其对 RESTful 服务的 Web API 控制器。

为了兼得两者,本文介绍了在 ASP.NET MVC 中集成 AngularJS 的两全其美的方案。

由于本文篇幅较长,故会分为3篇,分别进行介绍。

概述
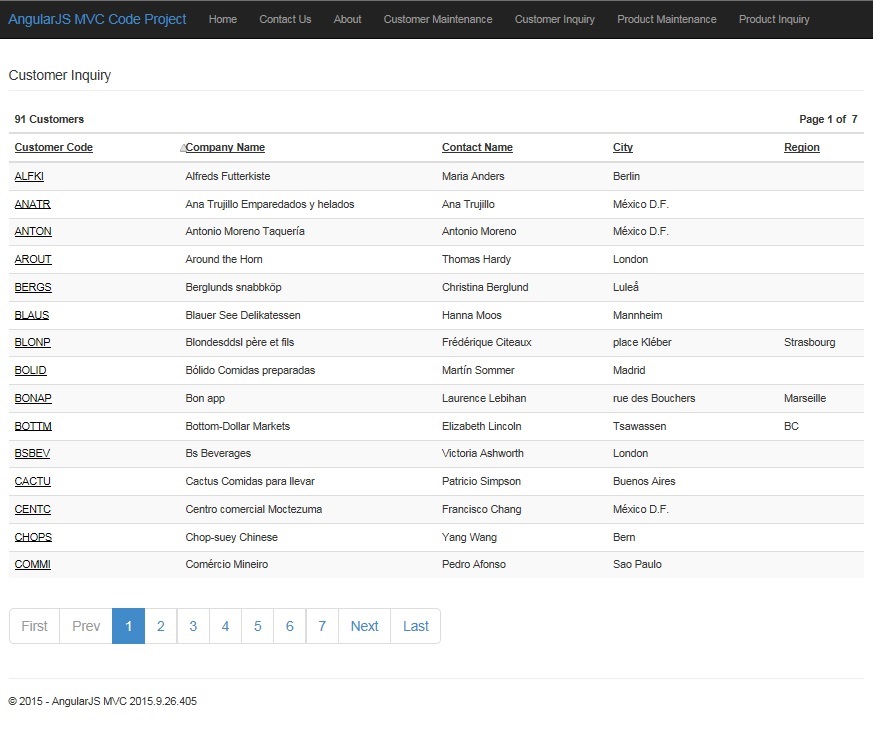
本文中示例的 Web 应用程序将有三个目标:

  • 在前端页面中实现 AngularJS 和 JavaScript AngularJS 控制器
  • 使用微软的 ASP.NET MVC 平台来建立、引导并捆绑一个应用
  • 根据功能模型的需求,动态的加载 AngularJS 的控制器和服务

本文的示例应用程序将包含三个主要文件夹:关于联系和索引的主文件夹、允许你创建,更新和查询客户的客户文件夹、允许你创建,更新和查询产品的产品文件夹。

除了使用 AngularJS 和 ASP.NET MVC,这个应用程序也将实现使用微软的 ASP.NET Web API 服务来创建 RESTful 服务。微软的实体框架将用于生成并更新一个 SQL Server Express 数据库。

此应用程序也将用到一些使用 Ninject 的依赖注入。此外,也会运用流畅的界面和 lambda 表达式,来合并使用称为 FluentValidation的.NET 的小型验证库,用于构建驻留在应用业务层的验证业务规则。

AngularJS VS ASP.NET Razor 视图

几年来,我一直在使用完整的 Microsoft ASP.NET MVC 平台来开发 Web 应用程序。相比于使用传统的 ASP.NET Web 窗体的 postback 模型, ASP.NET MVC 平台使用的是 Razor 视图。 这带来的是:适当的业务逻辑、数据和表示逻辑之间关注点的分离。在使用它的约定优于配置和简洁的设计模式进行 MVC 开发之后,你将永远不会想回过头去做 Web 窗体的开发。

ASP.NET MVC 平台及其 Razor 视图引擎,不但比 Web 窗体简洁,还鼓励和允许你将 .NET 服务器端代码和样式混合。在 Razor 视图中的 HTML 混合的 .NET 代码看起来像套管代码。另外,在 ASP.NET MVC 模式下,一些业务逻辑是可以被最终写入在 MVC 的控制器中。在MVC控制器中,写入代码来控制表示层中的信息,这是很有诱惑力的。

AngularJS 提供了以下对微软 ASP.NET MVC Razor 视图的增强功能:

  • AngularJS 视图是纯 HTML 的
  • AngularJS 视图被缓存在客户端上以实现更快的响应,并在每次请求不产生服务器端响应
  • AngularJS 提供了一个完整的框架,编写高质量的客户端 JavaScript 代码
  • AngularJS 提供了 JavaScript 控制器和 HTML 视图之间的完全分离


ASP.NET MVC 捆绑和压缩

捆绑和压缩是两种你可以用来缩短 Web 应用程序的请求负载时间的技术。这是通过减少对服务器的请求数量和减小请求规模,来实现缩短请求负载时间的(如 CSS 和 JavaScript)。压缩技术通过复杂的代码逻辑也使得别人更难的侵入你的 JavaScript 代码。

当涉及到捆绑技术和 AngularJS 框架时,你会发现捆绑和压缩过程中会自动使用 Grunt 和 Gulp 之类的框架,Grunt 和 Gulp 技术是一种流行的 web 库并配有插件,它允许你自动化你的每一项工作。

如果你是一个微软开发者,你可以使用它们在 Visual Studio 中一键式发布你的 Web 应用,而不用学习使用任何第三发工具和库类。幸运的是,捆绑和压缩是 ASP.NET 4.5 ASP.NET 中的一项功能,可以很容易地将多个文件合并或捆绑到一个文件中。你可以创建 CSS,JavaScript 和其他包。较少的文件意味着更少的 HTTP 请求,这也可以提高第一个页面的加载性能。

使用 RequireJS 来实现 MVC 捆绑的动态加载

在开发 AngularJS 单页的应用程序时,其中有一件事情是不确定的。由于应用开始时会被引导和下载,所以在主页面索引时,AngularJS 会请求所有的 JavaScript 文件和控制器。对于可能包含数百个 JavaScript 文件的大规模应用,这可能不是很理想。因为我想使用 ASP.NET 的捆绑来加载所有的 AngularJS 控制器。一旦开始索引,一个 ASP.NET 捆绑中的巨大的挑战将会出现在服务器端。

为了实现示例程序动态地绑定 ASP.NET 文件包,我决定用 RequireJS JavaScript 库。RequireJS 是一个众所周知的 JavaScript 模块和文件加载器,最新版本的浏览器是支持 RequireJS 的。起初,这似乎是一个很简单的事情,但随着时间的推移,我完成了大量的代码的编写,却并没有解决使用服务器端 rendered bundle 与客户端 AngularJS 等技术的问题。

最终,在大量的研究和反复试验和失败后,我想出了少量代码却行之有效的解决方案。

本文的接下来部分将会展示,在 ASP.NET MVC 中集成 AngularJS 的过程。

创建 MVC 项目并安装 Angular NuGet 包

为了开始示例应用程序,我通过在 Visual Studio 2013 专业版中选择 ASP.NET Web 应用程序模板来创建一个 ASP.NET MVC 5 Web 应用程序。之后,我选择了 MVC 工程并在应用中会用到 MVC Web API 添加文件夹和引用。下一步是选择工具菜单中的“管理 NuGet 包的解决方案”,来下载并安装 NuGet AngularJS。

对于此示例应用程序,我安装了所有的以下的 NuGet 包:

  • AngularJS – 安装整个 AngularJS 库
  • AngularJS UI – AngularJS 框架的伙伴套件UI工具和脚本。
  • AngularJS UI引导 – 包含一组原生 AngularJS 指令的引导标记和CSS
  • AngularJS 块UI – AngularJS BlockUI 指令,块状化 HTTP 中的请求
  • RequireJS – RequireJS 是一个 JavaScript 文件和模块加载
  • Ninject – 提供了支持 MVC 和 MVC Web API 支持的依赖注入
  • 实体框架 – 微软推荐的数据访问技术的新应用
  • 流畅的验证 – 建立验证规则的 .NET 验证库。
  • 优美字体- CSS 可立即定制的可升级的矢量图标

NuGet 是一个很好的包管理器。当你使用 NuGet 安装一个软件包,它会拷贝库文件到你的解决方案,并自动更新项目中的引用和配置文件。如果你删除一个包, NuGet 会让所有删除过程不会留下任何痕迹。

优美的URLS

对于此示例应用程序,我想在浏览器的地址栏中实现优美的网址。默认情况下,AngularJS 会将 URL 用#标签进行路由:

例如:

  • http://localhost:16390/
  • http://localhost:16390/#/contact
  • http://localhost:16390/#/about
  • http://localhost:16390/#/customers/CustomerInquiry
  • http://localhost:16390/#/products/ProductInquiry

通过转向 html5Mode 和设置基本的 URL,可以很方便的清除 URLS 并去除 URL 中的#。在 HTML5 模式下,AngularJS 的$位置服务会和使用 HTML5 History API 的浏览器 URL 地址进行交互。HTML5 History API 是通过脚本来操作浏览器历史记录的标准方法,以这点为核心,是实现单页面应用的重点。

要打开 html5Mode,你需要在 Angular 的配置过程中,将 $locationProviderhtml5Mode 设置为 true,如下所示:

// CodeProjectRouting-production.js
angular.module("codeProject").config('$locationProvider', function ($locationProvider) {
    $locationProvider.html5Mode(true);
}]);

当你使用 html5Mode 配置 $locationProvider 时,你需要使用 href 标记来指定应用的基本 URL。基本 URL 用于在整个应用程序中,解决所有相对 URL 的问题。你可以在应用程序中设置,如下所示的母版页的 header 部分的基本 URL:

<!-- _Layout.cshtml -->
<html>
<head>
<basehref="http://localhost:16390/"/>
</head>

对于示例应用程序,我以程序设置的方式将基本 URL 存储在 Web 配置文件中。这是一种最好的方式使得基本 URL 成为一种配置,这样能够让你根据环境、配置或者你开发的应用的站点的情况,来将基本 URL 设定为不同的值。此外,设置基本 URL 时,要确保基本 URL 以“/”为结尾,因为基本 URL 将是所有地址的前缀。

<!-- web.config.cs -->
<appsettings>
<addkey="BaseUrl"value="http://localhost:16390/"/>
</appsettings>

打开 html5Mode 并设置基本 URL 后,你需要以以下优美的 URL 作为结束:

  • http://localhost:16390/
  • http://localhost:16390/contact
  • http://localhost:16390/about
  • http://localhost:16390/customers/CustomerInquiry
  • http://localhost:16390/products/ProductInquiry


目录结构与配置

按照惯例,一个 MVC 项目模板要求所有的 Razor 视图驻留在视图文件夹中; 所有的 JavaScript 文件驻留在脚本文件夹; 所有的内容文件驻留在内容文件夹中。对于此示例应用程序,我想将所有的 Angular 视图和相关的 Angular JavaScript 控制器放入相同的目录下。基于 Web 的应用程序会变得非常大,我不想相关功能以整个应用程序的目录结构存储在不同文件夹中。
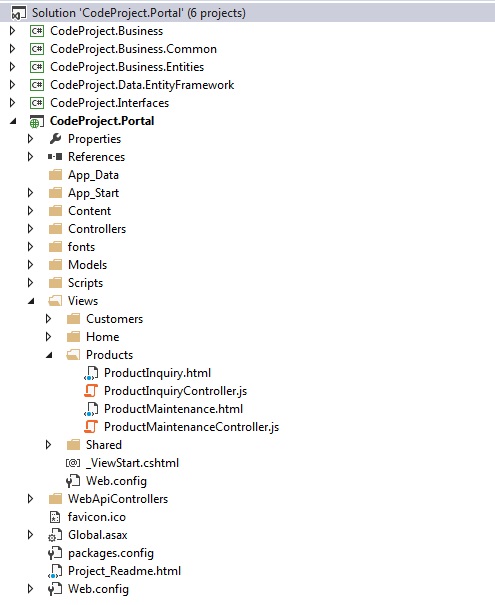
在示例应用程序,会出现两个 Razor 视图被用到,Index.cshtml 和 _Layout.cshtml 母版页布局,这两个 Razor 视图将用于引导和配置应用程序。应用程序的其余部分将包括 AngularJS 视图和控制器。

对于示例应用程序,我在视图文件夹下创建了两个额外的文件夹,一个客户的子文件夹,一个产品的子文件夹。所有的客户的 Angular 视图和控件器将驻留在客户子文件夹中,所有的产品的 Angular 视图和控件器将驻留在产品子文件夹中 。

由于 Angular 视图是 HTML 文件,而 Angular 控制器是 JavaScript 文件,从 Views 文件夹到浏览器,ASP.NET MVC 必须被配置为允许 HTML 文件和 JavaScript文 件进行访问和传递。这是一个 ASP.NET MVC 默认的约定。幸运的是,你可以通过编辑视图文件下的 web.config 文件并添加一个 HTML 和 JavaScript 的处理器来更改此约定,这将会使这些文件类型能够被送达至浏览器进行解析。

复制代码
<!-- web.config under the Views folder -->
<system.webserver>
<handlers>
<addname="JavaScriptHandler"path="*.js"verb="*"precondition="integratedMode"
type="System.Web.StaticFileHandler"/>

<addname="HtmlScriptHandler"path="*.html"verb="*"precondition="integratedMode"
type="System.Web.StaticFileHandler"/>
</handlers>
</system.webserver>
复制代码

应用程序版本自动刷新和工程构建

对于此示例应用程序,我想跟踪每一次编译的版本和内部版本号,在属性文件夹下使用 AssemblyInfo.cs 文件的信息测试并发布这个应用。每次应用程序运行的时候,我想获得最新版本的应用程序和使用的版本号,以实现最新的 HTML 文件和 JavaScript 文件生成时,帮助浏览器从缓存中,获取最新的文件来替换那些旧文件。

对于这种应用,我使用的 Visual Studio 2013 专业版,这让一切变得简单,我为 Visual Studio2013 专业版下载了一个自动版本的插件

https://visualstudiogallery.msdn.microsoft.com/dd8c5682-58a4-4c13-a0b4-9eadaba919fe

它会自动刷新 C# 和 VB.NET 项目的版本。将安装插件下载到名为自动版本设置的工具菜单中。该插件自带了配置工具,它允许你配置主要和次要版本号,以便每次编译时,自动的更新 AssemblyInfo.cs 文件。目前,这个插件只是在 Visual Studio 2013 专业版中支持,或者你也可以手动更新版本号或使用类似微软的 TFS 以持续构建和配置管理环境的方式,来管理你的版本号。
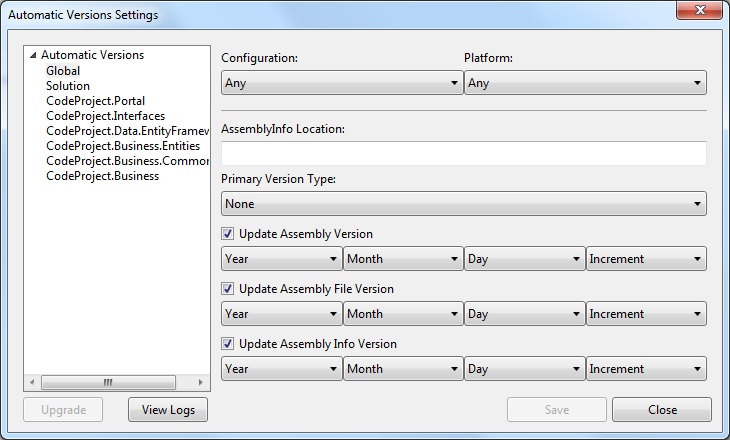
下面是一个使用更新的 AssemblyVersion 和 AssemlyFileVersion 号的示例,这个示例在版本编译之后会通过插件自动地进行更新。

复制代码
// AssemblyInfo.cs
using System.Reflection;
using System.Runtime.CompilerServices;
using System.Runtime.InteropServices;

[assembly: AssemblyTitle("CodeProject.Portal")]
[assembly: AssemblyProduct("CodeProject.Portal")]
[assembly: AssemblyCopyright("Copyright &copy; 2015")]

// The following GUID is for the ID of the typelib if this project is exposed to COM
[assembly: Guid("1d9cf973-f876-4adb-82cc-ac4bdf5fc3bd")]
// Version information for an assembly consists of the following four values:

// Major Version
// Minor Version
// Build Number
// Revision

// You can specify all the values or you can default the Revision and Build Numbers
// by using the '*' as shown below:

[assembly: AssemblyVersion("2015.9.12.403")]
复制代码

使用 Angular 视图和控制器更换联系我们和关于 Razor 视图

要想使用 MVC 工程,首先要做的事情之一就是使用 AngularJS 视图和控制器来更换联系我们和关于 Razor 视图。这是一个很好的起点来测试你的配置是否能够使 AngularJS 正常建立并运行。随后如果不需要这些页面,你可以删除关于和联系我们的视图和控制器。

AngularJS 的这种创建控制器的方式是通过注入 $scope 实现的。示例应用程序的视图和控制器使用“controller as”语法。此语法并非使用控制器中的 $scope,而是简化你的控制器的语法。当你声明一个“controller as”语法的控制器时,你会得到该控制器的一个实例。

使用“controller as”语法,你的所有的连接到控制器(视图模式)的属性必须以你视图的别名作为前缀。在下面的视图代码片段,属性标题前面就加上了“VM”的别名。

<!-- aboutController.js -->
<div ng-controller="aboutController as vm" ng-init="vm.initializeController()">
   <h4 class="page-header">{{vm.title}}</h4>
</div>

当控制器构造函数被调用时,使用“controller as”的语法,叫做“this”的控制器示例就会被创建。不需要使用 Angular 提供的 $scope 变量,你只需要简单的声明一个 vm 变量并分配“this”给它。所有被分配给 vm 对象的变量都会替换掉 $scope。有了分配给控制器功能的示例的变量,我们就可以使用这些别名并访问这些变量。

此外,所有示例应用程序中的控制器都是使用“use strict”JavaScript 命令以一种严格的模式运行的。这种严格模式可以更容易地编写“安全”的 JavaScript 代码。严格模式将此前“不严格的语法”变成了真正的错误。作为一个例子,在一般的 JavaScript 中,错误输入变量名称会创建一个新的全局变量。在严格模式下,这将抛出一个错误,因此无法意外创建一个全局变量。

复制代码
// aboutController.js
angular.module("codeProject").register.controller('aboutController', 
['$routeParams', '$location', function ($routeParams, $location) {
{
    "use strict";
    var vm = this;

    this.initializeController = function () {
        vm.title = "About Us";
    }
}]);
复制代码

如前所述,在 MVC Razor 视图中使用 AngularJS 视图和控制器的优势之一,就是 Angular 提供了很好的机制来编写高质量的 JavaScript 模块、一种纯 HTML 视图和 JavaScript 控制器之间的完全分离的编码方式。你不再需要使用 AngularJS 双向数据绑定技术来解析浏览器的文件对象模型,这也就使得你能够编写单元测试的 JavaScript 代码。

作为一个注脚,您将在 aboutController 看到一个名为 register.controller 的方法在本文的后面,你会看到注册方法是从哪儿来的和它用来做什么。

主页索引的 Razor 视图和 MVC 路由

ASP.NET MVC 中集成 AngularJS 的一件有趣的事情,就是应用程序实际上是如何启动和实现路由的。当你启动应用程序时,ASP.NET MVC 将会以如下默认的方式进入并查看路由表:

复制代码
// RouteConfig.cs
using System;
using System.Collections.Generic;
using System.Linq;
using System.Web;
using System.Web.Mvc;
using System.Web.Routing;

namespace CodeProject.Portal
{
    publicclass RouteConfig
    {
        publicstaticvoid RegisterRoutes(RouteCollection routes)
        {
          routes.IgnoreRoute("{resource}.axd/{*pathInfo}");
          routes.MapRoute(
          name: "Default",
          url: "{controller}/{action}/{id}",
          defaults: new { controller = "Home", action = "Index", id = UrlParameter.Optional }
          );
        }
    }
}
复制代码

应用开始时,以上外装配置的 MVC 路由表中的配置,会将应用路由到 MVC Home 主控制器,并执行主控制器中的索引方法。这样会以 MVC 默认工程模板的形式,将 Index.cshtml MVC Razor 视图传递到用户输出的主页面内容中。

这个应用程序的目标是使用 Angular 视图取代所有的 MVC 视图。但问题是,甚至在 AngularJS 被启动之前,主页的 Razor 视图索引就已经被执行和注入了 _Layout.cshtml 主页面中。

自从我决定,将主页面改为 AngularJS 视图,我就使用包含 AngularJS ng-view 标签的 div 标签删除了索引 Razor 视图的所有内容。

<!-- Index.cshtml -->
<divng-view></div>

该 AngularJS ngView 标签是一个指令,能以一种将当前路由的模板渲染成主页面布局的方式补充 $route service。我有两个选择,要么直接嵌入 NG-View 代码到母版页 _Layout.cshtml 或使用 Razor 视图将它注入到母版页。我决定简单地从索引 Razor 视图中注入标签。本质上,索引 Razor 视图在应用程序的引导过程中被简单的使用,并且在应用程序启动后不会被引用。

一旦应用程序被引导并开始启动,AngularJS 将会执行自己的路由系统并以路由表中配置来执行自己的默认路由。基于这一点,我创建了一个单独 AngularJS index.html 和主页的 IndexController.js 文件。

<!-- Index.html -->
<divng-controller="indexController as vm"ng-init="vm.initializeController()">
<h4class="page-header">{{vm.title}}</h4>
</div>

当视图加载时,索引 Angular 视图将会通过 ng-init 指令来执行索引控制器的初始化功能。

复制代码
// indexController.js
angular.module("codeProject").register.controller('indexController',
['$routeParams', '$location', function ($routeParams, $location) {
"use strict";
var vm = this;
this.initializeController = function () {
        vm.title = "Home Page";
    }
}]);
复制代码

RouteConfig.cs

当开发一个 AngularJS 应用时,首先将会发生的一件事,就是你需要先开发一个像驻留在路由文件中的 CustomerInquiry 一样的页面

/Views/Customers/ CustomerInquiry

当你在 HTML 页面寻找这个视图时,点击 Visual Studio 中的运行按钮来直接执行这个页面,MVC 将会执行并尝试去查找一个用于客户路由的 MVC 控制器和视图。将会发生的是,你会获得一个叫做找不到该路由的视图或控制器的错误。

你当然会遇到这个错误,因为/View/Customers/CustomerInquiry的路由是个 Angular 路由,而不是 MVC 路由。MVC 并不知道这个路由。如果你还想直接运行这个页面,则需要解决这一问题,给 MVC 路由表增加另外的路由以便告诉 MVC 将所有的请求路由到 MVC 主控制器,并渲染Razor 视图、通过路由引导这个应用。

由于我有三个视图文件夹,主文件夹、客户文件夹和产品文件夹,我增加了一下的 MVC 路由配置类以便将所有的请求路由到主/索引路由中。当应用程序运行时点击 F5,同样也会进入 MVC 路由表。就 Angular 和单页面如何运行而言,当你点击 F5 时,基本上就是重启了 AngularJS 应用。

有了这些额外的路由,现在就可以直接执行 AngularJS 路由了。你可以在 MVC 路由表中以一种通配符的路由来处理你的路由,但我更愿意使用明确的路由表,并使得 MVC 拒绝所有无效的路由。

要记住的基本的事情是,MVC 路由将会在 AngularJS 启动之前发生,一旦引导开始,AngularJS 将会接管所有以后路由请求。

复制代码
// RouteConfig.cs
using System;
using System.Collections.Generic;
using System.Linq;
using System.Web;
using System.Web.Mvc;
using System.Web.Routing;

namespace CodeProject.Portal 
{
    publicclass RouteConfig
    {
        publicstaticvoid RegisterRoutes(RouteCollection routes)
        {

             routes.IgnoreRoute("{resource}.axd/{*pathInfo}");
             routes.MapRoute(
             name: "HomeCatchAllRoute",
             url: "Home/{*.}",
             defaults: new { controller = "Home", action = "Index", 
             id = UrlParameter.Optional }
             );
             routes.MapRoute(
             name: "CustomersCatchAllRoute",
             url: "Customers/{*.}",
             defaults: new { controller = "Home", action = "Index", 
             id = UrlParameter.Optional }
             );

             routes.MapRoute(
             name: "ProductsCatchAllRoute",
             url: "Products/{*.}",
             defaults: new { controller = "Home", action = "Index", 
             id = UrlParameter.Optional }
             );

             routes.MapRoute(
             name: "Default",
             url: "{controller}/{action}/{id}",
             defaults: new { controller = "Home", action = "Index", 
             id = UrlParameter.Optional }
          );
       }
   }
}
复制代码

$ controllerProvider 和动态加载控制器

当示例应用程序启动时,该应用程序将会预加载应用程序的核心控制器和服务。这包括 Home 目录中的所有控制器和应用程序的共享服务。

此应用程序的共享服务,将在所有模块中执行- 包括一个 Ajax 服务和提醒服务。如前所述,此应用程序具有三个功能模块:基本的关于、联系我们和主页的模块、一个客户模块和产品模块。

由于此应用程序可随时间而增长,我不希望该在应用程序的配置和引导阶段中,预加载所有的功能模块。应用程序启动后,我仅希望当用户请求时,再加载这些控制器和产品模块。

默认情况下,AngularJS 被设计为预加载所有的控制器。一个典型的控制器看起来这样:

复制代码
// aboutController.js
angular.module("codeProject").controller('aboutController',
['$routeParams', '$location', function ($routeParams, $location) {
"use strict";
var vm = this;
this.initializeController = function () {
        vm.title = "About";
    }
}]);
复制代码

如果在配置阶段之后,你尝试动态加载上述控制器,将会收到一个 Angular 错误。你需要做的是使用 $controllerProvider 服务器在配置阶段之后,动态地加载控制器。Angular 使用 $controllerProvider 服务来创建新的控制器。这种方法允许通过注册方法来实现控制器注册。

复制代码
// aboutController.js
angular.module("codeProject").register.controller('aboutController',
['$routeParams', '$location', function ($routeParams, $location) {
"use strict";
var vm = this;
this.initializeController = function () {
         vm.title = "About";
     }
}]);
复制代码

上述有关控制器被修改为执行 $controllerProvider 的寄存器方法。为了使这种注册方法有效,必须在配置阶段配置这种注册。下面的代码片段在应用程序启动之后,使用了 $controllerProvider 来使注册方法有效。在下面的例子中,提供了一种用于注册和动态加载两个控制器和服务的注册方法。如果你愿意,也可以包括 Angular 全部库和指令的注册功能。

复制代码
// CodeProjectBootStrap.js
(function () {
var app = angular.module('codeProject', ['ngRoute', 'ui.bootstrap', 'ngSanitize', 'blockUI']);

app.config(['$controllerProvider', '$provide', function ($controllerProvider, $provide) {
        app.register =
        {
             controller: $controllerProvider.register, 
             service: $provide.service
        }
    }
}
复制代码

以上是如何在 ASP.NET MVC 中集成 AngularJS 的第一部分内容,后续内容会在本系列的后两篇文章中呈现,敬请期待!

通过第一部分内容的学习,相信大家已经对实现在 ASP.NET MVC 中集成 AngularJS 的基本思路有所了解。当我们在进行 ASP.NET MVC 和 AngularJS 开始时,还可以借助开发工具来助力开发过程。ASP.NET MVC开发时,可以借助 ComponentOne Studio ASP.NET MVC 这一款轻量级控件,它与 Visual Studio 无缝集成,完全与 MVC6 和 ASP.NET 5.0 兼容,将大幅提高工作效率;AngularJS 开发时,可以借助 Wijmo 这款为企业应用程序开发而推出的一系列包含 HTML5 和 JavaScript 的开发控件集,无论应用程序是移动端、PC端、还是必须要支持IE6,Wijmo 均能满足需求。

文章来源:By Mark J. Caplin 

原文链接:http://www.codeproject.com/Articles/1033076/Integrating-AngularJS-with-ASP-NET-MVC

从零开始实现ASP.NET Core MVC的插件式开发(八) - Razor视图相关问题及解决方案 - LamondLu - 博客园

mikel阅读(605)

来源: 从零开始实现ASP.NET Core MVC的插件式开发(八) – Razor视图相关问题及解决方案 – LamondLu – 博客园

系列文章

简介

在上一篇中,我给大家分享了程序调试问题的解决方案以及如何实现插件中的消息传递,完稿之后,又收到了不少问题反馈,其中最严重的问题应该就是运行时编译Razor视图失败的问题。

本篇我就给大家分享一下我针对此问题的解决方案,最后还会补上上一篇中鸽掉的动态加载菜单(T.T)。

Razor视图中引用出错问题

为了模拟一下当前的问题,我们首先之前的插件1中添加一个新类TestClass, 并在HelloWorld方法中创建一个TestClass对象作为视图模型传递给Razor视图,并在Razor视图中展示出TestClassMessage属性。

  • TestClass.cs
public class TestClass
{
    public string Message { get; set; }
}
  • HelloWorld.cshtml
@using DemoPlugin1.Models;
@model TestClass
@{

}

<h1>@ViewBag.Content</h1>
<h2>@Model.Message</h2>

  • Plugin1Controller.cs
    [Area("DemoPlugin1")]
    public class Plugin1Controller : Controller
    {
        private INotificationRegister _notificationRegister;

        public Plugin1Controller(INotificationRegister notificationRegister)
        {
            _notificationRegister = notificationRegister;
        }

        [HttpGet]
        public IActionResult HelloWorld()
        {
            string content = new Demo().SayHello();
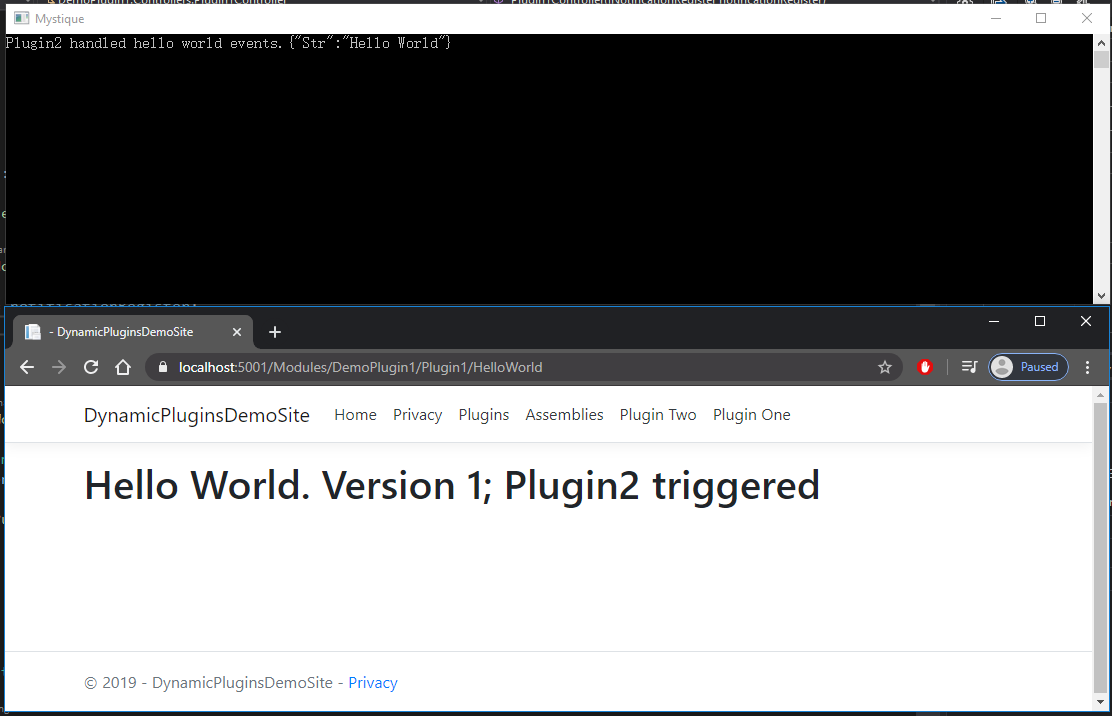
            ViewBag.Content = content + "; Plugin2 triggered";

            TestClass testClass = new TestClass();
            testClass.Message = "Hello World";

            _notificationRegister.Publish("LoadHelloWorldEvent", JsonConvert.SerializeObject(new LoadHelloWorldEvent() { Str = "Hello World" }));

            return View(testClass);
        }
    }

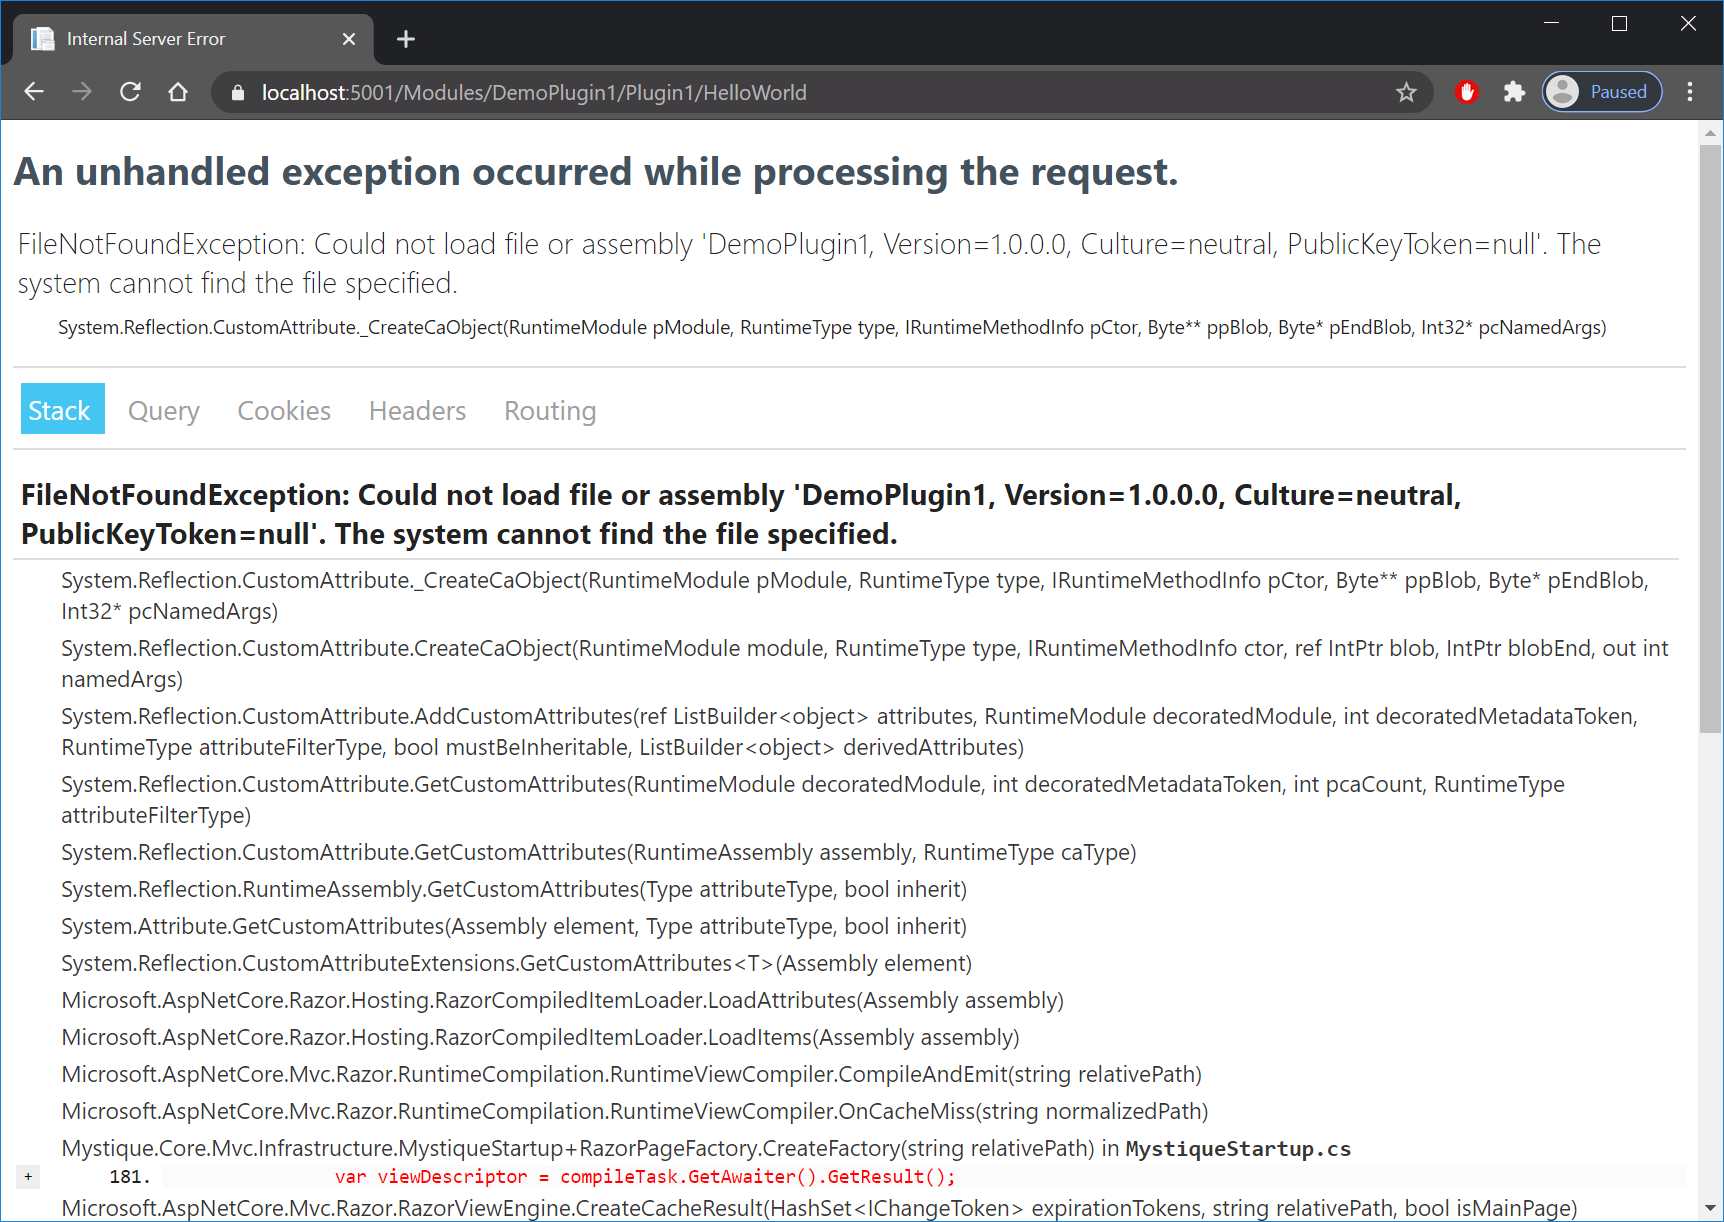
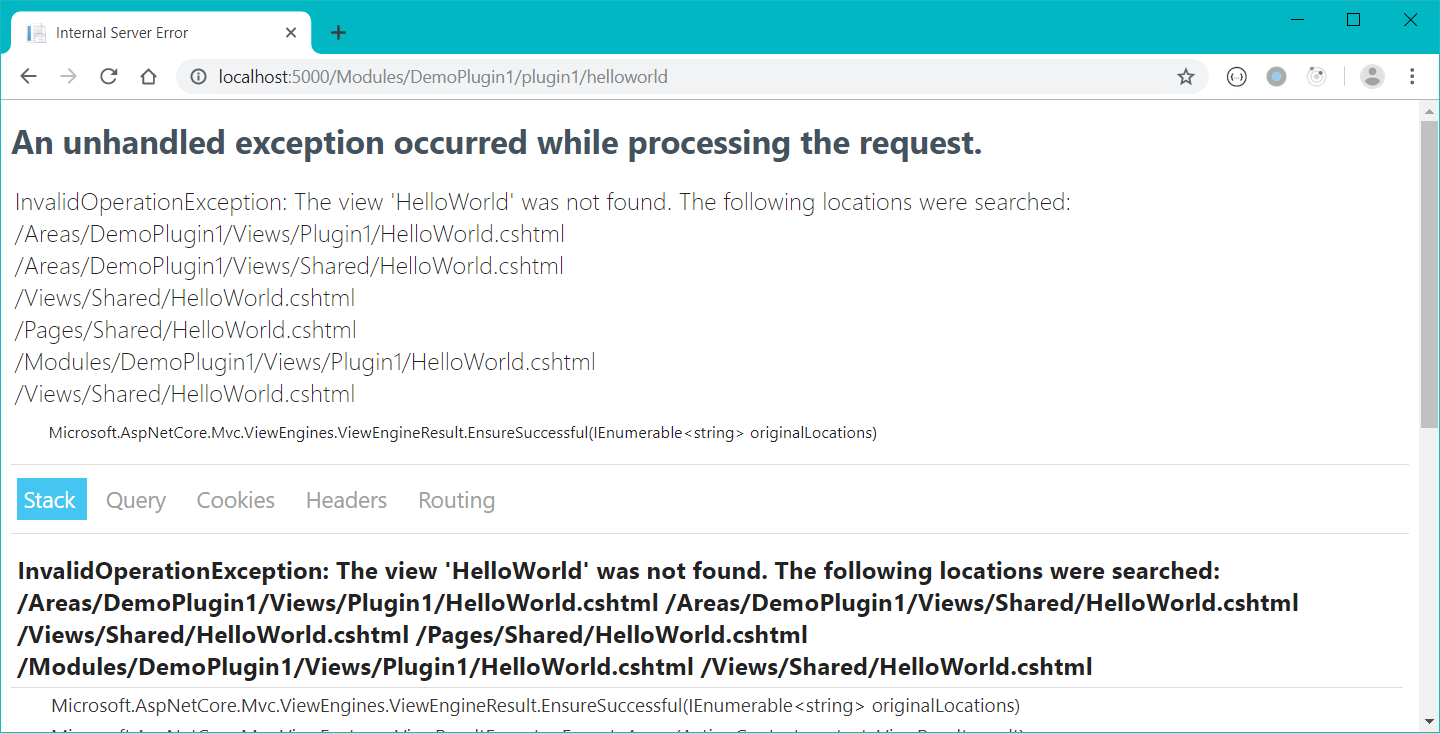
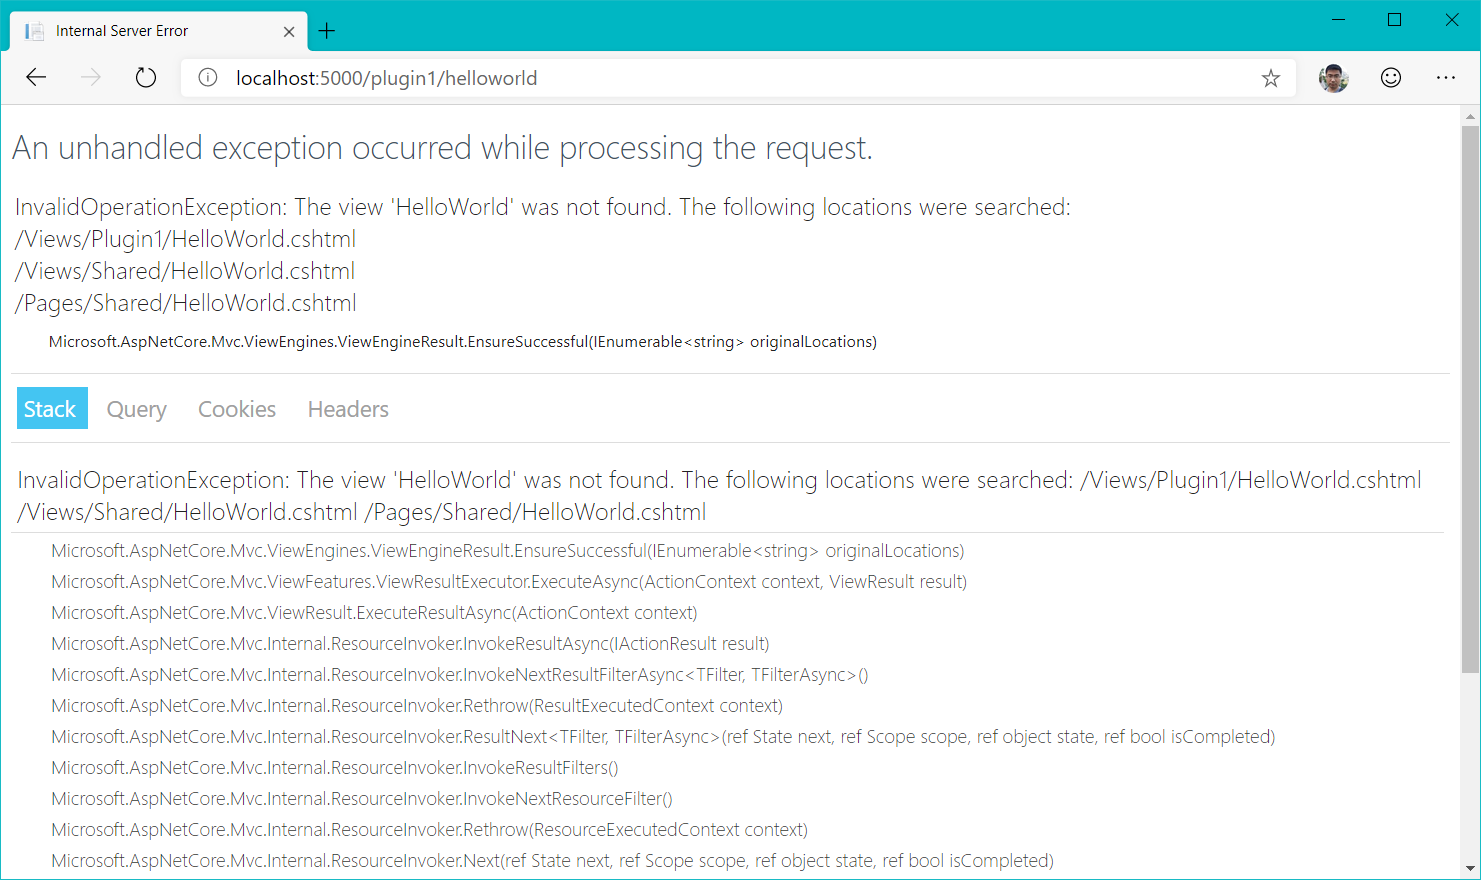
这个代码看似很简单,也是最常用的MVC视图展示方式,但是集成在动态组件系统中之后,你就会得到以下错误界面。

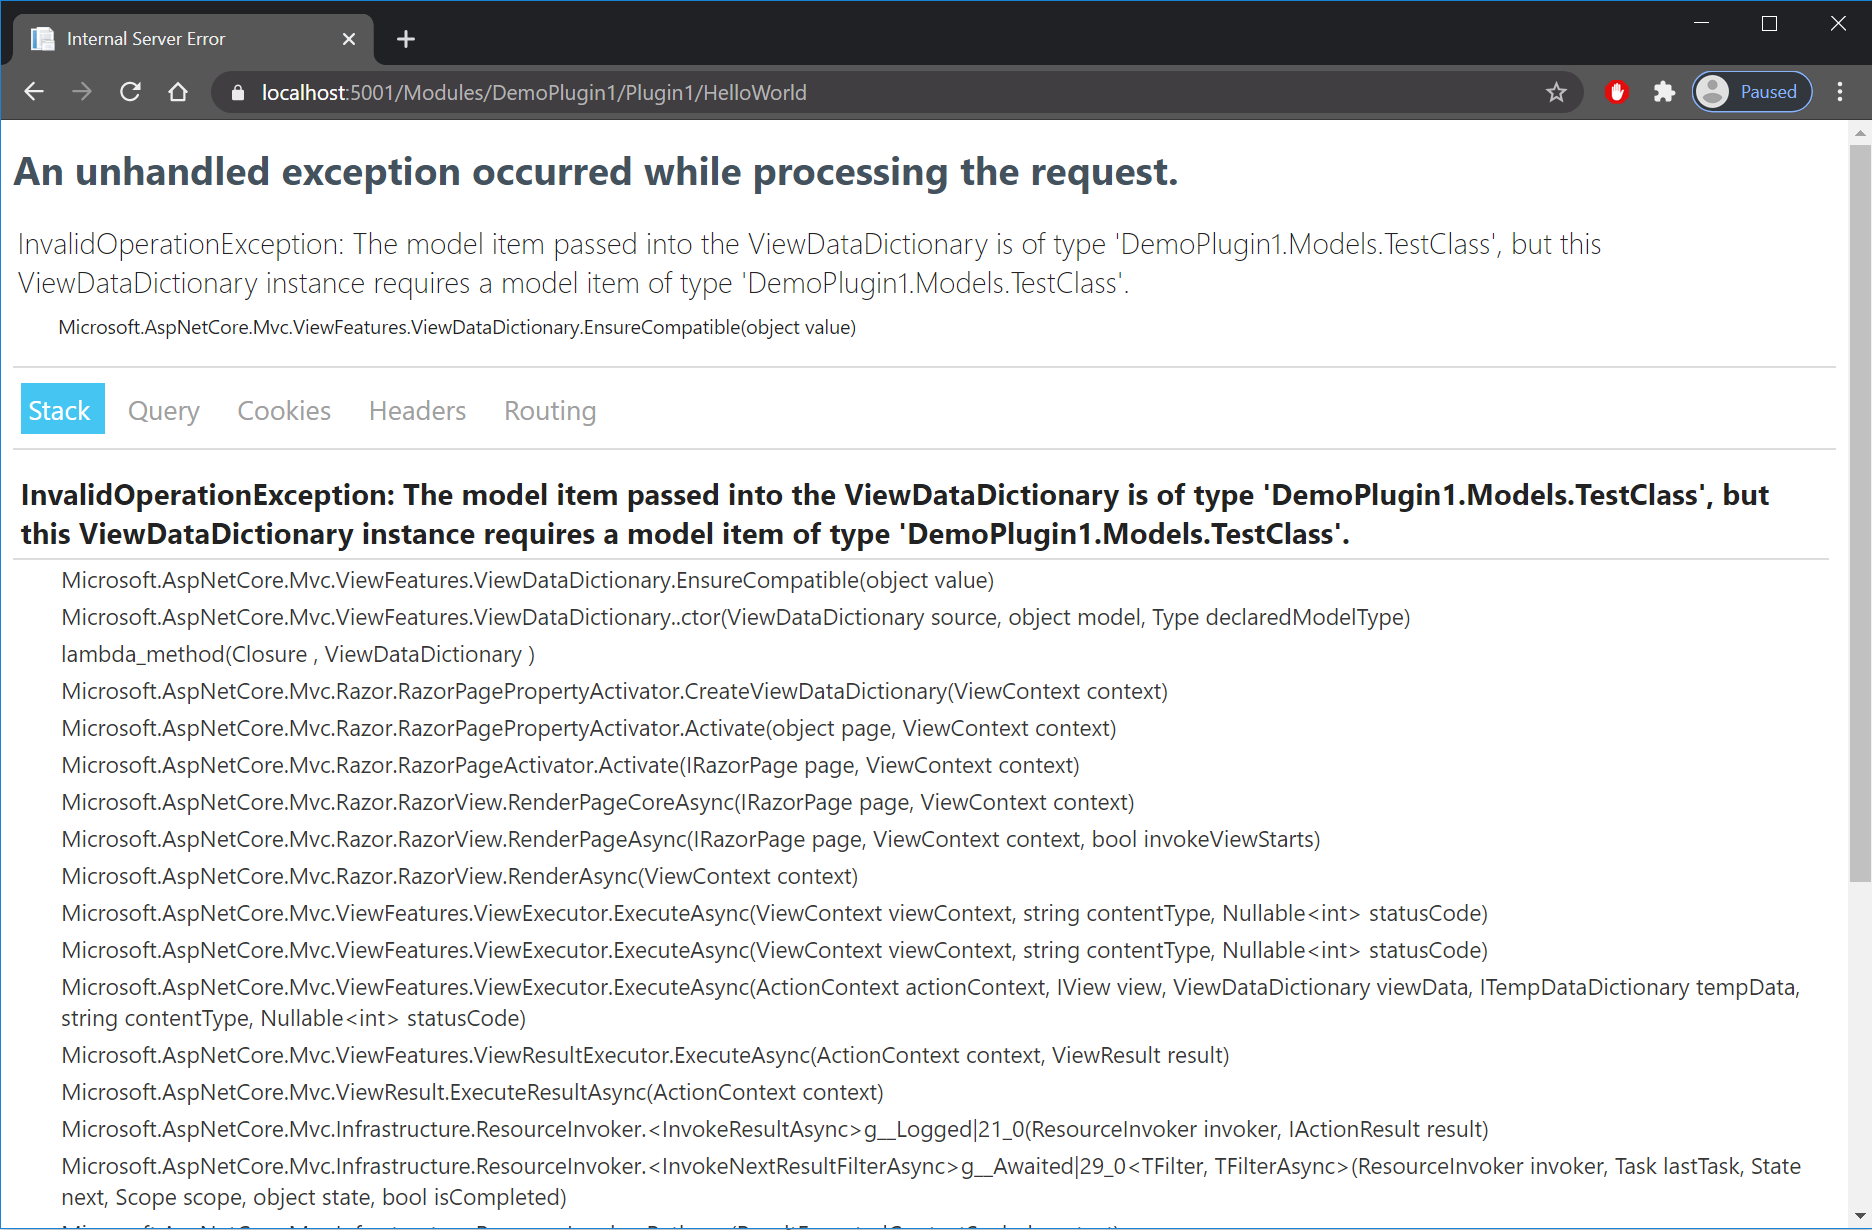
这里看起来似乎依然感觉是AssemblyLoadContext的问题。主要的线索是,如果你将插件1的程序集直接引入主程序工程中,重新启动项目之后,此处代码能够正常访问,所以我猜想Razor视图才进行运行时编译的时候,使用了默认的AssemblyLoadContext,而非插件AssemblyPart所在的AssemblyLoadContext

由此我做了一个实验,我在MystiqueSetup方法中,在插件加载的时候,也向默认AssemblyLoadContext中加载了插件程序集

    public static void MystiqueSetup(this IServiceCollection services, 
		IConfiguration configuration)
    {

        ...
        using (IServiceScope scope = provider.CreateScope())
        {
            MvcRazorRuntimeCompilationOptions option = scope.ServiceProvider.GetService<MvcRazorRuntimeCompilationOptions>();

            IUnitOfWork unitOfWork = scope.ServiceProvider.GetService<IUnitOfWork>();
            List<ViewModels.PluginListItemViewModel> allEnabledPlugins = unitOfWork.PluginRepository.GetAllEnabledPlugins();
            IReferenceLoader loader = scope.ServiceProvider.GetService<IReferenceLoader>();

            foreach (ViewModels.PluginListItemViewModel plugin in allEnabledPlugins)
            {
                ...
                using (FileStream fs = new FileStream(filePath, FileMode.Open))
                {
                    System.Reflection.Assembly assembly = context.LoadFromStream(fs);
                    context.SetEntryPoint(assembly);
                    loader.LoadStreamsIntoContext(context, referenceFolderPath, assembly);

                    ...

                    fs.Position = 0;
                    AssemblyLoadContext.Default.LoadFromStream(fs);
                }

                context.Enable();
            }
        }

        ...

    }

重新运行程序,访问插件1的路由,你就会得到以下错误。

这说明默认AssemblyLoadContext中的程序集正常加载了,只是和视图中需要的类型不匹配,所以此处也可以说明Razor视图的运行时编译使用的是默认AssemblyLoadContext

Notes: 这个场景在前几篇中遇到过,在不同AssemblyLoadContext加载相同的程序集,系统会将严格的将他们区分开,插件1中的AssemblyPart引用是插件1所在AssemblyLoadContext中的DemoPlugin1.Models.TestClass类型,这与默认AssemblyLoadContext中加载的DemoPlugin1.Models.TestClass不符。

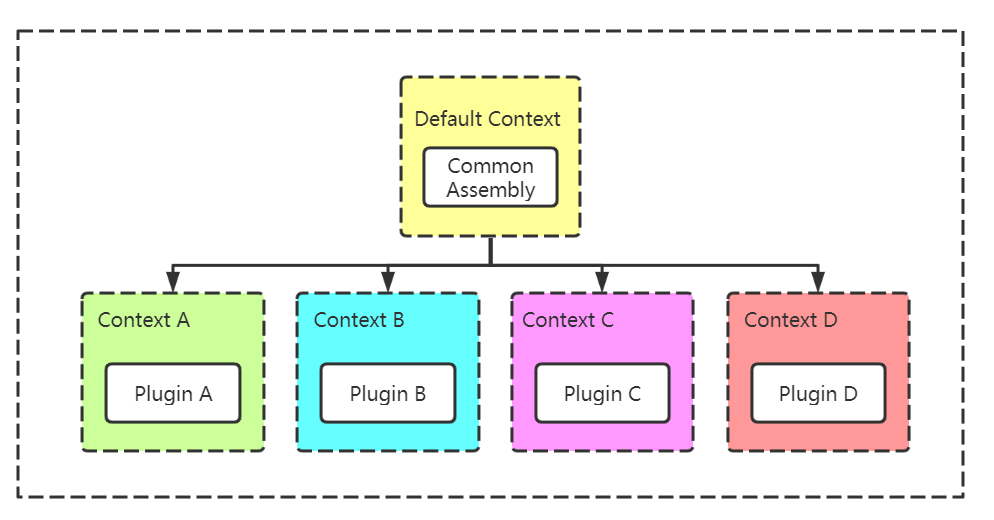
在之前系列文章中,我介绍过两次,在ASP.NET Core的设计文档中,针对AssemblyLoadContext部分的是这样设计的

  • 每个ASP.NET Core程序启动后,都会创建出一个唯一的默认AssemblyLoadContext
  • 开发人员可以自定义AssemblyLoadContext, 当在自定义AssemblyLoadContext加载某个程序集的时候,如果在当前自定义的AssemlyLoadContext中找不到该程序集,系统会尝试在默认AssemblyLoadContext中加载。

但是这种程序集加载流程只是单向的,如果默认AssemblyLoadContext未加载某个程序集,但某个自定义AssemblyLoadContext中加载了该程序集,你是不能从默认AssemblyLoadContext中加载到这个程序集的。

这也就是我们现在遇到的问题,如果你有兴趣的话,可以去Review一下ASP.NET Core的针对RuntimeCompilation源码部分,你会发现当ASP.NET Core的Razor视图引擎会使用Roslyn来编译视图,这里直接使用了默认的AssemblyLoadContext加载视图所需的程序集引用。

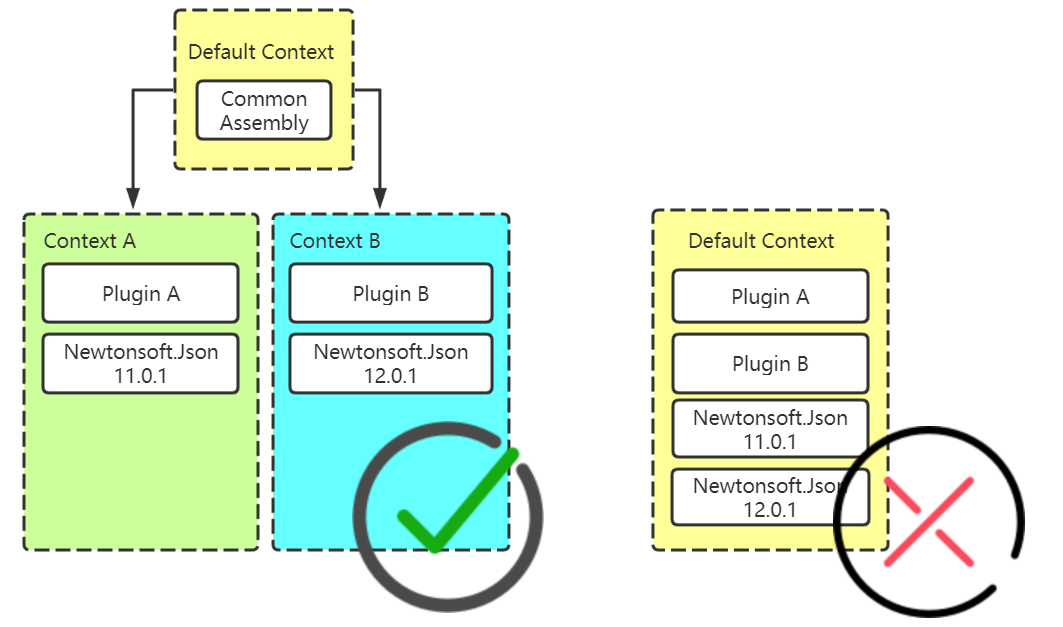
绿线是我们期望的加载方式,红线是实际的加载方式

为什么不直接用默认AssemblyLoadContext来加载插件?#

可能会有同学问,为什么不用默认的AssemblyLoadContext来加载插件,这里有2个主要原因。

首先如果都使用默认的AssemblyLoadContext来加载插件,当不同插件使用了两个不同版本、相同名称的程序集时, 程序加载会出错,因为一个AssemblyLoadContext不能加载不同版本,相同名称的程序集,所以在之前我们才设计成了这种使用自定义程序集加载不同插件的方式。

其次如果都是用默认的AssemblyLoadContext来加载插件,插件的卸载和升级会变成一个大问题,但是如果我们使用自定义AssemblyLoadContext的加载插件,当升级和卸载插件时,我们可以毫不犹豫的Unload当前的自定义AssemblyLoadContext

临时的解决方案#

既然不能使用默认AssemblyLoadContext来加载程序集了,那么是不是只能重写Razor视图运行时编译代码来满足当前需求呢?

答案当然是否定了,这里我们可以通过AssemblyLoadContext提供的Resolving事件来解决这个问题。

AssemblyLoadContextResolving事件是在当前AssemblyLoadContext不能加载指定程序集时触发的。所以当Razor引擎执行运行时视图编译的时候,如果在默认AssemblyLoadContext中找不到某个程序集,我们可以强制让它去自定义的AssemblyLoadContext中查找,如果能找到,就直接返回匹配的程序。这样我们的插件1视图就可以正常展示了。

    public static void MystiqueSetup(this IServiceCollection services, IConfiguration configuration)
    {

        ...

        AssemblyLoadContext.Default.Resolving += (context, assembly) =>
        {
            Func<CollectibleAssemblyLoadContext, bool> filter = p => 
                p.Assemblies.Any(p => p.GetName().Name == assembly.Name
                     && p.GetName().Version == assembly.Version);

            if (PluginsLoadContexts.All().Any(filter))
            {
                var ass = PluginsLoadContexts.All().First(filter)
                    .Assemblies.First(p => p.GetName().Name == assembly.Name
                    && p.GetName().Version == assembly.Version);
                return ass;
            }

            return null;
        };

        ...
    }

Note: 这里其实还有一个问题,如果插件1和插件2都引用了相同版本和名称的程序集,可能会出现插件1的视图匹配到插件2中程序集的问题,就会出现和前面一样的程序集冲突。这块最终的解决肯定还是要重写Razor的运行时编译代码,后续如果能完成这部分,再来更新。

临时的解决方案是,当一个相同版本和名称的程序集被2个插件共同使用时,我们可以使用默认AssemblyLoadContext来加载,并跳过自定义AssemblyLoadContext针对该程序集的加载。

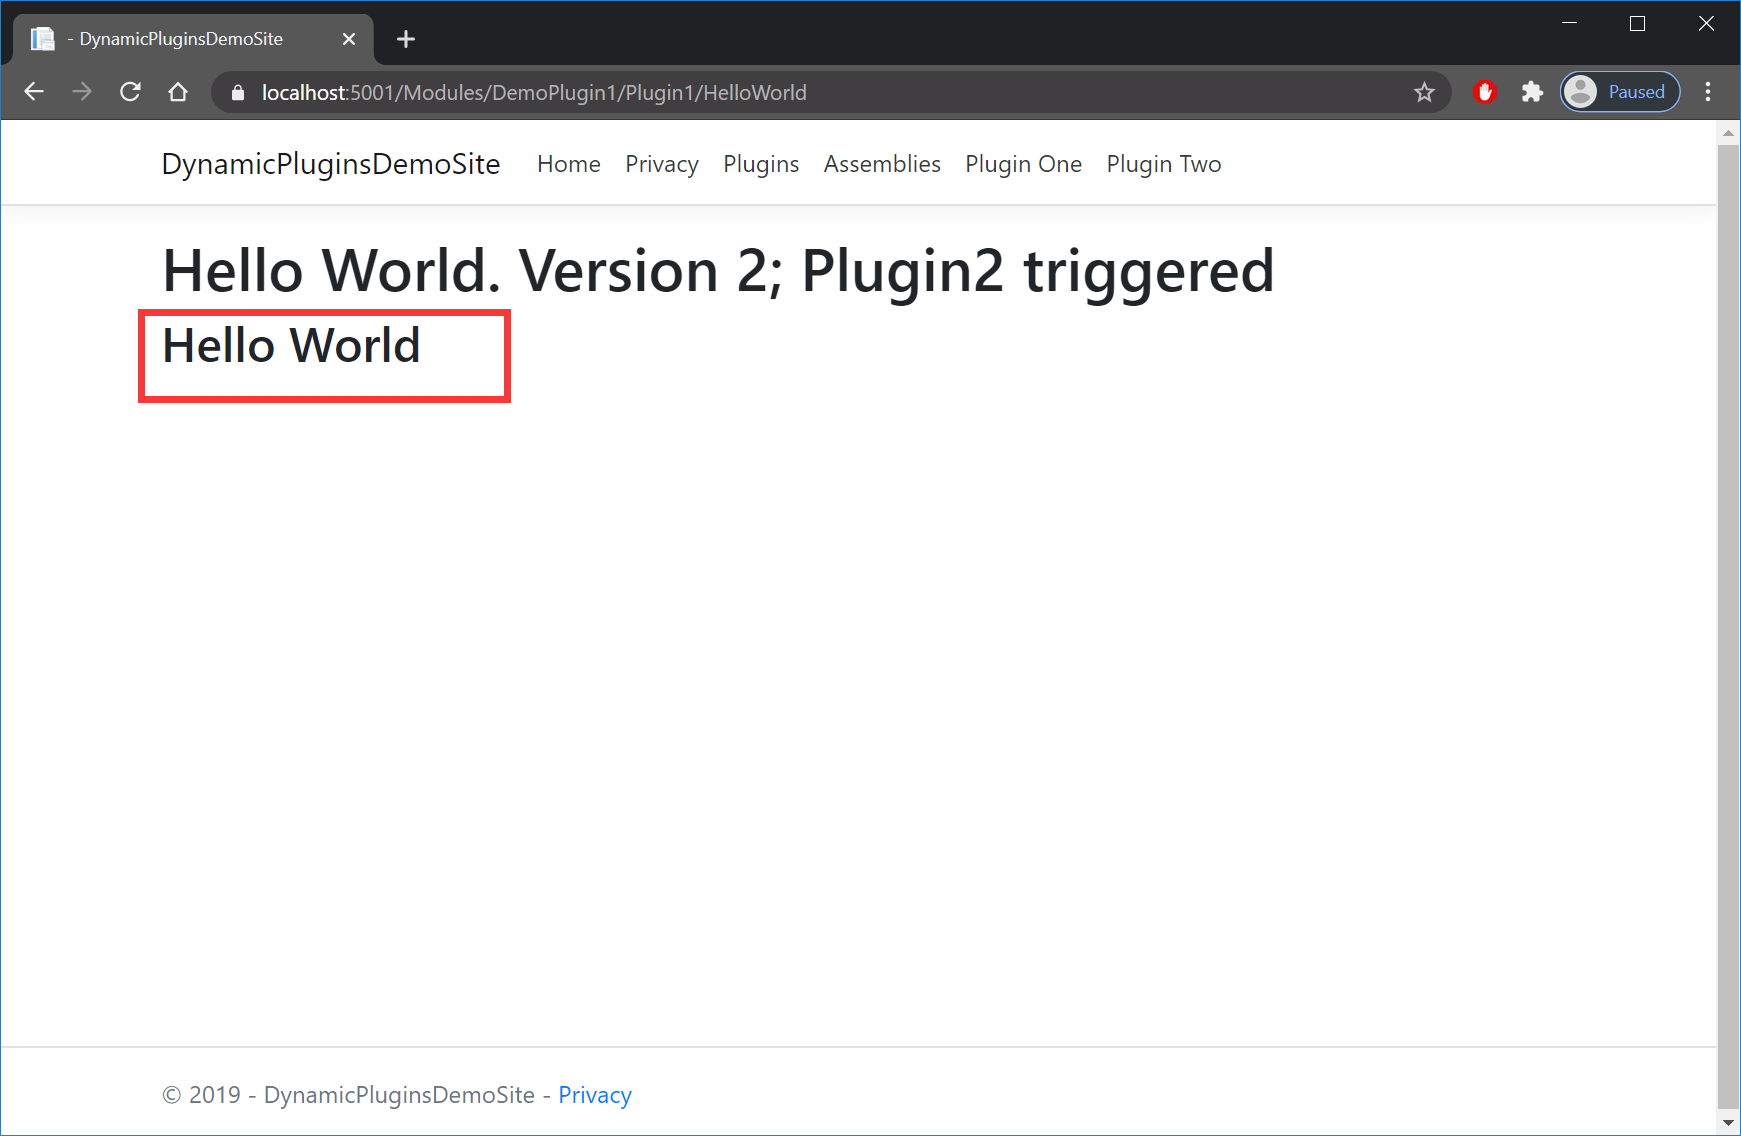
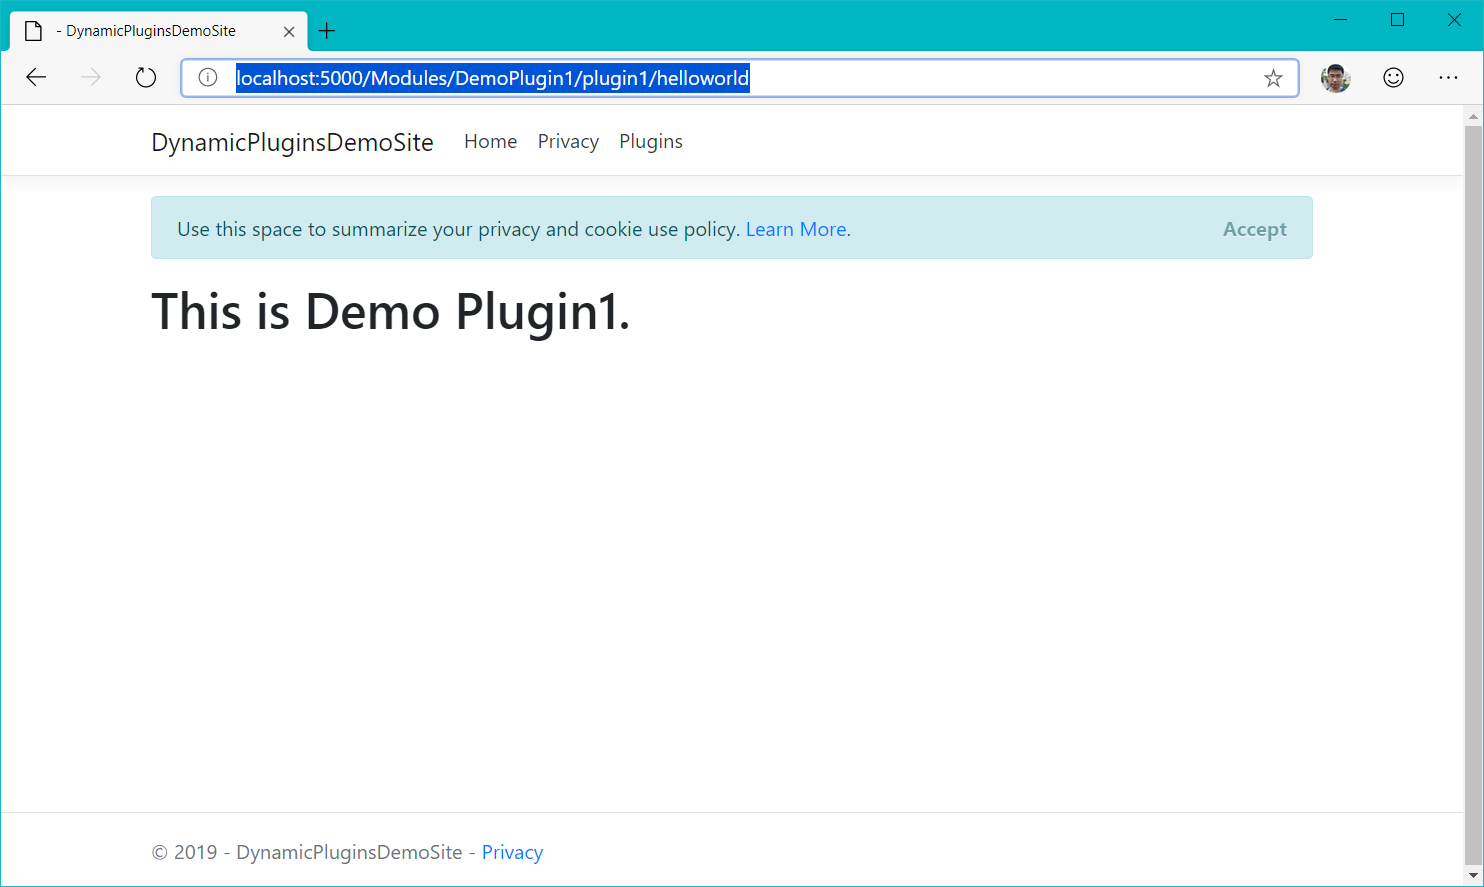
现在我们重新启动项目,访问插件1路由,页面正常显示了。

如何动态加载菜单

之前有小伙伴问,能不能动态加载菜单,每次都是手敲链接进入插件界面相当的不友好。答案是肯定的。

这里我先做一个简单的实现,如果后续其他的难点都解决了,我会将这里的实现改为一个单独的模块,实现方式也改的更优雅一点。

首先在Mystique.Core项目中添加一个特性类Page, 这个特性只允许在方法上使用,Name属性保存了当前页面的名称。

    [AttributeUsage(AttributeTargets.Method, AllowMultiple = false)]
    public class Page : Attribute
    {
        public Page(string name)
        {
            Name = name;
        }

        public string Name { get; set; }
    }

第二步,创建一个展示导航栏菜单用的视图模型类PageRouteViewModel,我们会在导航部分使用到它。

    public class PageRouteViewModel
    {
        public PageRouteViewModel(string pageName, string area, string controller, string action)
        {
            PageName = pageName;
            Area = area;
            Controller = controller;
            Action = action;
        }

        public string PageName { get; set; }

        public string Area { get; set; }

        public string Controller { get; set; }

        public string Action { get; set; }

        public string Url
        {
            get
            {
                return $"{Area}/{Controller}/{Action}";
            }
        }
    }

第三步,我们需要使用反射,从所有启用的插件程序集中加载所有带有Page特性的路由方法,并将他们组合成一个导航栏菜单的视图模型集合。

public static class CollectibleAssemblyLoadContextExtension
{
    public static List<PageRouteViewModel> GetPages(this CollectibleAssemblyLoadContext context)
    {
        var entryPointAssembly = context.GetEntryPointAssembly();
        var result = new List<PageRouteViewModel>();

        if (entryPointAssembly == null || !context.IsEnabled)
        {
            return result;
        }

        var areaName = context.PluginName;

        var types = entryPointAssembly.GetExportedTypes().Where(p => p.BaseType == typeof(Controller));

        if (types.Any())
        {
            foreach (var type in types)
            {

                var controllerName = type.Name.Replace("Controller", "");

                var actions = type.GetMethods().Where(p => p.GetCustomAttributes(false).Any(x => x.GetType() == typeof(Page))).ToList();

                foreach (var action in actions)
                {
                    var actionName = action.Name;

                    var pageAttribute = (Page)action.GetCustomAttributes(false).First(p => p.GetType() == typeof(Page));
                    result.Add(new PageRouteViewModel(pageAttribute.Name, areaName, controllerName, actionName));
                }
            }

            return result;
        }
        else
        {
            return result;
        }
    }
}

Notes: 这里其实可以集成MVC的路由系统来生成Url, 这里为了简单演示,就采取了手动拼凑Url的方式,有兴趣的同学可以自己改写一下。

最后我们来修改主站点的母版页_Layout.cshtml, 在导航栏尾部追加动态菜单。

@using Mystique.Core.Mvc.Extensions;
@{
    var contexts = Mystique.Core.PluginsLoadContexts.All();
    var menus = contexts.SelectMany(p => p.GetPages()).ToList();

}

...

    <header>
        <nav class="navbar navbar-expand-sm navbar-toggleable-sm navbar-light bg-white border-bottom box-shadow mb-3">
            <div class="container">
                <a class="navbar-brand" asp-area="" asp-controller="Home" asp-action="Index">DynamicPluginsDemoSite</a>
                <button class="navbar-toggler" type="button" data-toggle="collapse" data-target=".navbar-collapse" aria-controls="navbarSupportedContent"
                        aria-expanded="false" aria-label="Toggle navigation">
                    <span class="navbar-toggler-icon"></span>
                </button>
                <div class="navbar-collapse collapse d-sm-inline-flex flex-sm-row-reverse">
                    <ul class="navbar-nav flex-grow-1">
                        <li class="nav-item">
                            <a class="nav-link text-dark" asp-area="" asp-controller="Home" asp-action="Index">Home</a>
                        </li>
                        <li class="nav-item">
                            <a class="nav-link text-dark" asp-area="" asp-controller="Home" asp-action="Privacy">Privacy</a>
                        </li>
                        <li class="nav-item">
                            <a class="nav-link text-dark" asp-area="" asp-controller="Plugins" asp-action="Index">Plugins</a>
                        </li>
                        <li class="nav-item">
                            <a class="nav-link text-dark" asp-area="" asp-controller="Plugins" asp-action="Assemblies">Assemblies</a>
                        </li>
                        @foreach (var item in menus)
                        {
                           
                    <li class="nav-item">
                       <a class="nav-link text-dark" href="/Modules/@item.Url">@item.PageName</a>
                    </li>
                        }
                    </ul>
                </div>
            </div>
        </nav>
    </header>

这样基础设施部分的代码就完成了,下面我们来尝试修改插件1的代码,在HelloWorld路由方法上我们添加特性[Page("Plugin One")], 这样按照我们的预想,当插件1启动的时候,导航栏中应该出现Plugin One的菜单项。

    [Area("DemoPlugin1")]
    public class Plugin1Controller : Controller
    {
        private INotificationRegister _notificationRegister;

        public Plugin1Controller(INotificationRegister notificationRegister)
        {
            _notificationRegister = notificationRegister;
        }

        [Page("Plugin One")]
        [HttpGet]
        public IActionResult HelloWorld()
        {
            string content = new Demo().SayHello();
            ViewBag.Content = content + "; Plugin2 triggered";

            TestClass testClass = new TestClass();
            testClass.Message = "Hello World";

            _notificationRegister.Publish("LoadHelloWorldEvent", JsonConvert.SerializeObject(new LoadHelloWorldEvent() { Str = "Hello World" }));

            return View(testClass);
        }
    }

最终效果#

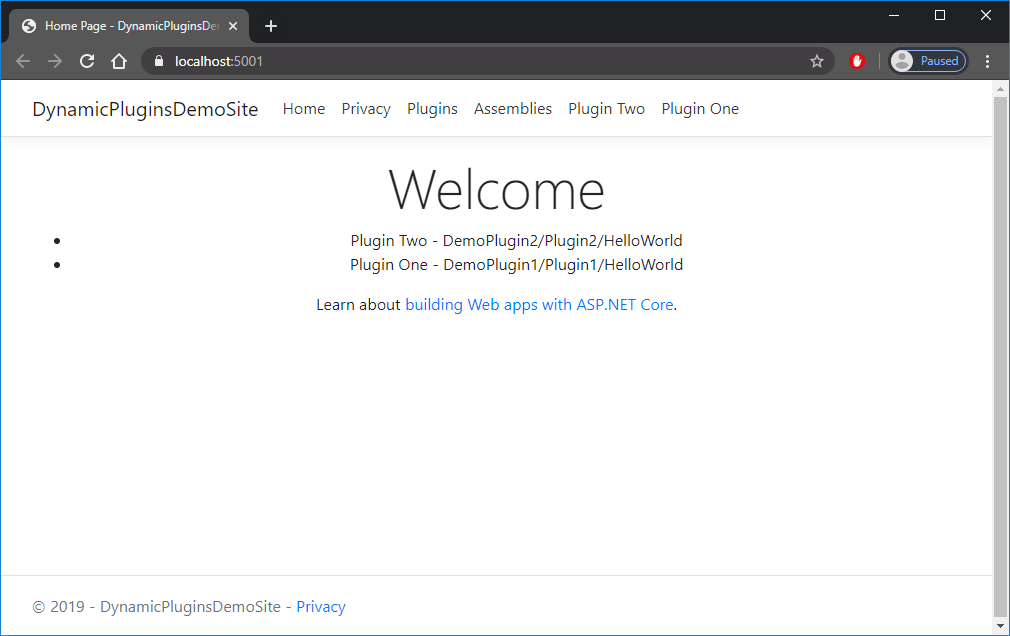
下面我们启动程序,来看一下最终的效果,动态菜单功能完成。

总结

本篇给大家演示了处理Razor视图引用问题的一个临时解决方案和动态菜单的实现,Razor视图引用问题归根结底还是AssemblyLoadContext的问题,这可能就是ASP.NET Core插件开发最常见的问题了。当然视图部分也有很多其他的问题,其实我一度感觉如果仅停留在控制器部分,仅实现ASP.NET Core Webapi的插件化可能相对更容易一些,一旦牵扯到Razor视图,特别是运行时编译Razor视图,就有各种各样的问题,后续编写部分组件可能会遇到更多的问题,希望能走的下去,有兴趣或者遇到问题的小伙伴可以给我发邮件(309728709@qq.com)或者在Github(https://github.com/lamondlu/Mystique)中提Issues,感谢支持。

从零开始实现ASP.NET Core MVC的插件式开发(七) - 近期问题汇总及部分问题解决方案 - LamondLu - 博客园

mikel阅读(645)

来源: 从零开始实现ASP.NET Core MVC的插件式开发(七) – 近期问题汇总及部分问题解决方案 – LamondLu – 博客园

系列文章

简介

在上一篇中,我给大家讲解插件引用程序集的加载问题,在加载插件的时候,我们不仅需要加载插件的程序集,还需要加载插件引用的程序集。在上一篇写完之后,有许多小伙伴联系到我,提出了各种各样的问题,在这里谢谢大家的支持,你们就是我前进的动力。本篇呢,我就对这其中的一些主要问题进行一下汇总和解答。

如何在Visual Studio中以调试模式启动项目?

在所有的问题中,提到最多的问题就是如何在Visual Studio中使用调试模式启动项目的问题。当前项目在默认情况下,可以在Visual Studio中启动调试模式,但是当你尝试访问已安装插件路由时,所有的插件视图都打不开。

这里之前给出临时的解决方案是在bin\Debug\netcoreapp3.1目录中使用命令行dotnet Mystique.dll的方式启动项目。

视图找不到的原因及解决方案#

这个问题的主要原因就是主站点在Visual Studio中以调试模式启动的时候,默认的Working directory是当前项目的根目录,而非bin\Debug\netcoreapp3.1目录,所以当主程序查找插件视图的时候,按照所有的内置规则,都找不到指定的视图文件, 所以就给出了The view 'xx' was not found的错误信息。

因此,这里我们要做的就是修改一下当前主站点的Working directory即可,这里我们需要将Working directory设置为当前主站点下的bin\Debug\netcoreapp3.1目录。

PS: 我在开发过程中,将.NET Core升级到了3.1版本,如果你还在使用.NET Core 2.2或者.NET Core 3.0,请将Working directory配置为相应目录

这样当你在Visual Studio中再次以调试模式启动项目之后,就能访问到插件视图了。

随之而来的样式丢失问题#

看完前面的解决方案之后,你不是已经跃跃欲试了?

但是当你启动项目之后,会心凉半截,你会发现整站的样式和JavaScript脚本文件引用都丢失了。

这里的原因是主站点的默认静态资源文件都放置在项目根目录的wwwroot子目录中,但是现在我们将Working directory改为了bin\Debug\netcoreapp3.1了,在bin\Debug\netcoreapp3.1中并没有wwwroot子目录,所以在修改Working directory后,就不能正常加载静态资源文件了。

这里为了修复这个问题,我们需要对代码做两处修改。

首先呢,我们需要知道当我们使用app.UseStaticFiles()添加静态资源文件目录,并以在Visual Studio中以调试模式启动项目的时候,项目查找的默认目录是当前项目根目录中的wwwroot目录,所以这里我们需要将这个地方改为PhysicalFileProvider的实现方式,并指定当前静态资源文件所在目录是项目目录下的wwwroot目录。

其次,因为当前配置只是针对Visual Studio调试的,所以我们需要使用预编译指令#if DEBUG和`#if !DEBUG针对不同的场景进行不同的静态资源文件目录配置。

所以Configure()方法最终的修改结果如下:

public void Configure(IApplicationBuilder app, IWebHostEnvironment env)
{
    if (env.IsDevelopment())
    {
        app.UseDeveloperExceptionPage();
    }
    else
    {
        app.UseExceptionHandler("/Home/Error");
    }

#if DEBUG
    app.UseStaticFiles(new StaticFileOptions
    {
         FileProvider = new PhysicalFileProvider(@"G:\D1\Mystique\Mystique\wwwroot")
    });
#endif

#if !DEBUG
    app.UseStaticFiles();
#endif

    app.MystiqueRoute();
}

在完成修改之后,重新编译项目,并以调试模式启动项目后,你就会发现,我们熟悉的界面又回来了。

如何实现插件间的消息传递?

这个问题是去年年底和衣明志大哥讨论动态插件开发的时候,衣哥提出来的功能,本身实现思路不麻烦,但是实践过程中,我却让AssemblyLoadContext给绊了一跤。

基本思路#

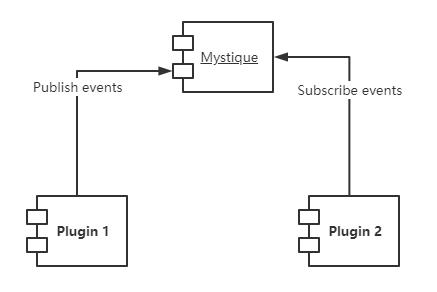
这里因为需要实现两个不同插件的消息通信,最简单的方式是使用消息注册订阅。

PS: 使用第三方消息队列也是一种实现方式,但是本次实践中只是为了简单,没有使用额外的消息注册订阅组件,直接使用了进程内的消息注册订阅

基本思路:

  • 定义INotificationHandler接口来处理消息
  • 在每个独立组件中,我们通过INotificationProvider接口向主程序公开当前组件订阅的消息及处理程序
  • 在主站点中,我们通过INotificationRegister接口实现一个消息注册订阅容器,当站点启动,系统可以通过每个组件的INotificationProvider接口实现,将订阅的消息和处理程序注册到主站点的消息发布订阅容器中。
  • 每个插件中,使用INotifcationRegister接口的Publish方法发布消息

根据以上思路,我们首先定义一个消息处理接口INotification

    public interface INotificationHandler
    {
        void Handle(string data);
    }

这里我没有采用强类型的来规范消息的格式,主要原因是如果使用强类型定义消息,不同的插件势必都要引用一个存放强类型强类型消息定义的的程序集,这样会增加插件之间的耦合度,每个插件就开发起来变得不那么独立了。

PS: 以上设计只是个人喜好,如果你喜欢使用强类型也完全没有问题。

接下来,我们再来定义消息发布订阅接口以及消息处理程序接口

    public interface INotificationProvider
    {
        Dictionary<string, List<INotificationHandler>> GetNotifications();
    }
    public interface INotificationRegister
    {
        void Subscribe(string eventName, INotificationHandler handler);

        void Publish(string eventName, string data);
    }

这里代码非常的简单,INotificationProvider接口提供一个消息处理器的集合,INotificationRegister接口定义了消息订阅和发布的方法。

下面我们在Mystique.Core.Mvc项目中完成INotificationRegister的接口实现。

    public class NotificationRegister : INotificationRegister
    {
        private static Dictionary<string, List<INotificationHandler>>
            _containers = new Dictionary<string, List<INotificationHandler>>();

        public void Publish(string eventName, string data)
        {
            if (_containers.ContainsKey(eventName))
            {
                foreach (var item in _containers[eventName])
                {
                    item.Handle(data);
                }
            }
        }

        public void Subscribe(string eventName, INotificationHandler handler)
        {
            if (_containers.ContainsKey(eventName))
            {
                _containers[eventName].Add(handler);
            }
            else
            {
                _containers[eventName] = new List<INotificationHandler>() { handler };
            }
        }
    }

最后,我们还需要在项目启动方法MystiqueSetup中配置消息订阅器的发现和绑定。

    public static void MystiqueSetup(this IServiceCollection services, 
    	IConfiguration configuration)
    {

        ...
        using (IServiceScope scope = provider.CreateScope())
        {
            ...

            foreach (ViewModels.PluginListItemViewModel plugin in allEnabledPlugins)
            {
                ...
                using (FileStream fs = new FileStream(filePath, FileMode.Open))
                {
                    ...
                    var providers = assembly.GetExportedTypes()
                    .Where(p => p.GetInterfaces()
                        .Any(x => x.Name == "INotificationProvider"));

                    if (providers != null && providers.Count() > 0)
                    {
                        var register = scope.ServiceProvider
                            .GetService<INotificationRegister>();

                        foreach (var p in providers)
                        {
                            var obj = (INotificationProvider)assembly
                                .CreateInstance(p.FullName);
                            var result = obj.GetNotifications();

                            foreach (var item in result)
                            {
                                foreach (var i in item.Value)
                                {
                                    register.Subscribe(item.Key, i);
                                }
                            }
                        }
                    }
                }
            }
        }

        ...
    }

完成以上基础设置之后,我们就可以尝试在插件中发布订阅消息了。

首先这里我们在DemoPlugin2中创建消息LoadHelloWorldEvent,并创建对应的消息处理器LoadHelloWorldEventHandler.

    public class NotificationProvider : INotificationProvider
    {
        public Dictionary<string, List<INotificationHandler>> GetNotifications()
        {
            var handlers = new List<INotificationHandler> { new LoadHelloWorldEventHandler() };
            var result = new Dictionary<string, List<INotificationHandler>>();

            result.Add("LoadHelloWorldEvent", handlers);

            return result;
        }
    }

    public class LoadHelloWorldEventHandler : INotificationHandler
    {
        public void Handle(string data)
        {
            Console.WriteLine("Plugin2 handled hello world events." + data);
        }
    }

    public class LoadHelloWorldEvent
    {
        public string Str { get; set; }
    }

然后我们修改DemoPlugin1的HelloWorld方法,在返回视图之前,发布一个LoadHelloWorldEvent的消息。

    [Area("DemoPlugin1")]
    public class Plugin1Controller : Controller
    {
        private INotificationRegister _notificationRegister;

        public Plugin1Controller(INotificationRegister notificationRegister)
        {
            _notificationRegister = notificationRegister;
        }

        [Page("Plugin One")]
        [HttpGet]
        public IActionResult HelloWorld()
        {
            string content = new Demo().SayHello();
            ViewBag.Content = content + "; Plugin2 triggered";

            _notificationRegister.Publish("LoadHelloWorldEvent", JsonConvert.SerializeObject(new LoadHelloWorldEvent() { Str = "Hello World" }));

            return View();
        }
    }

    public class LoadHelloWorldEvent
    {
        public string Str { get; set; }
    }

AssemblyLoadContext产生的灵异问题#

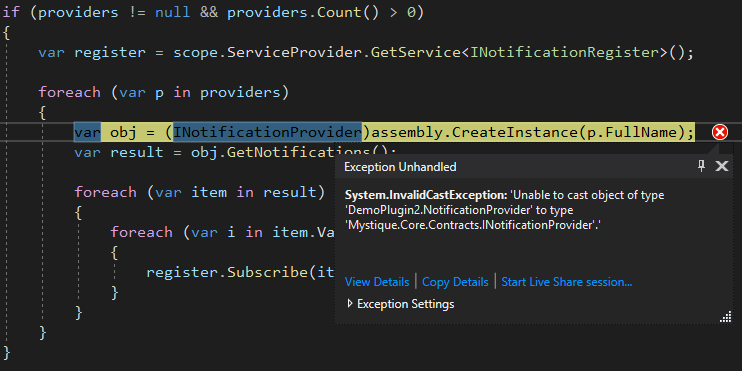
上面的代码看起来很美好,但是实际运行的时候,你会遇到一个灵异的问题,就是系统不能将DemoPlugin2中的NotificationProvider转换为INotificationProvider接口类型的对象。

这个问题困扰了我半天,完全想象不出可能的问题,但是我隐约感觉这是一个AssemblyLoadContext引起的问题。

在上一篇中,我们曾经查找过.NET Core的程序集加载设计文档。

在.NET Core的设计文档中,对于程序集加载有这样一段描述

If the assembly was already present in A1’s context, either because we had successfully loaded it earlier, or because we failed to load it for some reason, we return the corresponding status (and assembly reference for the success case).

However, if C1 was not found in A1’s context, the Load method override in A1’s context is invoked.

  • For Custom LoadContext, this override is an opportunity to load an assembly before the fallback (see below) to Default LoadContext is attempted to resolve the load.
  • For Default LoadContext, this override always returns null since Default Context cannot override itself.

这里简单来说,意思就是当在一个自定义LoadContext中加载程序集的时候,如果找不到这个程序集,程序会自动去默认LoadContext中查找,如果默认LoadContext中都找不到,就会返回null

这里我突然想到会不会是因为DemoPlugin1、DemoPlugin2以及主站点的AssemblyLoadContext都加载了Mystique.Core.dll程序集的缘故,虽然他们加载的是同一个程序集,但是因为LoadContext不同,所以系统认为它是2个程序集。

PS: 主站点的AssemblyLoadContext即默认的LoadContext

其实对于DemoPlugin1和DemoPlugin2来说,它们完全没有必须要加载Mystique.Core.dll程序集,因为主站点的默认LoadContext已经加载了此程序集,所以当DemoPlugin1和DemoPlugin2使用Mystique.Core.dll程序集中定义的INotificationProvider时,就会去默认的LoadContext中加载,这样他们加载的程序集就都是默认LoadContext中的了,就不存在差异了。

于是根据这个思路,我修改了一下插件程序集加载部分的代码,将Mystique.Core.*程序集排除在加载列表中。

重新启动项目之后,项目正常运行,消息发布订阅能正常运行。

项目后续尝试添加的功能

由于篇幅问题,剩余的其他问题和功能会在下一篇中来完成。以下是项目后续会逐步添加的功能

  • 添加/移除插件后,主站点导航栏自动加载插件入口页面(已完成,下一篇中说明)
  • 在主站点中,添加页面管理模块
  • 尝试一个页面加载多个插件,当前的插件只能实现一个插件一个页面。

不过如果大家如果有什么其他想法,也可以给我留言或者在Github上提Issue,你们的建议就是我进步的动力。

总结

本篇针对前一阵子Github Issue和文档评论中比较集中的问题进行了说明和解答,主要讲解了如何在Visual Studio中调试运行插件以及如何实现插件间的消息传输。后续我会根据反馈,继续添加新内容,大家敬请期待。

从零开始实现ASP.NET Core MVC的插件式开发(六) - 如何加载插件引用 - LamondLu - 博客园

mikel阅读(560)

来源: 从零开始实现ASP.NET Core MVC的插件式开发(六) – 如何加载插件引用 – LamondLu – 博客园

系列文章

简介

在前一篇中,我给大家演示了如何使用.NET Core 3.0中新引入的AssemblyLoadContext来实现运行时升级和删除插件。完成此篇之后,我得到了很多园友的反馈,很高兴有这么多人能够参与进来,我会根据大家的反馈,来完善这个项目。本篇呢,我将主要解决加载插件引用的问题,这个也是反馈中被问的最多的问题。

问题用例

在之前做的插件中,我们做的都是非常非常简单的功能,没有引入任何的第三方库。但是正常情况下,我们所创建的插件或多或少的都会引用一些第三方库,那么下面我们来尝试一下,使用我们先前的项目,加载一个第三方程序集, 看看会的得到什么结果。

这里为了模拟,我创建了一个新的类库项目DemoReferenceLibrary, 并在之前的DemoPlugin1项目中引用DemoReferenceLibrary项目。

DemoReferenceLibrary中,我新建了一个类Demo.cs文件, 其代码如下:

	public class Demo
    {
        public string SayHello()
        {
            return "Hello World. Version 1";
        }
    }

这里就是简单的通过SayHello方法,返回了一个字符串。

然后在DemoPlugin1项目中,我们修改之前创建的Plugin1Controller,从Demo类中通过SayHello方法得到需要在页面中显示的字符串。

    [Area("DemoPlugin1")]
    public class Plugin1Controller : Controller
    {
        public IActionResult HelloWorld()
        {
            var content = new Demo().SayHello();
            ViewBag.Content = content;
            return View();
        }
    }

最后我们打包一下插件,重新将其安装到系统中,访问插件路由之后,就会得到以下错误。

这里就是大部分同学遇到的问题,无法加载程序集DemoReferenceLibrary

如何加载插件引用?#

这个问题的原因很简单,就是当通过AssemblyLoadContext加载程序集的时候,我们只加载了插件程序集,没有加载它引用的程序集。

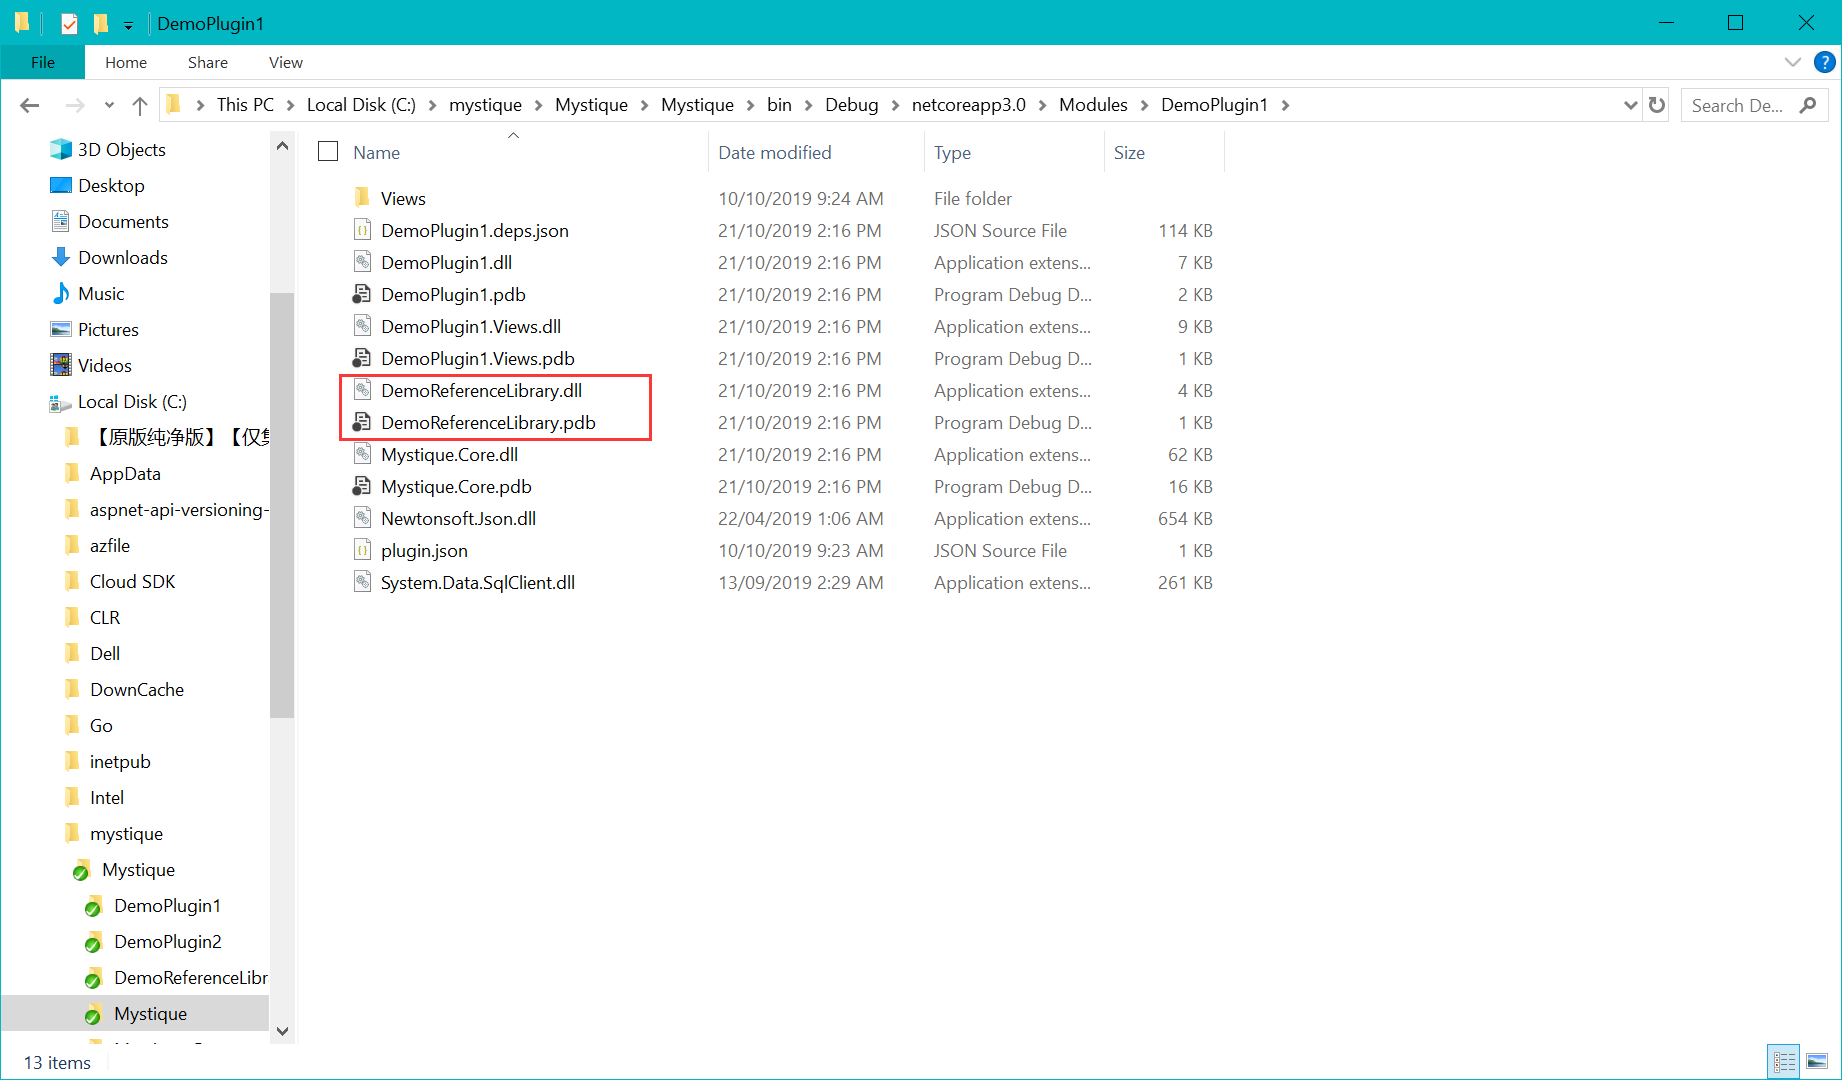
例如,我们以DemoPlugin1的为例,在这个插件的目录如下

在这个目录中,除了我们熟知的DemoPlugin1.dll,DemoPlugin1.Views.dll之外,还有一个DemoReferenceLibrary.dll文件。 这个文件我们并没有在插件启用时加载到当前的AssemblyLoadContext中,所以在访问插件路由时,系统找不到这个组件的dll文件。

为什么Mystique.Core.dllSystem.Data.SQLClient.dllNewtonsoft.Json.dll这些DLL不会出现问题呢?#

在.NET Core中有2种LoadContext。 一种是我们之前介绍的AssemblyLoadContext, 它是一种自定义LoadContext。 另外一种就是系统默认的DefaultLoadContext。当一个.NET Core应用启动的时候,都会创建并引用一个DefaultLoadContext

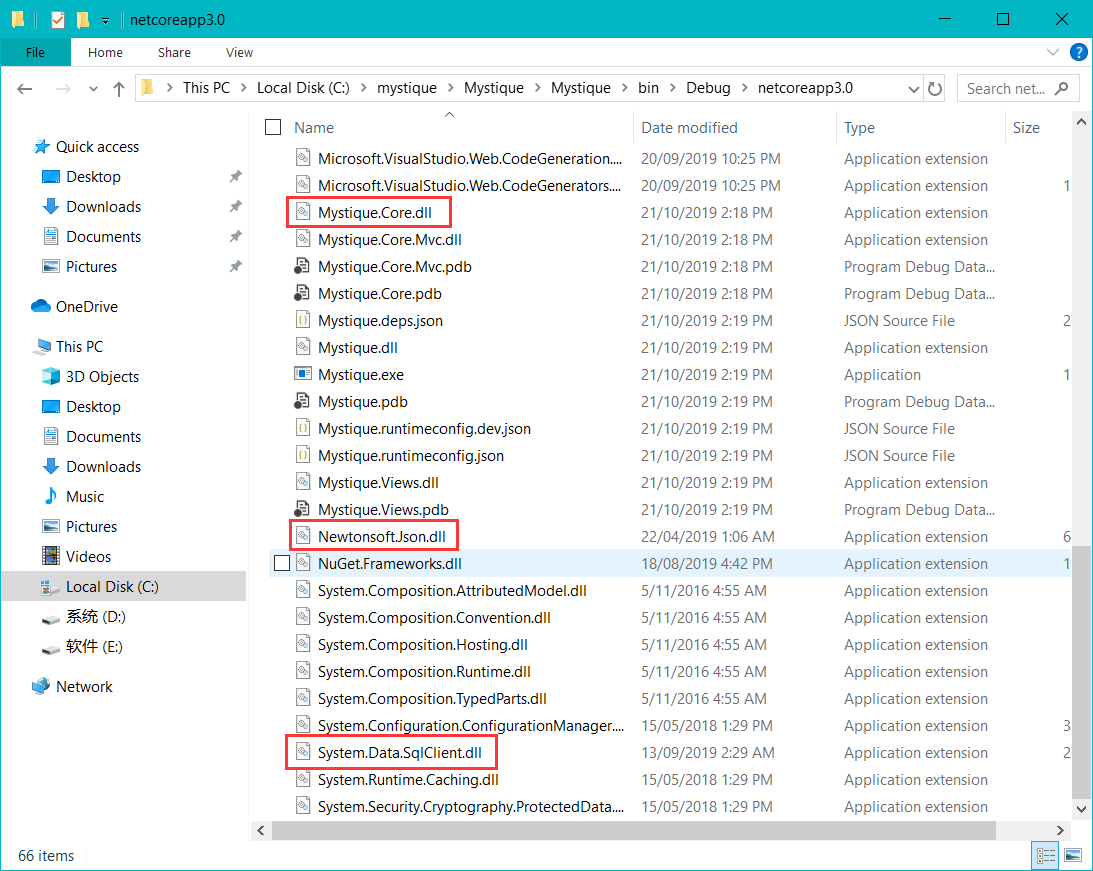
如果没有指定LoadContext, 系统默认会将程序集都加载到DefaultLoadContext中。这里我们可以查看一下我们的主站点项目,这个项目我们也引用了Mystique.Core.dllSystem.Data.SQLClient.dllNewtonsoft.Json.dll

在.NET Core的设计文档中,对于程序集加载有这样一段描述

If the assembly was already present in A1’s context, either because we had successfully loaded it earlier, or because we failed to load it for some reason, we return the corresponding status (and assembly reference for the success case).

However, if C1 was not found in A1’s context, the Load method override in A1’s context is invoked.

  • For Custom LoadContext, this override is an opportunity to load an assembly before the fallback (see below) to Default LoadContext is attempted to resolve the load.
  • For Default LoadContext, this override always returns null since Default Context cannot override itself.

这里简单来说,意思就是当在一个自定义LoadContext中加载程序集的时候,如果找不到这个程序集,程序会自动去默认LoadContext中查找,如果默认LoadContext中都找不到,就会返回null

由此,我们之前的疑问就解决了,这里正是因为主站点已经加载了所需的程序集,虽然在插件的AssemblyLoadContext中找不到这个程序集,程序依然可以通过默认LoadContext来加载程序集。

那么是不是真的就没有问题了呢?#

其实我不是很推荐用以上的方式来加载第三方程序集。主要原因有两点

  • 不同插件可以引用不同版本的第三方程序集,可能不同版本的第三方程序集实现不同。 而默认LoadContext只能加载一个版本,导致总有一个插件引用该程序集的功能失效。
  • 默认LoadContext中可能加载的第三方程序集与其他插件都不同,导致其他插件功能引用该程序集的功能失效。

所以这里最正确的方式,还是放弃使用默认LoadContext加载程序集,保证每个插件的AssemblyLoadContext都完全加载所需的程序集。

那么如何加载这些第三方程序集呢?我们下面就来介绍两种方式

  • 原始方式
  • 使用插件缓存

原始方式#

原始方式比较暴力,我们可以选择加载插件程序集的同时,加载程序集所在目录中所有的dll文件。

这里首先我们创建了一个插件引用库加载器接口IReferenceLoader

	public interface IRefenerceLoader
    {
        public void LoadStreamsIntoContext(CollectibleAssemblyLoadContext context, 
            string folderName, 
            string excludeFile);
    }

然后我们创建一个默认的插件引用库加载器DefaultReferenceLoader,其代码如下:

	public class DefaultReferenceLoader : IRefenerceLoader
    {
        public void LoadStreamsIntoContext(CollectibleAssemblyLoadContext context, 
        	string folderName, 
        	string excludeFile)
        {
            var streams = new List<Stream>();
            var di = new DirectoryInfo(folderName);
            var allReferences = di.GetFiles("*.dll").Where(p => p.Name != excludeFile);

            foreach (var file in allReferences)
            {
                using (var sr = new StreamReader(file.OpenRead()))
                {
                    context.LoadFromStream(sr.BaseStream);
                }
            }
        }
    }

代码解释

  • 这里我是为了排除当前已经加载插件程序集,所以添加了一个excludeFile参数。
  • folderName即当前插件的所在目录,这里我们通过DirectoryInfo类的GetFiles方法,获取了当前指定folderName目录中的所有dll文件。
  • 这里我依然通过文件流的方式加载了插件所需的第三方程序集。

完成以上代码之后,我们还需要修改启用插件的两部分代码

  • [MystiqueStartup.cs] – 程序启动时,注入IReferenceLoader服务,启用插件
  • [MvcModuleSetup.cs] – 在插件管理页面,触发启用插件操作

MystiqueStartup.cs

	public static void MystiqueSetup(this IServiceCollection services, IConfiguration configuration)
    {

        ...
            
        services.AddSingleton<IReferenceLoader, DefaultReferenceLoader>();

        var mvcBuilder = services.AddMvc();

        var provider = services.BuildServiceProvider();
        using (var scope = provider.CreateScope())
        {
            ...

            foreach (var plugin in allEnabledPlugins)
            {
                var context = new CollectibleAssemblyLoadContext();
                var moduleName = plugin.Name;
                var filePath = $"{AppDomain.CurrentDomain.BaseDirectory}Modules\\{moduleName}\\{moduleName}.dll";
                var referenceFolderPath = $"{AppDomain.CurrentDomain.BaseDirectory}Modules\\{moduleName}";

                _presets.Add(filePath);
                using (var fs = new FileStream(filePath, FileMode.Open))
                {
                    var assembly = context.LoadFromStream(fs);
                    loader.LoadStreamsIntoContext(context, 
                          referenceFolderPath,
                          $"{moduleName}.dll");

                   ...
                }
            }
        }

        ...
    }

MvcModuleSetup.cs

	public void EnableModule(string moduleName)
    {
        if (!PluginsLoadContexts.Any(moduleName))
        {
            var context = new CollectibleAssemblyLoadContext();

            var filePath = $"{AppDomain.CurrentDomain.BaseDirectory}Modules\\{moduleName}\\{moduleName}.dll";
            var referenceFolderPath = $"{AppDomain.CurrentDomain.BaseDirectory}Modules\\{moduleName}";
            using (var fs = new FileStream(filePath, FileMode.Open))
            {
                var assembly = context.LoadFromStream(fs);
                _referenceLoader.LoadStreamsIntoContext(context, 
                      referenceFolderPath, 
                      $"{moduleName}.dll");

                ...
            }
        }
        else
        {
            var context = PluginsLoadContexts.GetContext(moduleName);
            var controllerAssemblyPart = new MystiqueAssemblyPart(context.Assemblies.First());
            _partManager.ApplicationParts.Add(controllerAssemblyPart);
        }

        ResetControllActions();
    }

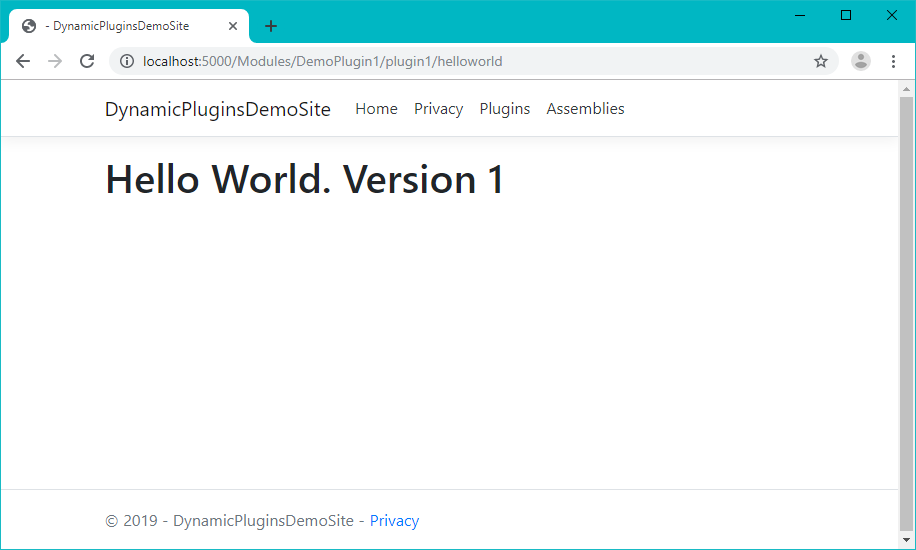
现在我们重新运行之前的项目,并访问插件1的路由,你会发现页面正常显示了,并且页面内容也是从DemoReferenceLibrary程序集中加载出来了。

使用插件缓存#

原始方式虽然可以帮助我们成功加载插件引用程序集,但是它并不效率,如果插件1和插件2引用了相同的程序集,当插件1的AssemblyLoadContext加载所有的引用程序集之后,插件2会将插件1所干的事情重复一遍。这并不是我们想要的,我们希望如果多个插件同时使用了相同的程序集,就不需要重复读取dll文件了。

如何避免重复读取dll文件呢?这里我们可以使用一个静态字典来缓存文件流信息,从而避免重复读取dll文件。

如果大家觉着在ASP.NET Core MVC中使用静态字典来缓存文件流信息不安全,可以改用其他缓存方式,这里只是为了简单演示。

这里我们首先创建一个引用程序集缓存容器接口IReferenceContainer, 其代码如下:

	public interface IReferenceContainer
    {
        List<CachedReferenceItemKey> GetAll();

        bool Exist(string name, string version);

        void SaveStream(string name, string version, Stream stream);

        Stream GetStream(string name, string version);
    }

代码解释

  • GetAll方法会在后续使用,用来获取系统中加载的所有引用程序集
  • Exist方法判断了指定版本程序集的文件流是否存在
  • SaveStream是将指定版本的程序集文件流保存到静态字典中
  • GetStream是从静态字典中拉取指定版本程序集的文件流

然后我们可以创建一个引用程序集缓存容器的默认实现DefaultReferenceContainer类,其代码如下:

	public class DefaultReferenceContainer : IReferenceContainer
    {
        private static Dictionary<CachedReferenceItemKey, Stream> _cachedReferences = new Dictionary<CachedReferenceItemKey, Stream>();

        public List<CachedReferenceItemKey> GetAll()
        {
            return _cachedReferences.Keys.ToList();
        }

        public bool Exist(string name, string version)
        {
            return _cachedReferences.Keys.Any(p => p.ReferenceName == name
                && p.Version == version);
        }

        public void SaveStream(string name, string version, Stream stream)
        {
            if (Exist(name, version))
            {
                return;
            }

            _cachedReferences.Add(new CachedReferenceItemKey { ReferenceName = name, Version = version }, stream);
        }

        public Stream GetStream(string name, string version)
        {
            var key = _cachedReferences.Keys.FirstOrDefault(p => p.ReferenceName == name
                && p.Version == version);

            if (key != null)
            {
                _cachedReferences[key].Position = 0;
                return _cachedReferences[key];
            }

            return null;
        }
    }

这个类比较简单,我就不做太多解释了。

完成了引用缓存容器之后,我修改了之前创建的IReferenceLoader接口,及其默认实现DefaultReferenceLoader

	public interface IReferenceLoader
    {
        public void LoadStreamsIntoContext(CollectibleAssemblyLoadContext context, string moduleFolder, Assembly assembly);
    }
	public class DefaultReferenceLoader : IReferenceLoader
    {
        private IReferenceContainer _referenceContainer = null;
        private readonly ILogger<DefaultReferenceLoader> _logger = null;

        public DefaultReferenceLoader(IReferenceContainer referenceContainer, ILogger<DefaultReferenceLoader> logger)
        {
            _referenceContainer = referenceContainer;
            _logger = logger;
        }

        public void LoadStreamsIntoContext(CollectibleAssemblyLoadContext context, string moduleFolder, Assembly assembly)
        {
            var references = assembly.GetReferencedAssemblies();

            foreach (var item in references)
            {
                var name = item.Name;

                var version = item.Version.ToString();

                var stream = _referenceContainer.GetStream(name, version);

                if (stream != null)
                {
                    _logger.LogDebug($"Found the cached reference '{name}' v.{version}");
                    context.LoadFromStream(stream);
                }
                else
                {

                    if (IsSharedFreamwork(name))
                    {
                        continue;
                    }

                    var dllName = $"{name}.dll";
                    var filePath = $"{moduleFolder}\\{dllName}";

                    if (!File.Exists(filePath))
                    {
                        _logger.LogWarning($"The package '{dllName}' is missing.");
                        continue;
                    }

                    using (var fs = new FileStream(filePath, FileMode.Open))
                    {
                        var referenceAssembly = context.LoadFromStream(fs);

                        var memoryStream = new MemoryStream();

                        fs.Position = 0;
                        fs.CopyTo(memoryStream);
                        fs.Position = 0;
                        memoryStream.Position = 0;
                        _referenceContainer.SaveStream(name, version, memoryStream);

                        LoadStreamsIntoContext(context, moduleFolder, referenceAssembly);
                    }
                }
            }
        }

        private bool IsSharedFreamwork(string name)
        {
            return SharedFrameworkConst.SharedFrameworkDLLs.Contains($"{name}.dll");
        }
    }

代码解释:

  • 这里LoadStreamsIntoContext方法的assembly参数,即当前插件程序集。
  • 这里我通过GetReferencedAssemblies方法,获取了插件程序集引用的所有程序集。
  • 如果引用程序集在引用容器中不存在,我们就是用文件流加载它,并将其保存到引用容器中, 如果引用程序集已存在于引用容器,就直接加载到当前插件的AssemblyLoadContext中。这里为了检验效果,如果程序集来自缓存,我使用日志组件输出了一条日志。
  • 由于插件引用的程序集,有可能是来自Shared Framework, 这种程序集是不需要加载的,所以这里我选择跳过这类程序集的加载。(这里我还没有考虑Self-Contained发布的情况,后续这里可能会更改)

最后我们还是需要修改MystiqueStartup.csMvcModuleSetup.cs中启用插件的代码。

MystiqueStartup.cs

	public static void MystiqueSetup(this IServiceCollection services, IConfiguration configuration)
    {

        ...
        services.AddSingleton<IReferenceContainer, DefaultReferenceContainer>();
        services.AddSingleton<IReferenceLoader, DefaultReferenceLoader>();
        ...

        var mvcBuilder = services.AddMvc();

        var provider = services.BuildServiceProvider();
        using (var scope = provider.CreateScope())
        {
            ...

            foreach (var plugin in allEnabledPlugins)
            {
                ...
               
                using (var fs = new FileStream(filePath, FileMode.Open))
                {
                    var assembly = context.LoadFromStream(fs);
                    loader.LoadStreamsIntoContext(context, referenceFolderPath, assembly);

                    ...
                }
            }
        }

        ...
    }

MvcModuleSetup.cs

	public void EnableModule(string moduleName)
    {
        if (!PluginsLoadContexts.Any(moduleName))
        {
            ...
            using (var fs = new FileStream(filePath, FileMode.Open))
            {
                var assembly = context.LoadFromStream(fs);
                _referenceLoader.LoadStreamsIntoContext(context, referenceFolderPath, assembly);
			   ...
            }
        }
        else
        {
            ...
        }

        ResetControllActions();
    }

完成代码之后,为了检验效果,我创建了另外一个插件DemoPlugin2, 这个项目的代码和DemoPlugin1基本一样。程序启动时,你会发现DemoPlugin2所使用的引用程序集都是从缓存中加载的,而且DemoPlugin2的路由也能正常访问。

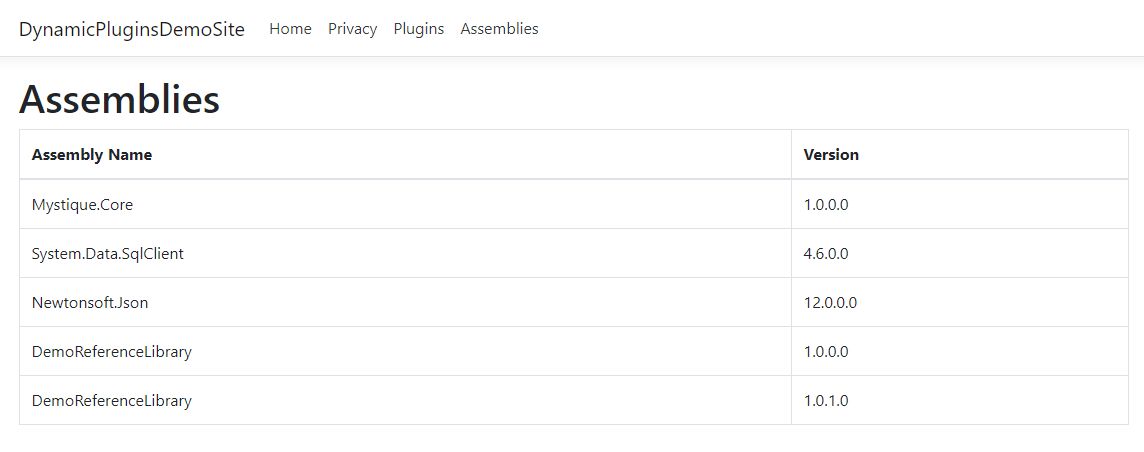
添加页面来显示加载的第三方程序集#

这里为了显示一下系统中加载了哪些程序集,我添加了一个新页面Assembilies, 这个页面就是调用了IReferenceContainer接口中定义的GetAll方法,显示了静态字典中,所有加载的程序集。

效果如下:

几个测试场景

最后,在编写完成以上代码功能之后,我们使用以下几种场景来测试一下,看一看AssemblyLoadContext为我们提供的强大功能。

场景1#

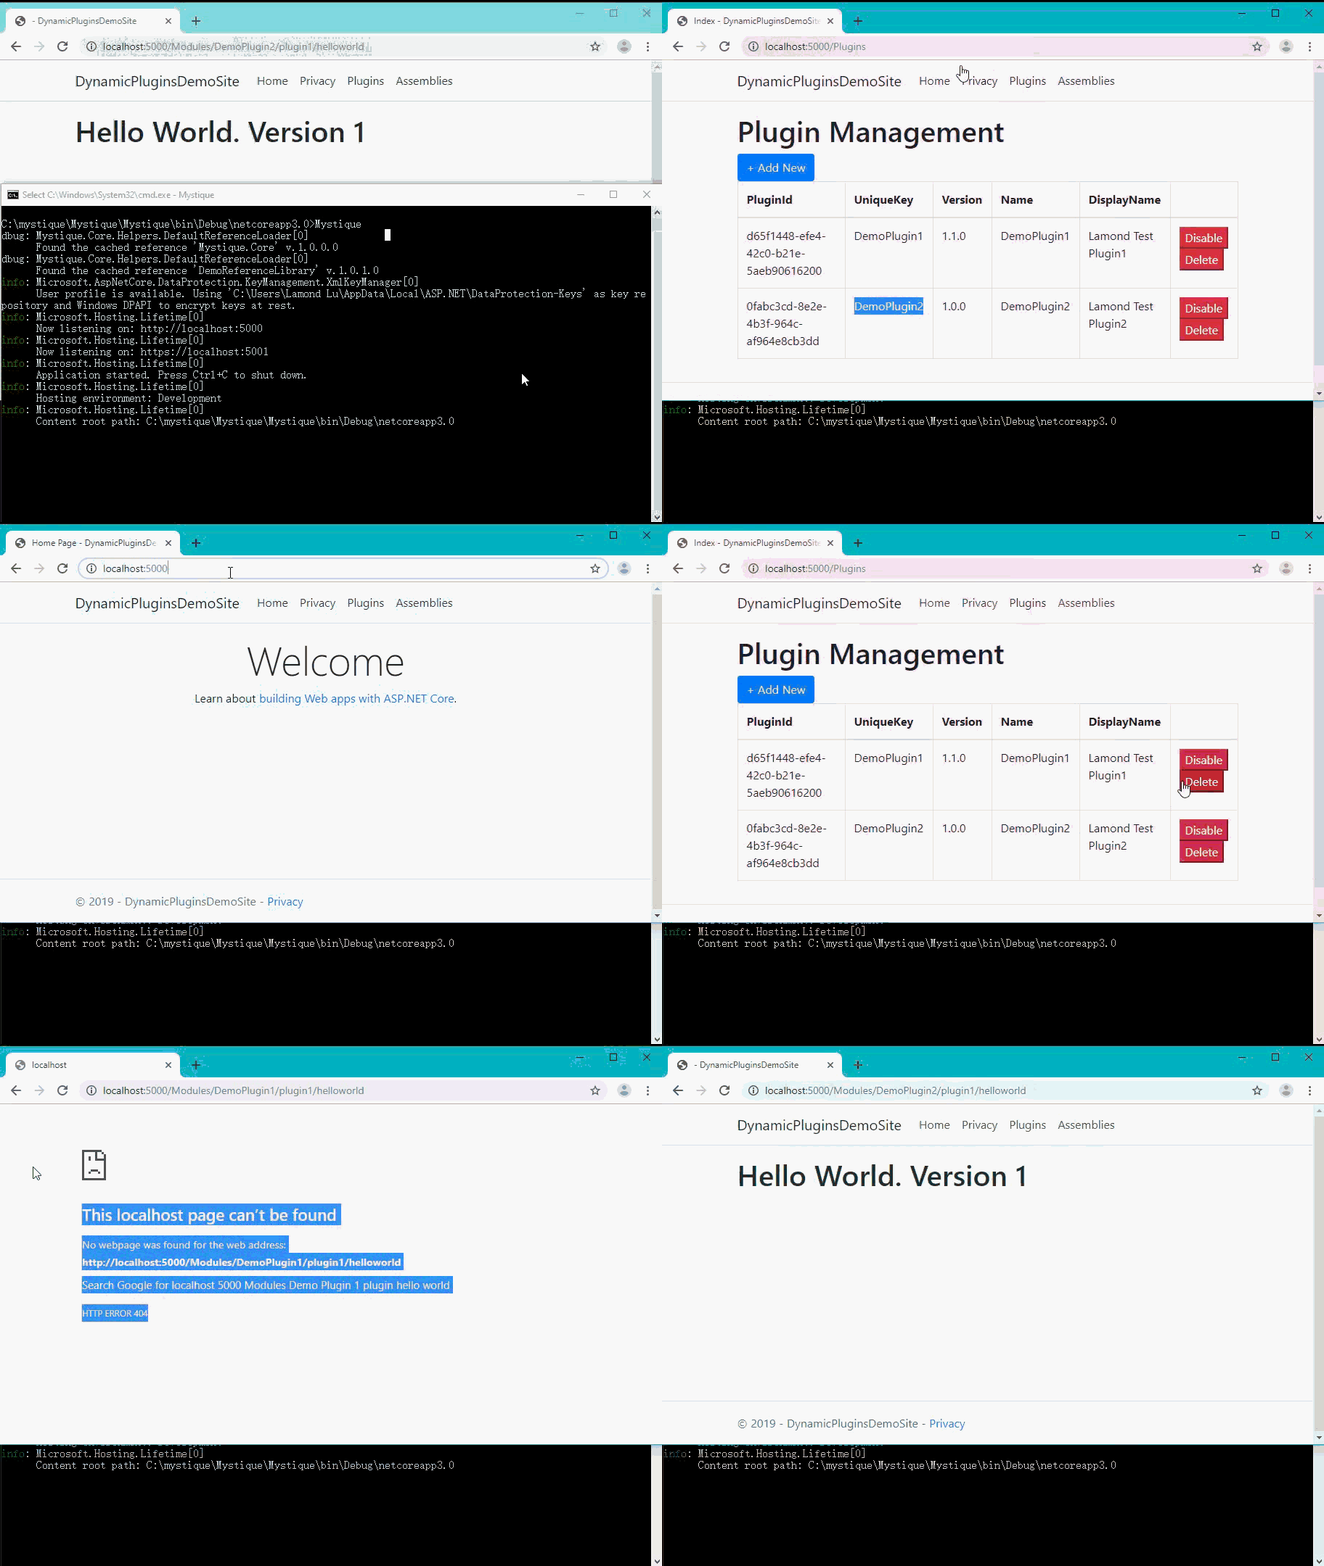
2个插件,一个引用DemoReferenceLibrary的1.0.0.0版本,另外一个引用DemoReferenceLibrary的1.0.1.0版本。其中1.0.0.0版本,SayHello方法返回的字符串是”Hello World. Version 1″, 1.0.1.0版本, SayHello方法返回的字符串是“Hello World. Version 2”。

启动项目,安装插件1和插件2,分别运行插件1和插件2的路由,你会得到不同的结果。这说明AssemblyLoadContext为我们做了很好的隔离,插件1和插件2虽然引用了相同插件的不同版本,但是互相之间完全没有影响。

场景2#

当2个插件使用了相同的第三方库,并加载完成之后,禁用插件1。虽然他们引用的程序集相同,但是你会发现插件2还是能够正常访问,这说明插件1的AssemblyLoadContext的释放,对插件2的AssemblyLoadContext完全没有影响。

总结

本篇我为大家介绍了如何解决插件引用程序集的加载问题,这里我们讲解了两种方式,原始方式和缓存方式。这两种方式的最终效果虽然相同,但是缓存方式的效率明显更高。后续我会根据反馈,继续添加新内容,大家敬请期待。

从零开始实现ASP.NET Core MVC的插件式开发(五) - 插件的删除和升级 - LamondLu - 博客园

mikel阅读(649)

来源: 从零开始实现ASP.NET Core MVC的插件式开发(五) – 插件的删除和升级 – LamondLu – 博客园

系列文章

简介

在上一篇中,我为大家讲解了如何实现插件的安装,在文章的最后,留下了两个待解决的问题。

  • .NET Core 2.2中不能实现运行时删除插件
  • .NET Core 2.2中不能实现运行时升级插件

其实这2个问题归根结底其实都是一个问题,就是插件程序集被占用,不能在运行时更换程序集。在本篇中,我将分享一下我是如何一步一步解决这个问题的,其中也绕了不少弯路,查阅过资料,在.NET Core官方提过Bug,几次差点想放弃了,不过最终是找到一个可行的方案。

.NET Core 2.2的遗留问题

程序集被占用的原因#

回顾一下,我们之前加载插件程序集时所有使用的代码。

	var provider = services.BuildServiceProvider();
    using (var scope = provider.CreateScope())
    {
    	var unitOfWork = scope.ServiceProvider.GetService<IUnitOfWork>();
        var allEnabledPlugins = unitOfWork.PluginRepository
        	.GetAllEnabledPlugins();

		foreach (var plugin in allEnabledPlugins)
        {
        	var moduleName = plugin.Name;
            var assembly = Assembly.LoadFile($"{AppDomain.CurrentDomain.BaseDirectory}Modules\\{moduleName}\\{moduleName}.dll");

			var controllerAssemblyPart = new AssemblyPart(assembly);
            mvcBuilders.PartManager
                    .ApplicationParts
                    .Add(controllerAssemblyPart);
        }
    }

这里我们使用了Assembly.LoadFile方法加载了插件程序集。 在.NET中使用Assembly.LoadFile方法加载的程序集会被自动锁定,不能执行任何转移,删除等造作,所以这就给我们删除和升级插件造成了很大困难。

PS: 升级插件需要覆盖已加载的插件程序集,由于程序集锁定,所以覆盖操作不能成功。

使用AssemblyLoadContext#

在.NET Framework中,如果遇到这个问题,常用的解决方案是使用AppDomain类来实现插件热插拔,但是在.NET Core中没有AppDomain类。不过经过查阅,.NET Core 2.0之后引入了一个AssemblyLoadContext类来替代.NET Freamwork中的AppDomain。本以为使用它就能解决当前程序集占用的问题,结果没想到.NET Core 2.x版本提供的AssemblyLoadContext没有提供Unload方法来释放加载的程序集,只有在.NET Core 3.0版本中才为AssemblyLoadContext类添加了Unload方法。

相关链接:

升级.NET Core 3.0 Preview 8

因此,为了完成插件的删除和升级功能,我将整个项目升级到了最新的.NET Core 3.0 Preview 8版本。

这里.NET Core 2.2升级到.NET Core 3.0有一点需要注意的问题。

在.NET Core 2.2中默认启用了Razor视图的运行时编译,简单点说就是.NET Core 2.2中自动启用了读取原始的Razor视图文件,并编译视图的功能。这就是我们在第三章和第四章中的实现方法,每个插件文件最终都放置在了一个Modules目录中,每个插件既有包含Controller/Action的程序集,又有对应的原始Razor视图目录Views,在.NET Core 2.2中当我们在运行时启用一个组件之后,对应的Views可以自动加载。

The files tree is:
=================

  |__ DynamicPlugins.Core.dll
  |__ DynamicPlugins.Core.pdb
  |__ DynamicPluginsDemoSite.deps.json
  |__ DynamicPluginsDemoSite.dll
  |__ DynamicPluginsDemoSite.pdb
  |__ DynamicPluginsDemoSite.runtimeconfig.dev.json
  |__ DynamicPluginsDemoSite.runtimeconfig.json
  |__ DynamicPluginsDemoSite.Views.dll
  |__ DynamicPluginsDemoSite.Views.pdb
  |__ Modules
    |__ DemoPlugin1
      |__ DemoPlugin1.dll
      |__ Views
        |__ Plugin1
          |__ HelloWorld.cshtml
        |__ _ViewStart.cshtml

但是在.NET Core 3.0中,Razor视图的运行时编译需要引入程序集Microsoft.AspNetCore.Mvc.Razor.RuntimeCompilation。并且在程序启动时,需要启动运行时编译的功能。

public void ConfigureServices(IServiceCollection services)
{
    ...
	var mvcBuilders = services.AddMvc()
        .AddRazorRuntimeCompilation();
    
    ...
}

如果没有启用Razor视图的运行时编译,程序访问插件视图的时候,就会报错,提示视图找不到。

使用.NET Core 3.0的AssemblyLoadContext加载程序集#

这里为了创建一个可回收的程序集加载上下文,我们首先基于AssemblyLoadcontext创建一个CollectibleAssemblyLoadContext类。其中我们将IsCollectible属性通过父类构造函数,将其设置为true。

	public class CollectibleAssemblyLoadContext 
        : AssemblyLoadContext
    {
        public CollectibleAssemblyLoadContext() 
        	: base(isCollectible: true)
        {
        }

        protected override Assembly Load(AssemblyName name)
        {
            return null;
        }
    }

在整个插件加载上下文的设计上,每个插件都使用一个单独的CollectibleAssemblyLoadContext来加载,所有插件的CollectibleAssemblyLoadContext都放在一个PluginsLoadContext对象中。

相关代码: PluginsLoadContexts.cs

	public static class PluginsLoadContexts
    {
        private static Dictionary<string, CollectibleAssemblyLoadContext>
            _pluginContexts = null;

        static PluginsLoadContexts()
        {
            _pluginContexts = new Dictionary<string, CollectibleAssemblyLoadContext>();
        }

        public static bool Any(string pluginName)
        {
            return _pluginContexts.ContainsKey(pluginName);
        }

        public static void RemovePluginContext(string pluginName)
        {
            if (_pluginContexts.ContainsKey(pluginName))
            {
                _pluginContexts[pluginName].Unload();
                _pluginContexts.Remove(pluginName);
            }
        }

        public static CollectibleAssemblyLoadContext GetContext(string pluginName)
        {
            return _pluginContexts[pluginName];
        }

        public static void AddPluginContext(string pluginName, 
             CollectibleAssemblyLoadContext context)
        {
            _pluginContexts.Add(pluginName, context);
        }
    }

代码解释:

  • 当加载插件的时候,我们需要将当前插件的程序集加载上下文放到_pluginContexts字典中。字典的key是插件的名称,字典的value是插件的程序集加载上下文。
  • 当移除一个插件的时候,我们需要使用Unload方法,来释放当前的程序集加载上下文。

在完成以上代码之后,我们更改程序启动和启用组件的代码,因为这两部分都需要将插件程序集加载到CollectibleAssemblyLoadContext中。

Startup.cs

	var provider = services.BuildServiceProvider();
    using (var scope = provider.CreateScope())
    {
        var option = scope.ServiceProvider
        	.GetService<MvcRazorRuntimeCompilationOptions>();


        var unitOfWork = scope.ServiceProvider
        	.GetService<IUnitOfWork>();
        var allEnabledPlugins = unitOfWork.PluginRepository
        	.GetAllEnabledPlugins();

        foreach (var plugin in allEnabledPlugins)
        {
            var context = new CollectibleAssemblyLoadContext();
            var moduleName = plugin.Name;
            var filePath = $"{AppDomain.CurrentDomain.BaseDirectory}Modules\\{moduleName}\\{moduleName}.dll";

            var assembly = context.LoadFromAssemblyPath(filePath);

            var controllerAssemblyPart = new AssemblyPart(assembly);

            mvcBuilders.PartManager.ApplicationParts
                    .Add(controllerAssemblyPart);
            PluginsLoadContexts.AddPluginContext(plugin.Name, context);
        }
    }
    

PluginsController.cs

	public IActionResult Enable(Guid id)
    {
        var module = _pluginManager.GetPlugin(id);
        if (!PluginsLoadContexts.Any(module.Name))
        {
            var context = new CollectibleAssemblyLoadContext();

            _pluginManager.EnablePlugin(id);
            var moduleName = module.Name;

            var filePath = $"{AppDomain.CurrentDomain.BaseDirectory}Modules\\{moduleName}\\{moduleName}.dll";
            
            context.
            
            var assembly = context.LoadFromAssemblyPath(filePath);
            var controllerAssemblyPart = new AssemblyPart(assembly);
            _partManager.ApplicationParts.Add(controllerAssemblyPart);

            MyActionDescriptorChangeProvider.Instance.HasChanged = true;
            MyActionDescriptorChangeProvider.Instance.TokenSource.Cancel();

            PluginsLoadContexts.AddPluginContext(module.Name, context);
        }
        else
        {
            var context = PluginsLoadContexts.GetContext(module.Name);
            var controllerAssemblyPart = new AssemblyPart(context.Assemblies.First());
            _partManager.ApplicationParts.Add(controllerAssemblyPart);
            _pluginManager.EnablePlugin(id);

            MyActionDescriptorChangeProvider.Instance.HasChanged = true;
            MyActionDescriptorChangeProvider.Instance.TokenSource.Cancel();
        }

        return RedirectToAction("Index");
    }

意外结果#

完成以上代码之后,我立刻尝试了删除程序集的操作,但是得到的结果却不是我想要的。

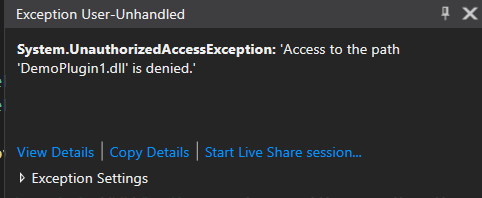
虽然.NET Core 3.0为AssemblyLoadContext提供了Unload方法,但是调用之后, 你依然会得到一个文件被占用的错误

暂时不知道这是不是.NET Core 3.0的bug, 还是功能就是这么设计的,反正感觉这条路是走不通了,折腾了一天,在网上找了好多方案,但是都不能解决这个问题。

就在快放弃的时候,突然发现AssemblyLoadContext类提供了另外一种加载程序集的方式LoadFromStream

改用LoadFromStream加载程序集#

看到LoadFromStream方法之后,我的第一思路就是可以使用FileStream加载插件程序集,然后将获得的文件流传给LoadFromStream方法,并在文件加载完毕之后,释放掉这个FileStream对象。

根据以上思路,我将加载程序集的方法修改如下

PS: Enable方法的修改方式类似,这里我就不重复写了。

	var provider = services.BuildServiceProvider();
    using (var scope = provider.CreateScope())
    {
        var option = scope.ServiceProvider
            .GetService<MvcRazorRuntimeCompilationOptions>();


        var unitOfWork = scope.ServiceProvider.GetService<IUnitOfWork>();
        var allEnabledPlugins = unitOfWork.PluginRepository.GetAllEnabledPlugins();

        foreach (var plugin in allEnabledPlugins)
        {
            var context = new CollectibleAssemblyLoadContext();
            var moduleName = plugin.Name;
            var filePath = $"{AppDomain.CurrentDomain.BaseDirectory}Modules\\{moduleName}\\{moduleName}.dll";

            _presetReferencePaths.Add(filePath);
            using (var fs = new FileStream(filePath, FileMode.Open))
            {
                var assembly = context.LoadFromStream(fs);
                var controllerAssemblyPart = new AssemblyPart(assembly);

                mvcBuilders.PartManager.ApplicationParts.Add(controllerAssemblyPart);
                PluginsLoadContexts.AddPluginContext(plugin.Name, context);
            }
        }
    }

修改之后,我又试了一下删除插件的代码,果然成功删除了。

就在我认为功能已经全部完成之后,我又重新安装了删除的插件,尝试访问插件中的controller/action, 结果得到了意想不到的错误,插件的中包含的页面打不开了。

fail: Microsoft.AspNetCore.Diagnostics.ExceptionHandlerMiddleware[1]
      An unhandled exception has occurred while executing the request.
System.ArgumentException: Empty path name is not legal. (Parameter 'path')
   at System.IO.FileStream..ctor(String path, FileMode mode, FileAccess access, FileShare share, Int32 bufferSize, FileOptions options)
   at Microsoft.AspNetCore.Mvc.Razor.RuntimeCompilation.RazorReferenceManager.CreateMetadataReference(String path)
   at System.Linq.Enumerable.SelectListIterator`2.ToList()
   at System.Linq.Enumerable.ToList[TSource](IEnumerable`1 source)
   at Microsoft.AspNetCore.Mvc.Razor.RuntimeCompilation.RazorReferenceManager.GetCompilationReferences()
   at System.Threading.LazyInitializer.EnsureInitializedCore[T](T& target, Boolean& initialized, Object& syncLock, Func`1 valueFactory)
   at System.Threading.LazyInitializer.EnsureInitialized[T](T& target, Boolean& initialized, Object& syncLock, Func`1 valueFactory)
   at Microsoft.AspNetCore.Mvc.Razor.RuntimeCompilation.RazorReferenceManager.get_CompilationReferences()
   at Microsoft.AspNetCore.Mvc.Razor.RuntimeCompilation.LazyMetadataReferenceFeature.get_References()
   at Microsoft.CodeAnalysis.Razor.CompilationTagHelperFeature.GetDescriptors()
   at Microsoft.AspNetCore.Razor.Language.DefaultRazorTagHelperBinderPhase.ExecuteCore(RazorCodeDocument codeDocument)
   at Microsoft.AspNetCore.Razor.Language.RazorEnginePhaseBase.Execute(RazorCodeDocument codeDocument)
   at Microsoft.AspNetCore.Razor.Language.DefaultRazorEngine.Process(RazorCodeDocument document)
   at Microsoft.AspNetCore.Razor.Language.DefaultRazorProjectEngine.ProcessCore(RazorCodeDocument codeDocument)
   at Microsoft.AspNetCore.Razor.Language.RazorProjectEngine.Process(RazorProjectItem projectItem)
   at Microsoft.AspNetCore.Mvc.Razor.RuntimeCompilation.RuntimeViewCompiler.CompileAndEmit(String relativePath)
   at Microsoft.AspNetCore.Mvc.Razor.RuntimeCompilation.RuntimeViewCompiler.OnCacheMiss(String normalizedPath)
--- End of stack trace from previous location where exception was thrown ---
   at Microsoft.AspNetCore.Mvc.Razor.Compilation.DefaultRazorPageFactoryProvider.CreateFactory(String relativePath)
   at Microsoft.AspNetCore.Mvc.Razor.RazorViewEngine.CreateCacheResult(HashSet`1 expirationTokens, String relativePath, Boolean isMainPage)
   at Microsoft.AspNetCore.Mvc.Razor.RazorViewEngine.OnCacheMiss(ViewLocationExpanderContext expanderContext, ViewLocationCacheKey cacheKey)
   at Microsoft.AspNetCore.Mvc.Razor.RazorViewEngine.LocatePageFromViewLocations(ActionContext actionContext, String pageName, Boolean isMainPage)
   at Microsoft.AspNetCore.Mvc.Razor.RazorViewEngine.FindView(ActionContext context, String viewName, Boolean isMainPage)
   at Microsoft.AspNetCore.Mvc.ViewEngines.CompositeViewEngine.FindView(ActionContext context, String viewName, Boolean isMainPage)
   at Microsoft.AspNetCore.Mvc.ViewFeatures.ViewResultExecutor.FindView(ActionContext actionContext, ViewResult viewResult)
   at Microsoft.AspNetCore.Mvc.ViewFeatures.ViewResultExecutor.ExecuteAsync(ActionContext context, ViewResult result)
   at Microsoft.AspNetCore.Mvc.ViewResult.ExecuteResultAsync(ActionContext context)
   at Microsoft.AspNetCore.Mvc.Infrastructure.ResourceInvoker.<InvokeNextResultFilterAsync>g__Awaited|29_0[TFilter,TFilterAsync](ResourceInvoker invoker, Task lastTask, State next, Scope scope, Object state, Boolean isCompleted)
   at Microsoft.AspNetCore.Mvc.Infrastructure.ResourceInvoker.Rethrow(ResultExecutedContextSealed context)
   at Microsoft.AspNetCore.Mvc.Infrastructure.ResourceInvoker.ResultNext[TFilter,TFilterAsync](State& next, Scope& scope, Object& state, Boolean& isCompleted)
   at Microsoft.AspNetCore.Mvc.Infrastructure.ResourceInvoker.InvokeResultFilters()
--- End of stack trace from previous location where exception was thrown ---
   at Microsoft.AspNetCore.Mvc.Infrastructure.ResourceInvoker.<InvokeNextResourceFilter>g__Awaited|24_0(ResourceInvoker invoker, Task lastTask, State next, Scope scope, Object state, Boolean isCompleted)
   at Microsoft.AspNetCore.Mvc.Infrastructure.ResourceInvoker.Rethrow(ResourceExecutedContextSealed context)
   at Microsoft.AspNetCore.Mvc.Infrastructure.ResourceInvoker.Next(State& next, Scope& scope, Object& state, Boolean& isCompleted)
   at Microsoft.AspNetCore.Mvc.Infrastructure.ResourceInvoker.InvokeFilterPipelineAsync()
--- End of stack trace from previous location where exception was thrown ---
   at Microsoft.AspNetCore.Mvc.Infrastructure.ResourceInvoker.<InvokeAsync>g__Awaited|17_0(ResourceInvoker invoker, Task task, IDisposable scope)
   at Microsoft.AspNetCore.Routing.EndpointMiddleware.<Invoke>g__AwaitRequestTask|6_0(Endpoint endpoint, Task requestTask, ILogger logger)
   at Microsoft.AspNetCore.Routing.EndpointRoutingMiddleware.SetRoutingAndContinue(HttpContext httpContext)
   at Microsoft.AspNetCore.Diagnostics.ExceptionHandlerMiddleware.<Invoke>g__Awaited|6_0(ExceptionHandlerMiddleware middleware, HttpContext context, Task task)

这个文件路径非法的错误让我感觉很奇怪,为什么会有这种问题呢?与之前的代码的不同之处只有一个地方,就是从LoadFromAssemblyPath改为了LoadFromStream

为了弄清这个问题,我clone了最新的.NET Core 3.0 Preview 8源代码,发现了在 .NET Core运行时编译视图的时候,会调用如下方法。

RazorReferenceManager.cs

    internal IEnumerable<string> GetReferencePaths()
    {
        var referencePaths = new List<string>();

        foreach (var part in _partManager.ApplicationParts)
        {
            if (part is ICompilationReferencesProvider compilationReferenceProvider)
            {
                referencePaths.AddRange(compilationReferenceProvider.GetReferencePaths());
            }
            else if (part is AssemblyPart assemblyPart)
            {
                referencePaths.AddRange(assemblyPart.GetReferencePaths());
            }
        }

        referencePaths.AddRange(_options.AdditionalReferencePaths);

        return referencePaths;
    }

这段代码意思是根据当前加载程序集的所在位置,来发现对应视图。

那么问题就显而易见了,我们之前用LoadFromAssemblyPath加载程序集,程序集的文件位置被自动记录下来,但是我们改用LoadFromStream之后,所需的文件位置信息丢失了,是一个空字符串,所以.NET Core在尝试加载视图的时候,遇到空字符串,抛出了一个非法路径的错误。

其实这里的方法很好改,只需要将空字符串的路径排除掉即可。

	internal IEnumerable<string> GetReferencePaths()
    {
        var referencePaths = new List<string>();

        foreach (var part in _partManager.ApplicationParts)
        {
            if (part is ICompilationReferencesProvider compilationReferenceProvider)
            {
                referencePaths.AddRange(compilationReferenceProvider.GetReferencePaths());
            }
            else if (part is AssemblyPart assemblyPart)
            {
                referencePaths.AddRange(assemblyPart.GetReferencePaths().Where(o => !string.IsNullOrEmpty(o));
            }
        }

        referencePaths.AddRange(_options.AdditionalReferencePaths);

        return referencePaths;
    }

但是由于不清楚会不会导致其他问题,所以我没有采取这种方法,我将这个问题作为一个Bug提交到了官方。

问题地址: https://github.com/aspnet/AspNetCore/issues/13312

没想到仅仅8小时,就得到官方的解决方案。

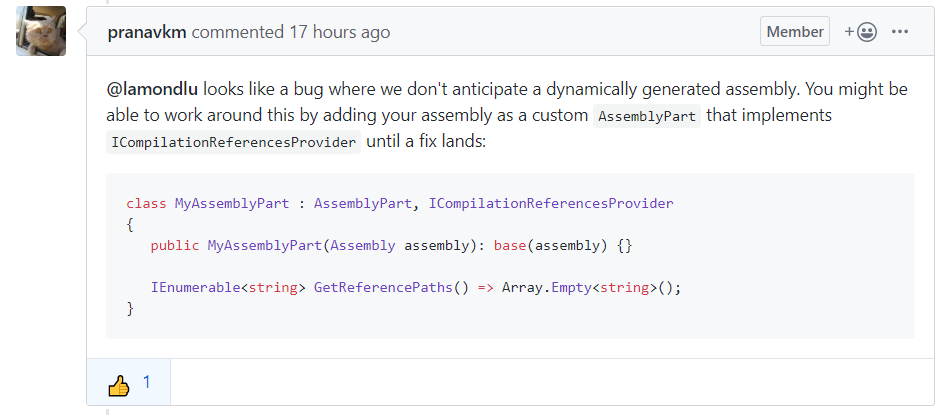
这段意思是说ASP.NET Core暂时不支持动态加载程序集,如果要在当前版本实现功能,需要自己实现一个AssemblyPart类, 在获取程序集路径的时候,返回空集合而不是空字符串。

PS: 官方已经将这个问题放到了.NET 5 Preview 1中,相信.NET 5中会得到真正的解决。

根据官方的方案,Startup.cs文件的最终版本

	public class MyAssemblyPart : AssemblyPart, ICompilationReferencesProvider
    {
        public MyAssemblyPart(Assembly assembly) : base(assembly) { }

        public IEnumerable<string> GetReferencePaths() => Array.Empty<string>();
    }

    public static class AdditionalReferencePathHolder
    {
        public static IList<string> AdditionalReferencePaths = new List<string>();
    }

    public class Startup
    {
        public IList<string> _presets = new List<string>();

        public Startup(IConfiguration configuration)
        {
            Configuration = configuration;
        }

        public IConfiguration Configuration { get; }

        // This method gets called by the runtime. Use this method to add services to the container.
        public void ConfigureServices(IServiceCollection services)
        {
            services.AddOptions();

            services.Configure<ConnectionStringSetting>(Configuration.GetSection("ConnectionStringSetting"));

            services.AddScoped<IPluginManager, PluginManager>();
            services.AddScoped<IUnitOfWork, UnitOfWork>();

            var mvcBuilders = services.AddMvc()
                .AddRazorRuntimeCompilation(o =>
                {
                    foreach (var item in _presets)
                    {
                        o.AdditionalReferencePaths.Add(item);
                    }

                    AdditionalReferencePathHolder.AdditionalReferencePaths = o.AdditionalReferencePaths;
                });

            services.Configure<RazorViewEngineOptions>(o =>
            {
                o.AreaViewLocationFormats.Add("/Modules/{2}/Views/{1}/{0}" + RazorViewEngine.ViewExtension);
                o.AreaViewLocationFormats.Add("/Views/Shared/{0}.cshtml");
            });

            services.AddSingleton<IActionDescriptorChangeProvider>(MyActionDescriptorChangeProvider.Instance);
            services.AddSingleton(MyActionDescriptorChangeProvider.Instance);

            var provider = services.BuildServiceProvider();
            using (var scope = provider.CreateScope())
            {
                var option = scope.ServiceProvider.GetService<MvcRazorRuntimeCompilationOptions>();


                var unitOfWork = scope.ServiceProvider.GetService<IUnitOfWork>();
                var allEnabledPlugins = unitOfWork.PluginRepository.GetAllEnabledPlugins();

                foreach (var plugin in allEnabledPlugins)
                {
                    var context = new CollectibleAssemblyLoadContext();
                    var moduleName = plugin.Name;
                    var filePath = $"{AppDomain.CurrentDomain.BaseDirectory}Modules\\{moduleName}\\{moduleName}.dll";

                    _presets.Add(filePath);
                    using (var fs = new FileStream(filePath, FileMode.Open))
                    {
                        var assembly = context.LoadFromStream(fs);

                        var controllerAssemblyPart = new MyAssemblyPart(assembly);

                        mvcBuilders.PartManager.ApplicationParts.Add(controllerAssemblyPart);
                        PluginsLoadContexts.AddPluginContext(plugin.Name, context);
                    }
                }
            }
        }

        public void Configure(IApplicationBuilder app, IWebHostEnvironment env)
        {
            if (env.IsDevelopment())
            {
                app.UseDeveloperExceptionPage();
            }
            else
            {
                app.UseExceptionHandler("/Home/Error");
            }

            app.UseStaticFiles();

            app.UseRouting();
            app.UseEndpoints(routes =>
            {
                routes.MapControllerRoute(
                    name: "Customer",
                    pattern: "{controller=Home}/{action=Index}/{id?}");

                routes.MapControllerRoute(
                    name: "Customer",
                    pattern: "Modules/{area}/{controller=Home}/{action=Index}/{id?}");
            });

        }
    }

插件删除和升级的代码

解决了程序集占用问题之后,我们就可以开始编写删除/升级插件的代码了。

删除插件#

如果要删除一个插件,我们需要完成以下几个步骤

  • 删除组件记录
  • 删除组件迁移的表结构
  • 移除加载过的ApplicationPart
  • 刷新Controller/Action
  • 移除组件对应的程序集加载上下文
  • 删除组件文件

根据这个步骤,我编写了一个Delete方法,代码如下:

	    public IActionResult Delete(Guid id)
        {
            var module = _pluginManager.GetPlugin(id);
            _pluginManager.DisablePlugin(id);
            _pluginManager.DeletePlugin(id);
            var moduleName = module.Name;

            var matchedItem = _partManager.ApplicationParts.FirstOrDefault(p => 
                                                   p.Name == moduleName);

            if (matchedItem != null)
            {
                _partManager.ApplicationParts.Remove(matchedItem);
                matchedItem = null;
            }

            MyActionDescriptorChangeProvider.Instance.HasChanged = true;
            MyActionDescriptorChangeProvider.Instance.TokenSource.Cancel();

            PluginsLoadContexts.RemovePluginContext(module.Name);

            var directory = new DirectoryInfo($"{AppDomain.CurrentDomain.BaseDirectory}Modules/{module.Name}");
            directory.Delete(true);

            return RedirectToAction("Index");
        }
        

升级插件#

对于升级插件的代码,我将它和新增插件的代码放在了一起

	public void AddPlugins(PluginPackage pluginPackage)
    {
        var existedPlugin = _unitOfWork.PluginRepository.GetPlugin(pluginPackage.Configuration.Name);

        if (existedPlugin == null)
        {
            InitializePlugin(pluginPackage);
        }
        else if (new DomainModel.Version(pluginPackage.Configuration.Version) > new DomainModel.Version(existedPlugin.Version))
        {
            UpgradePlugin(pluginPackage, existedPlugin);
        }
        else
        {
            DegradePlugin(pluginPackage);
        }
    }

    private void InitializePlugin(PluginPackage pluginPackage)
    {
        var plugin = new DTOs.AddPluginDTO
        {
            Name = pluginPackage.Configuration.Name,
            DisplayName = pluginPackage.Configuration.DisplayName,
            PluginId = Guid.NewGuid(),
            UniqueKey = pluginPackage.Configuration.UniqueKey,
            Version = pluginPackage.Configuration.Version
        };

        _unitOfWork.PluginRepository.AddPlugin(plugin);
        _unitOfWork.Commit();

        var versions = pluginPackage.GetAllMigrations(_connectionString);

        foreach (var version in versions)
        {
            version.MigrationUp(plugin.PluginId);
        }

        pluginPackage.SetupFolder();
    }

    public void UpgradePlugin(PluginPackage pluginPackage, PluginViewModel oldPlugin)
    {
        _unitOfWork.PluginRepository.UpdatePluginVersion(oldPlugin.PluginId, 
                    pluginPackage.Configuration.Version);
        _unitOfWork.Commit();

        var migrations = pluginPackage.GetAllMigrations(_connectionString);

        var pendingMigrations = migrations.Where(p => p.Version > oldPlugin.Version);

        foreach (var migration in pendingMigrations)
        {
            migration.MigrationUp(oldPlugin.PluginId);
        }

        pluginPackage.SetupFolder();
    }

    public void DegradePlugin(PluginPackage pluginPackage)
    {
        throw new NotImplementedException();
    }

代码解释:

  • 这里我首先判断了当前插件包和已安装版本的版本差异
    • 如果系统没有安装过当前插件,就安装插件
    • 如果当前插件包的版本比已安装的版本高,就升级插件
    • 如果当前插件包的版本比已安装的版本低,就降级插件(现实中这种情况不多)
  • InitializePlugin是用来加载新组件的,它的内容就是之前的新增插件方法
  • UpgradePlugin是用来升级组件的,当我们升级一个组件的时候,我们需要做一下几个事情
    • 升级组件版本
    • 做最新版本组件的脚本迁移
    • 使用最新程序包覆盖老程序包
  • DegradePlugin是用来降级组件的,由于篇幅问题,我就不详细写了,大家可以自行填补。

最终效果

总结

本篇中,我为大家演示如果使用.NET Core 3.0的AssemblyLoadContext来解决已加载程序集占用的问题,以此实现了插件的升级和降级。本篇的研究时间较长,因为中间出现的问题确实太多了,没有什么可以复用的方案,我也不知道是不是第一个在.NET Core中这么尝试的。不过结果还算好,想实现的功能最终还是做出来了。后续呢,这个项目会继续添加新的功能,希望大家多多支持。

项目地址:https://github.com/lamondlu/Mystique

从零开始实现ASP.NET Core MVC的插件式开发(四) - 插件安装 - LamondLu - 博客园

mikel阅读(533)

来源: 从零开始实现ASP.NET Core MVC的插件式开发(四) – 插件安装 – LamondLu – 博客园

系列文章

上一篇中,我们针对运行时启用/禁用组件做了一些尝试,最终我们发现借助IActionDescriptorChangeProvider可以帮助我们实现所需的功能。本篇呢,我们就来继续研究如何完成插件的安装,毕竟之前的组件都是我们预先放到主程序中的,这样并不是一种很好的安装插件方式。

准备阶段

创建数据库#

为了完成插件的安装,我们首先需要为主程序创建一个数据库,来保存插件信息。 这里为了简化逻辑,我只创建了2个表,Plugins表是用来记录插件信息的,PluginMigrations表是用来记录插件每个版本的升级和降级脚本的。

设计说明:这里我的设计是将所有插件使用的数据库表结构都安装在主程序的数据库中,暂时不考虑不同插件的数据库表结构冲突,也不考虑插件升降级脚本的破坏性操作检查,所以有类似问题的小伙伴可以先假设插件之间的表结构没有冲突,插件迁移脚本中也不会包含破坏主程序所需系统表的问题。

备注:数据库脚本可查看源代码的DynamicPlugins.Database项目

创建一个安装包#

为了模拟安装的效果,我决定将插件做成插件压缩包,所以需要将之前的DemoPlugin1项目编译后的文件以及一个plugin.json文件打包。安装包的内容如下:

这里暂时使用手动的方式来实现,后面我会创建一个Global Tools来完成这个操作。

在plugin.json文件中记录当前插件的一些元信息,例如插件名称,版本等。

{
    "name": "DemoPlugin1",
    "uniqueKey": "DemoPlugin1",
    "displayName":"Lamond Test Plugin1",
    "version": "1.0.0"
}

编码阶段

在创建完插件安装包,并完成数据库准备操作之后,我们就可以开始编码了。

抽象插件逻辑#

为了项目扩展,我们需要针对当前业务进行一些抽象和建模。

创建插件接口和插件基类#

首先我们需要将插件的概念抽象出来,所以这里我们首先定义一个插件接口IModule以及一个通用的插件基类ModuleBase

IModule.cs

	public interface IModule
    {
        string Name { get; }

        DomainModel.Version Version { get; }
    }

IModule接口中我们定义了当前插件的名称和插件的版本号。

ModuleBase.cs

	public class ModuleBase : IModule
    {
        public ModuleBase(string name)
        {
            Name = name;
            Version = "1.0.0";
        }

        public ModuleBase(string name, string version)
        {
            Name = name;
            Version = version;
        }

        public ModuleBase(string name, Version version)
        {
            Name = name;
            Version = version;
        }

        public string Name
        {
            get;
            private set;
        }

        public Version Version
        {
            get;
            private set;
        }
    }

ModuleBase类实现了IModule接口,并进行了一些初始化的操作。后续的插件类都需要继承ModuleBase类。

解析插件配置#

为了完成插件包的解析,这里我创建了一个PluginPackage类,其中封装了插件包的相关操作。

	public class PluginPackage
    {
        private PluginConfiguration _pluginConfiguration = null;
        private Stream _zipStream = null;

        private string _folderName = string.Empty;

        public PluginConfiguration Configuration
        {
            get
            {
                return _pluginConfiguration;
            }
        }

        public PluginPackage(Stream stream)
        {
            _zipStream = stream;
            Initialize(stream);
        }

        public List<IMigration> GetAllMigrations(string connectionString)
        {
            var assembly = Assembly.LoadFile($"{_folderName}/{_pluginConfiguration.Name}.dll");

            var dbHelper = new DbHelper(connectionString);

            var migrationTypes = assembly.ExportedTypes.Where(p => p.GetInterfaces().Contains(typeof(IMigration)));

            List<IMigration> migrations = new List<IMigration>();
            foreach (var migrationType in migrationTypes)
            {
                var constructor = migrationType.GetConstructors().First(p => p.GetParameters().Count() == 1 && p.GetParameters()[0].ParameterType == typeof(DbHelper));

                migrations.Add((IMigration)constructor.Invoke(new object[] { dbHelper }));
            }

            assembly = null;

            return migrations.OrderBy(p => p.Version).ToList();
        }

        public void Initialize(Stream stream)
        {
            var tempFolderName = $"{ AppDomain.CurrentDomain.BaseDirectory }{ Guid.NewGuid().ToString()}";
            ZipTool archive = new ZipTool(stream, ZipArchiveMode.Read);

            archive.ExtractToDirectory(tempFolderName);

            var folder = new DirectoryInfo(tempFolderName);

            var files = folder.GetFiles();

            var configFiles = files.Where(p => p.Name == "plugin.json");

            if (!configFiles.Any())
            {
                throw new Exception("The plugin is missing the configuration file.");
            }
            else
            {
                using (var s = configFiles.First().OpenRead())
                {
                    LoadConfiguration(s);
                }
            }

            folder.Delete(true);

            _folderName = $"{AppDomain.CurrentDomain.BaseDirectory}Modules\\{_pluginConfiguration.Name}";

            if (Directory.Exists(_folderName))
            {
                throw new Exception("The plugin has been existed.");
            }

            stream.Position = 0;
            archive.ExtractToDirectory(_folderName);
        }

        private void LoadConfiguration(Stream stream)
        {
            using (var sr = new StreamReader(stream))
            {
                var content = sr.ReadToEnd();
                _pluginConfiguration = JsonConvert.DeserializeObject<PluginConfiguration>(content);

                if (_pluginConfiguration == null)
                {
                    throw new Exception("The configuration file is wrong format.");
                }
            }
        }
    }

代码解释:

  • 这里在Initialize方法中我使用了ZipTool类来进行解压缩,解压缩之后,程序会尝试读取临时解压目录中的plugin.json文件,如果文件不存在,就会报出异常。
  • 如果主程序中没有当前插件,就会解压到定义好的插件目录中。(这里暂时不考虑插件升级,下一篇中会做进一步说明)
  • GetAllMigrations方法的作用是从程序集中加载当前插件所有的迁移脚本。

新增脚本迁移功能#

为了让插件在安装时,自动实现数据库表的创建,这里我还添加了一个脚本迁移机制,这个机制类似于EF的脚本迁移,以及之前分享过的FluentMigrator迁移。

这里我们定义了一个迁移接口IMigration, 并在其中定义了2个接口方法MigrationUpMigrationDown来完成插件升级和降级的功能。

	public interface IMigration
    {
        DomainModel.Version Version { get; }

        void MigrationUp(Guid pluginId);

        void MigrationDown(Guid pluginId);
    }	

然后我们实现了一个迁移脚本基类BaseMigration

	public abstract class BaseMigration : IMigration
    {
        private Version _version = null;
        private DbHelper _dbHelper = null;

        public BaseMigration(DbHelper dbHelper, Version version)
        {
            this._version = version;
            this._dbHelper = dbHelper;
        }

        public Version Version
        {
            get
            {
                return _version;
            }
        }

        protected void SQL(string sql)
        {
            _dbHelper.ExecuteNonQuery(sql);
        }

        public abstract void MigrationDown(Guid pluginId);

        public abstract void MigrationUp(Guid pluginId);

        protected void RemoveMigrationScripts(Guid pluginId)
        {
            var sql = "DELETE PluginMigrations WHERE PluginId = @pluginId AND Version = @version";

            _dbHelper.ExecuteNonQuery(sql, new List<SqlParameter>
            {
                new SqlParameter{ ParameterName = "@pluginId", SqlDbType = SqlDbType.UniqueIdentifier, Value = pluginId },
                new SqlParameter{ ParameterName = "@version", SqlDbType = SqlDbType.NVarChar, Value = _version.VersionNumber }
            }.ToArray());
        }

        protected void WriteMigrationScripts(Guid pluginId, string up, string down)
        {
            var sql = "INSERT INTO PluginMigrations(PluginMigrationId, PluginId, Version, Up, Down) VALUES(@pluginMigrationId, @pluginId, @version, @up, @down)";

            _dbHelper.ExecuteNonQuery(sql, new List<SqlParameter>
            {
                new SqlParameter{ ParameterName = "@pluginMigrationId", SqlDbType = SqlDbType.UniqueIdentifier, Value = Guid.NewGuid() },
                new SqlParameter{ ParameterName = "@pluginId", SqlDbType = SqlDbType.UniqueIdentifier, Value = pluginId },
                new SqlParameter{ ParameterName = "@version", SqlDbType = SqlDbType.NVarChar, Value = _version.VersionNumber },
                new SqlParameter{ ParameterName = "@up", SqlDbType = SqlDbType.NVarChar, Value = up},
                new SqlParameter{ ParameterName = "@down", SqlDbType = SqlDbType.NVarChar, Value = down}
            }.ToArray());
        }
    }

代码解释

  • 这里的WriteMigrationScriptsRemoveMigrationScripts的作用是用来将插件升级和降级的迁移脚本的保存到数据库中。因为我并不想每一次都通过加载程序集的方式读取迁移脚本,所以这里在安装插件时,我会将每个插件版本的迁移脚本导入到数据库中。
  • SQL方法是用来运行迁移脚本的,这里为了简化代码,缺少了事务处理,有兴趣的同学可以自行添加。

为之前的脚本添加迁移程序#

这里我们假设安装DemoPlugin1插件1.0.0版本之后,需要在主程序的数据库中添加一个名为Test的表。

根据以上需求,我添加了一个初始的脚本迁移类Migration.1.0.0.cs, 它继承了BaseMigration类。

	public class Migration_1_0_0 : BaseMigration
    {
        private static DynamicPlugins.Core.DomainModel.Version _version = new DynamicPlugins.Core.DomainModel.Version("1.0.0");
        private static string _upScripts = @"CREATE TABLE [dbo].[Test](
                        TestId[uniqueidentifier] NOT NULL,
                    );";
        private static string _downScripts = @"DROP TABLE [dbo].[Test]";

        public Migration_1_0_0(DbHelper dbHelper) : base(dbHelper, _version)
        {

        }

        public DynamicPlugins.Core.DomainModel.Version Version
        {
            get
            {
                return _version;
            }
        }

        public override void MigrationDown(Guid pluginId)
        {
            SQL(_downScripts);

            base.RemoveMigrationScripts(pluginId);
        }

        public override void MigrationUp(Guid pluginId)
        {
            SQL(_upScripts);

            base.WriteMigrationScripts(pluginId, _upScripts, _downScripts);
        }
    }

代码解释

  • 这里我们通过实现MigrationUpMigrationDown方法来完成新表的创建和删除,当然本文只实现了插件的安装,并不涉及删除或降级,这部分代码在后续文章中会被使用。
  • 这里注意在运行升级脚本之后,会将当前插件版本的升降级脚本通过base.WriteMigrationScripts方法保存到数据库。

添加安装插件包的业务处理类#

为了完成插件包的安装逻辑,这里我创建了一个PluginManager类, 其中AddPlugins方法使用来进行插件安装的。

    public void AddPlugins(PluginPackage pluginPackage)
    {
        var plugin = new DTOs.AddPluginDTO
        {
            Name = pluginPackage.Configuration.Name,
            DisplayName = pluginPackage.Configuration.DisplayName,
            PluginId = Guid.NewGuid(),
            UniqueKey = pluginPackage.Configuration.UniqueKey,
            Version = pluginPackage.Configuration.Version
        };

        _unitOfWork.PluginRepository.AddPlugin(plugin);
        _unitOfWork.Commit();

        var versions = pluginPackage.GetAllMigrations(_connectionString);

        foreach (var version in versions)
        {
            version.MigrationUp(plugin.PluginId);
        }
    }

代码解释

  • 方法签名中的pluginPackage即包含了插件包的所有信息
  • 这里我们首先将插件的信息,通过工作单元保存到了数据库
  • 保存成功之后,我通过pluginPackage对象,获取了当前插件包中所包含的所有迁移脚本,并依次运行这些脚本来完成数据库的迁移。

在主站点中添加插件管理界面#

这里为了管理插件,我在主站点中创建了2个新页面,插件列表页以及添加新插件页面。这2个页面的功能非常的简单,这里我就不进一步介绍了,大部分的处理都是复用了之前的代码,例如插件的安装,启用和禁用,相关的代码大家可以自行查看。


设置已安装插件默认启动#

在完成2个插件管理页面之后,最后一步,我们还需要做的就是在注程序启动阶段,将已安装的插件加载到运行时,并启用。

    public void ConfigureServices(IServiceCollection services)
    {
        ...

        var provider = services.BuildServiceProvider();
        using (var scope = provider.CreateScope())
        {
            var unitOfWork = scope.ServiceProvider.GetService<IUnitOfWork>();
            var allEnabledPlugins = unitOfWork.PluginRepository.GetAllEnabledPlugins();

            foreach (var plugin in allEnabledPlugins)
            {
                var moduleName = plugin.Name;
                var assembly = Assembly.LoadFile($"{AppDomain.CurrentDomain.BaseDirectory}Modules\\{moduleName}\\{moduleName}.dll");

                var controllerAssemblyPart = new AssemblyPart(assembly);
                mvcBuilders.PartManager.ApplicationParts.Add(controllerAssemblyPart);
            }
        }   
    }

设置完成之后,整个插件的安装编码就告一段落了。

最终效果

总结以及待解决的问题

本篇中,我给大家分享了如果将打包的插件安装到系统中,并完成对应的脚本迁移。不过在本篇中,我们只完成了插件的安装,针对插件的删除,以及插件的升降级我们还未解决,有兴趣的同学,可以自行尝试一下,你会发现在.NET Core 2.2版本,我们没有任何在运行时Unload程序集能力,所以在从下一篇开始,我将把当前项目的开发环境升级到.NET Core 3.0 Preview, 针对插件的删除和升降级我将在.NET Core 3.0中给大家演示。

从零开始实现ASP.NET Core MVC的插件式开发(三) - 如何在运行时启用组件 - LamondLu - 博客园

mikel阅读(595)

来源: 从零开始实现ASP.NET Core MVC的插件式开发(三) – 如何在运行时启用组件 – LamondLu – 博客园

前情回顾

在前面两篇中,我为大家演示了如何使用Application Part动态加载控制器和视图,以及如何创建插件模板来简化操作。
在上一篇写完之后,我突然想到了一个问题,如果像前两篇所设计那个来构建一个插件式系统,会有一个很严重的问题,即

当你添加一个插件之后,整个程序不能立刻启用该插件,只有当重启整个ASP.NET Core应用之后,才能正确的加载插件。因为所有插件的加载都是在程序启动时ConfigureService方法中配置的。

这种方式的插件系统会很难用,我们期望的效果是在运行时动态启用和禁用插件,那么有没有什么解决方案呢?答案是肯定的。下面呢,我将一步一步说明一下自己的思路、编码中遇到的问题,以及这些问题的解决方案。

为了完成这个功能,我走了许多弯路,当前这个方案可能不是最好的,但是确实是一个可行的方案,如果大家有更好的方案,我们可以一起讨论一下。

在Action中激活组件

当遇到这个问题的时候,我的第一思路就是将ApplicationPartManager加载插件库的代码移动到某个Action中。于是我就在主站点中创建了一个PluginsController, 并在启用添加了一个名为Enable的Action方法。

public class PluginsController : Controller
{
	public IActionResult Enable()
	{
    	var assembly = Assembly.LoadFile(AppDomain.CurrentDomain.BaseDirectory + "DemoPlugin1\\DemoPlugin1.dll");
    	var viewAssembly = Assembly.LoadFile(AppDomain.CurrentDomain.BaseDirectory + "DemoPlugin1\\DemoPlugin1.Views.dll");
     	var viewAssemblyPart = new CompiledRazorAssemblyPart(viewAssembly);

    	var controllerAssemblyPart = new AssemblyPart(assembly);
    	_partManager.ApplicationParts.Add(controllerAssemblyPart);
    	_partManager.ApplicationParts.Add(viewAssemblyPart);

    	return Content("Enabled");
    }
}

修改代码之后,运行程序,这里我们首先调用/Plugins/Enable来尝试激活组件,激活之后,我们再次调用/Plugin1/HelloWorld

这里会发现程序返回了404, 即控制器和视图没有正确的激活。

这里你可能有疑问,为什么会激活失败呢?

这里的原因是,只有当ASP.NET Core应用启动时,才会去ApplicationPart管理器中加载控制器与视图的程序集,所以虽然新的控制器程序集在运行时被添加到了ApplicationPart管理器中,但是ASP.NET Core不会自动进行更新操作,所以这里我们需要寻找一种方式能够让ASP.NET Core重新加载控制器的方法。

通过查询各种资料,我最终找到了一个切入点,在ASP.NET Core 2.2中有一个类是ActionDescriptorCollectionProvider,它的子类DefaultActionDescriptorCollectionProvider是用来配置Controller和Action的。

源代码:

    internal class DefaultActionDescriptorCollectionProvider : ActionDescriptorCollectionProvider
    {
        private readonly IActionDescriptorProvider[] _actionDescriptorProviders;
        private readonly IActionDescriptorChangeProvider[] _actionDescriptorChangeProviders;
        private readonly object _lock;
        private ActionDescriptorCollection _collection;
        private IChangeToken _changeToken;
        private CancellationTokenSource _cancellationTokenSource;
        private int _version = 0;

        public DefaultActionDescriptorCollectionProvider(
            IEnumerable<IActionDescriptorProvider> actionDescriptorProviders,
            IEnumerable<IActionDescriptorChangeProvider> actionDescriptorChangeProviders)
        {
            ...
            ChangeToken.OnChange(
                GetCompositeChangeToken,
                UpdateCollection);
        }
       
        public override ActionDescriptorCollection ActionDescriptors
        {
            get
            {
                Initialize();

                return _collection;
            }
        }

        ...

        private IChangeToken GetCompositeChangeToken()
        {
            if (_actionDescriptorChangeProviders.Length == 1)
            {
                return _actionDescriptorChangeProviders[0].GetChangeToken();
            }

            var changeTokens = new IChangeToken[_actionDescriptorChangeProviders.Length];
            for (var i = 0; i < _actionDescriptorChangeProviders.Length; i++)
            {
                changeTokens[i] = _actionDescriptorChangeProviders[i].GetChangeToken();
            }

            return new CompositeChangeToken(changeTokens);
        }

        ...

        private void UpdateCollection()
        {
            lock (_lock)
            {
                var context = new ActionDescriptorProviderContext();

                for (var i = 0; i < _actionDescriptorProviders.Length; i++)
                {
                    _actionDescriptorProviders[i].OnProvidersExecuting(context);
                }

                for (var i = _actionDescriptorProviders.Length - 1; i >= 0; i--)
                {
                    _actionDescriptorProviders[i].OnProvidersExecuted(context);
                }
                
                var oldCancellationTokenSource = _cancellationTokenSource;
           
                _collection = new ActionDescriptorCollection(
                    new ReadOnlyCollection<ActionDescriptor>(context.Results),
                    _version++);

                _cancellationTokenSource = new CancellationTokenSource();
                _changeToken = new CancellationChangeToken(_cancellationTokenSource.Token);

                oldCancellationTokenSource?.Cancel();
            }
        }
    }
  • 这里ActionDescriptors属性中记录了当ASP.NET Core程序启动后,匹配到的所有Controller/Action集合。
  • UpdateCollection方法使用来更新ActionDescriptors集合的。
  • 在构造函数中设计了一个触发器,ChangeToken.OnChange(GetCompositeChangeToken,UpdateCollection)。这里程序会监听一个Token对象,当这个Token对象发生变化时,就自动触发UpdateCollection方法。
  • 这里Token是由一组IActionDescriptorChangeProvider接口对象组合而成的。

所以这里我们就可以通过自定义一个IActionDescriptorChangeProvider接口对象,并在组件激活方法Enable中修改这个接口Token的方式,使DefaultActionDescriptorCollectionProvider中的CompositeChangeToken发生变化,从而实现控制器的重新装载。

使用IActionDescriptorChangeProvider在运行时激活控制器

这里我们首先创建一个MyActionDescriptorChangeProvider类,并让它实现IActionDescriptorChangeProvider接口

	public class MyActionDescriptorChangeProvider : IActionDescriptorChangeProvider
    {
        public static MyActionDescriptorChangeProvider Instance { get; } = new MyActionDescriptorChangeProvider();

        public CancellationTokenSource TokenSource { get; private set; }

        public bool HasChanged { get; set; }

        public IChangeToken GetChangeToken()
        {
            TokenSource = new CancellationTokenSource();
            return new CancellationChangeToken(TokenSource.Token);
        }
    }

然后我们需要在Startup.csConfigureServices方法中,将MyActionDescriptorChangeProvider.Instance属性以单例的方式注册到依赖注入容器中。

	public void ConfigureServices(IServiceCollection services)
    {
        ...

        services.AddSingleton<IActionDescriptorChangeProvider>(MyActionDescriptorChangeProvider.Instance);
        services.AddSingleton(MyActionDescriptorChangeProvider.Instance);
        
        ...
    }

最后我们在Enable方法中通过两行代码来修改当前MyActionDescriptorChangeProvider对象的Token。

    public class PluginsController : Controller
    {
        public IActionResult Enable()
        {
            var assembly = Assembly.LoadFile(AppDomain.CurrentDomain.BaseDirectory + "DemoPlugin1\\DemoPlugin1.dll");
            var viewAssembly = Assembly.LoadFile(AppDomain.CurrentDomain.BaseDirectory + "DemoPlugin1\\DemoPlugin1.Views.dll");
            var viewAssemblyPart = new CompiledRazorAssemblyPart(viewAssembly);

            var controllerAssemblyPart = new AssemblyPart(assembly);
            _partManager.ApplicationParts.Add(controllerAssemblyPart);
            _partManager.ApplicationParts.Add(viewAssemblyPart);
            
            MyActionDescriptorChangeProvider.Instance.HasChanged = true;
            MyActionDescriptorChangeProvider.Instance.TokenSource.Cancel();

            return Content("Enabled");
        }
    }

修改代码之后重新运行程序,这里我们依然首先调用/Plugins/Enable,然后再次调用/Plugin1/Helloworld, 这时候你会发现Action被触发了,只是没有找到对应的Views。

如何解决插件的预编译Razor视图不能重新加载的问题?

通过以上的方式,我们终于获得了在运行时加载插件控制器程序集的能力,但是插件的预编译Razor视图程序集没有被正确加载,这就说明IActionDescriptorChangeProvider只会触发控制器的重新加载,不会触发预编译Razor视图的重新加载。ASP.NET Core只会在整个应用启动时,才会加载插件的预编译Razor程序集,所以我们并没有获得在运行时重新加载预编译Razor视图的能力。

针对这一点,我也查阅了好多资料,最终也没有一个可行的解决方案,也许使用ASP.NET Core 3.0的Razor Runtime Compilation可以实现,但是在ASP.NET Core 2.2版本,我们还没有获得这种能力。

为了越过这个难点,最终我还是选择了放弃预编译Razor视图,改用原始的Razor视图。

因为在ASP.NET Core启动时,我们可以在Startup.csConfigureServices方法中配置Razor视图引擎检索视图的规则。

这里我们可以把每个插件组织成ASP.NET Core MVC中一个Area, Area的名称即插件的名称, 这样我们就可以将为Razor视图引擎的添加一个检索视图的规则,代码如下

	services.Configure<RazorViewEngineOptions>(o =>
    {
    	o.AreaViewLocationFormats.Add("/Modules/{2}/{1}/Views/{0}" + RazorViewEngine.ViewExtension);
    });

这里{2}代表Area名称, {1}代表Controller名称, {0}代表Action名称。

这里Modules是我重新创建的一个目录,后续所有的插件都会放置在这个目录中。

同样的,我们还需要在Configure方法中为Area注册路由。

	app.UseMvc(routes =>
    {
    	routes.MapRoute(
    	name: "default",
    	template: "{controller=Home}/{action=Index}/{id?}");

		routes.MapRoute(
		name: "default",
		template: "Modules/{area}/{controller=Home}/{action=Index}/{id?}");
	});

因为我们已经不需要使用Razor的预编译视图,所以Enable方法我们的最终代码如下

    public IActionResult Enable()
    {
        var assembly = Assembly.LoadFile(AppDomain.CurrentDomain.BaseDirectory + "Modules\\DemoPlugin1\\DemoPlugin1.dll");

        var controllerAssemblyPart = new AssemblyPart(assembly);
        _partManager.ApplicationParts.Add(controllerAssemblyPart);

        MyActionDescriptorChangeProvider.Instance.HasChanged = true;
        MyActionDescriptorChangeProvider.Instance.TokenSource.Cancel();

        return Content("Enabled");
    }

以上就是针对主站点的修改,下面我们再来修改一下插件项目。

首先我们需要将整个项目的Sdk类型改为由之前的Microsoft.Net.Sdk.Razor改为Microsoft.Net.Sdk.Web, 由于之前我们使用了预编译的Razor视图,所以我们使用了Microsoft.Net.Sdk.Razor,它会将视图编译为一个dll文件。但是现在我们需要使用原始的Razor视图,所以我们需要将其改为Microsoft.Net.Sdk.Web, 使用这个Sdk, 最终的Views文件夹中的文件会以原始的形式发布出来。

<Project Sdk="Microsoft.NET.Sdk.Web">

  <PropertyGroup>
    <TargetFramework>netcoreapp2.2</TargetFramework>
  </PropertyGroup>

  <PropertyGroup Condition="'$(Configuration)|$(Platform)'=='Debug|AnyCPU'">
    <OutputPath></OutputPath>
  </PropertyGroup>

  <ItemGroup>
    <PackageReference Include="Microsoft.AspNetCore.App" Version="2.2.0" />
    <PackageReference Include="Microsoft.AspNetCore.Razor" Version="2.2.0" />
    <PackageReference Include="Microsoft.AspNetCore.Razor.Design" Version="2.2.0" />
  </ItemGroup>

  <ItemGroup>
    <ProjectReference Include="..\DynamicPlugins.Core\DynamicPlugins.Core.csproj" />
  </ItemGroup>


</Project>

最后我们需要在Plugin1Controller上添加Area配置, 并将编译之后的程序集以及Views目录放置到主站点项目的Modules目录中

	[Area("DemoPlugin1")]
    public class Plugin1Controller : Controller
    {
        public IActionResult HelloWorld()
        {
            return View();
        }
    }

最终主站点项目目录结构

The files tree is:
=================

  |__ DynamicPlugins.Core.dll
  |__ DynamicPlugins.Core.pdb
  |__ DynamicPluginsDemoSite.deps.json
  |__ DynamicPluginsDemoSite.dll
  |__ DynamicPluginsDemoSite.pdb
  |__ DynamicPluginsDemoSite.runtimeconfig.dev.json
  |__ DynamicPluginsDemoSite.runtimeconfig.json
  |__ DynamicPluginsDemoSite.Views.dll
  |__ DynamicPluginsDemoSite.Views.pdb
  |__ Modules
    |__ DemoPlugin1
      |__ DemoPlugin1.dll
      |__ Views
        |__ Plugin1
          |__ HelloWorld.cshtml
        |__ _ViewStart.cshtml

现在我们重新启动项目,重新按照之前的顺序,先激活插件,再访问新的插件路由/Modules/DemoPlugin1/plugin1/helloworld, 页面正常显示了。

总结

本篇中,我为大家演示了如何在运行时启用一个插件,这里我们借助IActionDescriptorChangeProvider, 让ASP.NET Core在运行时重新加载了控制器,虽然不支持预编译Razor视图的加载,但是我们通过配置原始Razor视图加载的目录规则,同样实现了动态读取视图的功能。

下一篇我将继续将这个项目重构,编写业务模型,并尝试编写插件的安装以及升降级版本的代码。

从零开始实现ASP.NET Core MVC的插件式开发(二) - 如何创建项目模板 - LamondLu - 博客园

mikel阅读(510)

来源: 从零开始实现ASP.NET Core MVC的插件式开发(二) – 如何创建项目模板 – LamondLu – 博客园

系列文章

在上一篇中,我们介绍了通过一个最简单了例子,给大家演示了一下,如何在ASP.NET Core Mvc中借助ApplicationPart来开发一个插件。在文章的最后,我们也提出了一些待解决的问题。

首先呢,第一个要解决问题是,每次我们创建一个新的插件,每次都要重新创建项目,添加类库引用,以及手动修改 csproj 文件,非常的繁琐。那么有没有一种方式可以减少这部分操作的?

回想一下,当我们每次使用 Visual Studio创建项目的时候,我们都可以选择一个项目模板,Visual Studio不仅可以根据我们选择的模板创建出项目,而且我们所需的程序集引用都会预先配置好,不需要我们重复配置了。那么我们是否可以自己创建一些模板呢?答案是肯定的。

本文中,我就来给大家演示一下,在如何为.NET Core项目创建项目模板,简化操作流程。

编写template.json

如果要创建一个项目模板,我们需要做2件事情。

  • 创建一份项目代码作为模板
  • 编写template.json文件

这里我们之前已经创建了一个DemoPlugin1的项目了,所以这次我们可以直接将其转换成一个模板项目。

首先我们在当前项目中添加一个 .template.config目录, 并在其中添加一个 template.json 文件。内容如下:

{
    "author": "Lamond Lu", 
    "classifications": [ "Web/Plugins" ],
    "name": "DemoPlugin1", 
    "identity": "LamondDynamicPlugins", 
    "shortName": "ldp", 
    "tags": {
      "language": "C#" ,
      "type":"project"
    },
    "sourceName": "DemoPlugin1",  
    "preferNameDirectory": true
}

配置说明:

  • Author属性指明了模板的作者,必填
  • classifications属性指明了模板的分类,必填
  • name表示模板的名称,当你使用dotnet new创建项目时,指定的模板名称,必填
  • identity表示模板的唯一名称,可选
  • shortName表示模板的简短名称,必填
  • tags为当前模板指定了一些标签
  • sourceName指定了一个字符串,当使用dotnet new指定-n参数的时候,-n参数的值,会替换sourceName指定的字符串。以当前项目为例,我们的项目文件名称和所有使用的命名空间都是DemoPlugin1, 但是如果我们生成新的项目不可能都是用这个名字,所以我们需要使用-n参数指定的项目名来替换”DemoPlugin1″, 如果当前dotnet new命令指定的-n参数值为DemoPlugin2, 当项目创建成功时候,项目中所有的命名空间以及项目文件名称,都会使用新的DemoPlugin2
  • preferNameDirectory, 是否生成相同名称的目录,可选。

针对template.json的详细配置列表,有兴趣的同学可以查看以下链接https://github.com/dotnet/templating/wiki/Reference-for-template.json

使用dotnet-CLI创建模板

编写完代码之后,我们就可以使用如下dotnet-CLI的命令来安装项目模板了。

dotnet new -i <PATH>

这里<PATH>指定了当前模板项目所在的目录

运行命令之后,会输出一个最新的本地模板列表,我们可以发现DemoPlugin1已经作为模板出现在了列表中。

使用dotnet new创建项目

当模板安装到本地之后,我们就可以使用dotnet new命令来创建项目了,比如我们现在要创建一个新的插件,我们就可以使用如下命令。

dotnet new ldp -n DemoPlugin2

运行命令之后,对应的代码就生成出来了。来到项目目录中,我们发现之前的DemoPlugin1.csproj文件已经被更名为DemoPlugin2.csproj, 这说明之前在template.json文件中指定的sourceName属性帮我我们正确的替换了项目文件名。

随后,我们可以在查看一个代码中唯一个控制器,其命名空间也被正确替换了。

怎么样?这样是不是比之前手动的方式简单的很多?

注:如果你想要卸载刚刚安装的模板,你需要使用dotnet new --Debug:reinit命令, 这里使用dotnet new -u命令是无法卸载的, dotnet new -u只适用与从nuget.org下载下来的模板包

如何将模板打包成Nuget包

除了以上这种使用项目目录创建项目模板的方式,我们还可以将模板打包成Nuget包供其他人使用。

如果要创建一个模板,这里首先我们需要创建一个Nuget包的元数据文件,这里我们命名为LamondDynamicPlugin.nuspec

<?xml version="1.0" encoding="utf-8"?>
<package xmlns="http://schemas.microsoft.com/packaging/2012/06/nuspec.xsd">
  <metadata>
    <id>LamondDynamicPlugin</id>
    <version>1.0.0</version>
    <description>
      Creates dynamic plugin in asp.net core
    </description>
    <authors>Lamond Lu</authors>
    <packageTypes>
      <packageType name="Template" />
    </packageTypes>
  </metadata>
</package>

这里设置的属性都很简单,唯一需要注意的packageType一定要设置成Template

编写好元数据文件之后,我们就可以使用Nuget pack命令来打包了, 这个命令的第一个参数就是指定一个.nuspec文件所在的路径。

nuget pack DemoPlugin1/LamondDynamicPlugin.nuspec

运行之后,Nuget会生成一个LamondDynamicPlugin.nupkg文件,这个就是我们所说的Nuget包了。

为了使用Nuget包的方式安装模板,我们可以使用相同的命令dotnet new -i

dotnet new -i LamondDynamicPlugin.nupkg

当然,通常来说我们都会将这个Nuget包发布到nuget.org, 这样就可以将这个模板分享给其他人了。

发布到Nuget之后,我们就可以使用LamondDynamicPlugin.nuspec中定义的唯一id来安装模板了。安装的命令和之前从目录安装模板是一样的。

dotnet new -i LamondDynamicPlugin

如果你想卸载某个模板,只需要使用dotnet new -u [Nuget包]即可。

dotnet new -u LamondDynamicPlugin

总结

本文中我演示了如何使用dotnet-CLI创建一个.NET Core的项目模板,以及如何使用Nuget来打包项目模板供其他人使用,这样就解决了我们之前手动创建插件项目繁琐的问题。下一期,我会尝试将模块的业务逻辑抽象出来,创建一个核心类库,大家敬请期待。