浅析 .NET 中 AsyncLocal 的实现原理 - 黑洞视界 - 博客园

mikel阅读(612)

来源: 浅析 .NET 中 AsyncLocal 的实现原理 – 黑洞视界 – 博客园

浅析 .NET 中 AsyncLocal 的实现原理


前言

对于写过 ASP.NET Core 的童鞋来说,可以通过 HttpContextAccessor 在 Controller 之外的地方获取到HttpContext,而它实现的关键其实是在于一个AsyncLocal<HttpContextHolder> 类型的静态字段。接下来就和大家来一起探讨下这个 AsyncLocal 的具体实现原理。如果有讲得不清晰或不准确的地方,还望指出。

public class HttpContextAccessor : IHttpContextAccessor
{
    private static AsyncLocal<HttpContextHolder> _httpContextCurrent = new AsyncLocal<HttpContextHolder>();

	// 其他代码这里不展示
}

本文源码参考为发文时间点为止最新的 github 开源代码,和之前实现有些许不同,但设计思想基本一致。

代码库地址:https://github.com/dotnet/runtime

1、线程本地存储

如果想要整个.NET程序中共享一个变量,我们可以将想要共享的变量放在某个类的静态属性上来实现。

而在多线程的运行环境中,则可能会希望能将这个变量的共享范围缩小到单个线程内。例如在web应用中,服务器为每个同时访问的请求分配一个独立的线程,我们要在这些独立的线程中维护自己的当前访问用户的信息时,就需要需要线程本地存储了。

例如下面这样一个例子。

class Program
{
    [ThreadStatic]
    private static string _value;
    static void Main(string[] args)
    {
        Parallel.For(0, 4, _ =>
        {
            var threadId = Thread.CurrentThread.ManagedThreadId;

            _value ??= $"这是来自线程{threadId}的数据";
            Console.WriteLine($"Thread:{threadId}; Value:{_value}");
        });
    }
}

输出结果:

Thread:4; Value:这是来自线程4的数据
Thread:1; Value:这是来自线程1的数据
Thread:5; Value:这是来自线程5的数据
Thread:6; Value:这是来自线程6的数据

除了可以使用 ThreadStaticAttribute 外,我们还可以使用 ThreadLocal<T> 、CallContext 、AsyncLocal<T> 来实现一样的功能。由于 .NET Core 不再实现 CallContext,所以下列代码只能在 .NET Framework 中执行。

class Program
{
    [ThreadStatic]
    private static string _threadStatic;
    private static ThreadLocal<string> _threadLocal = new ThreadLocal<string>();
    private static AsyncLocal<string> _asyncLocal = new AsyncLocal<string>();
    static void Main(string[] args)
    {
        Parallel.For(0, 4, _ =>
        {
            var threadId = Thread.CurrentThread.ManagedThreadId;

            var value = $"这是来自线程{threadId}的数据";
            _threadStatic ??= value;
            CallContext.SetData("value", value);
            _threadLocal.Value ??= value;
            _asyncLocal.Value ??= value;
            Console.WriteLine($"Use ThreadStaticAttribute; Thread:{threadId}; Value:{_threadStatic}");
            Console.WriteLine($"Use CallContext;           Thread:{threadId}; Value:{CallContext.GetData("value")}");
            Console.WriteLine($"Use ThreadLocal;           Thread:{threadId}; Value:{_threadLocal.Value}");
            Console.WriteLine($"Use AsyncLocal;            Thread:{threadId}; Value:{_asyncLocal.Value}");
        });

        Console.Read();
    }
}

输出结果:

Use ThreadStaticAttribute; Thread:3; Value:这是来自线程3的数据
Use ThreadStaticAttribute; Thread:4; Value:这是来自线程4的数据
Use ThreadStaticAttribute; Thread:1; Value:这是来自线程1的数据
Use CallContext; Thread:1; Value:这是来自线程1的数据
Use ThreadLocal; Thread:1; Value:这是来自线程1的数据
Use AsyncLocal; Thread:1; Value:这是来自线程1的数据
Use ThreadStaticAttribute; Thread:5; Value:这是来自线程5的数据
Use CallContext; Thread:5; Value:这是来自线程5的数据
Use ThreadLocal; Thread:5; Value:这是来自线程5的数据
Use AsyncLocal; Thread:5; Value:这是来自线程5的数据
Use CallContext; Thread:3; Value:这是来自线程3的数据
Use CallContext; Thread:4; Value:这是来自线程4的数据
Use ThreadLocal; Thread:4; Value:这是来自线程4的数据
Use AsyncLocal; Thread:4; Value:这是来自线程4的数据
Use ThreadLocal; Thread:3; Value:这是来自线程3的数据
Use AsyncLocal; Thread:3; Value:这是来自线程3的数据

上面的例子都只是在同一个线程中对线程进行存和取,但日常开发的过程中,我们会有很多异步的场景,这些场景可能会导致执行代码的线程发生切换。

比如下面的例子

class Program
{
    [ThreadStatic]
    private static string _threadStatic;
    private static ThreadLocal<string> _threadLocal = new ThreadLocal<string>();
    private static AsyncLocal<string> _asyncLocal = new AsyncLocal<string>();
    static void Main(string[] args)
    {
        _threadStatic = "ThreadStatic保存的数据";
        _threadLocal.Value = "ThreadLocal保存的数据";
        _asyncLocal.Value = "AsyncLocal保存的数据";
        PrintValuesInAnotherThread();
        Console.ReadKey();
    }

    private static void PrintValuesInAnotherThread()
    {
        Task.Run(() =>
        {
            Console.WriteLine($"ThreadStatic: {_threadStatic}");
            Console.WriteLine($"ThreadLocal: {_threadLocal.Value}");
            Console.WriteLine($"AsyncLocal: {_asyncLocal.Value}");
        });
    }
}

输出结果:

ThreadStatic:
ThreadLocal:
AsyncLocal: AsyncLocal保存的数据

在线程发生了切换之后,只有 AsyncLocal 还能够保留原来的值,当然,.NET Framework 中的 CallContext 也可以实现这个需求,下面给出一个相对完整的总结。

实现方式 .NET FrameWork 可用 .NET Core 可用 是否支持数据流向辅助线程
ThreadStaticAttribute
ThreadLocal<T>
CallContext.SetData(string name, object data) 仅当参数 data 对应的类型实现了 ILogicalThreadAffinative 接口时支持
CallContext.LogicalSetData(string name, object data)
AsyncLocal<T>

2、AsyncLocal 实现

我们主要对照 .NET Core 源码进行学习,源码地址:https://github.com/dotnet/runtime/blob/master/src/libraries/System.Private.CoreLib/src/System/Threading/AsyncLocal.cs

2.1、主体 AsyncLocal<T>#

AsyncLocal<T> 为我们提供了两个功能

  • 通过 Value 属性存取值
  • 通过构造函数注册回调函数监听任意线程中对值做出的改动,需记着这个功能,后面介绍源码的时候会有很多地方涉及

其内部代码相对简单

public sealed class AsyncLocal<T> : IAsyncLocal
{
    private readonly Action<AsyncLocalValueChangedArgs<T>>? m_valueChangedHandler;
    
    // 无参构造
    public AsyncLocal()
    {
    }
    
    // 可以注册回调的构造函数,当 Value 在任意线程被改动,将调用回调
    public AsyncLocal(Action<AsyncLocalValueChangedArgs<T>>? valueChangedHandler)
    {
        m_valueChangedHandler = valueChangedHandler;
    }
    
    [MaybeNull]
    public T Value
    {
        get
        {
            // 从 ExecutionContext 中以自身为 Key 获取值
            object? obj = ExecutionContext.GetLocalValue(this);
            return (obj == null) ? default : (T)obj;
        }
        // 是否注册回调将回影响到 ExecutionContext 是否保存其引用
        set => ExecutionContext.SetLocalValue(this, value, m_valueChangedHandler != null);
    }
    
    // 在 ExecutionContext 如果判断到值发生了变化,此方法将被调用
    void IAsyncLocal.OnValueChanged(object? previousValueObj, object? currentValueObj, bool contextChanged)
    {
        Debug.Assert(m_valueChangedHandler != null);
        T previousValue = previousValueObj == null ? default! : (T)previousValueObj;
        T currentValue = currentValueObj == null ? default! : (T)currentValueObj;
        m_valueChangedHandler(new AsyncLocalValueChangedArgs<T>(previousValue, currentValue, contextChanged));
    }
}

internal interface IAsyncLocal
{
    void OnValueChanged(object? previousValue, object? currentValue, bool contextChanged);
}

真正的数据存取是通过 ExecutionContext.GetLocalValue 和 ExecutionContext.SetLocalValue 实现的。

public class ExecutionContext
{
    internal static object? GetLocalValue(IAsyncLocal local);
    internal static void SetLocalValue(
        IAsyncLocal local,
        object? newValue,
        bool needChangeNotifications);
}

需要注意的是这边通过 IAsyncLocal 这一接口实现了 AsyncLocal 与 ExcutionContext 的解耦。 ExcutionContext 只关注数据的存取本身,接口定义的类型都是 object,而不关心具体的类型 T

2.2、AsyncLocal<T> 在 ExecutionContext 中的数据存取实现#

在.NET 中,每个线程都关联着一个 执行上下文(execution context) 。 可以通过Thread.CurrentThread.ExecutionContext 属性进行访问,或者通过 ExecutionContext.Capture() 获取(前者的实现) 。

AsyncLocal 最终就是把数据保存在 ExecutionContext 上的,为了更深入地理解 AsyncLocal 我们需要先理解一下它。

源码地址:https://github.com/dotnet/runtime/blob/master/src/libraries/System.Private.CoreLib/src/System/Threading/ExecutionContext.cs

2.2.1、 ExecutionContext 与 线程的绑定关系#

ExecutionContext 被保存 Thread 的 internal 修饰的 _executionContext 字段上。但Thread.CurrentThread.ExecutionContext 并不直接暴露 _executionContext 而与 ExecutionContext.Capture() 共用一套逻辑。

class ExecutionContext
{
    public static ExecutionContext? Capture()
    {
        ExecutionContext? executionContext = Thread.CurrentThread._executionContext;
        if (executionContext == null)
        {
            executionContext = Default;
        }
        else if (executionContext.m_isFlowSuppressed)
        {
            executionContext = null;
        }

        return executionContext;
    }
}

下面是经过整理的 Thread 的与 ExecutionContext 相关的部分,Thread 属于部分类,_executionContext 字段定义在 Thread.CoreCLR.cs 文件中

class Thread
{
	// 保存当前线程所关联的 执行上下文
    internal ExecutionContext? _executionContext;

    [ThreadStatic]
    private static Thread? t_currentThread;
	
    public static Thread CurrentThread => t_currentThread ?? InitializeCurrentThread();
	
	public ExecutionContext? ExecutionContext => ExecutionContext.Capture();
}

2.2.2、ExecutionContext 的私有变量#

public sealed class ExecutionContext : IDisposable, ISerializable
{
    // 默认执行上下文
    internal static readonly ExecutionContext Default = new ExecutionContext(isDefault: true);
    // 执行上下文禁止流动后的默认上下文
    internal static readonly ExecutionContext DefaultFlowSuppressed = new ExecutionContext(AsyncLocalValueMap.Empty, Array.Empty<IAsyncLocal>(), isFlowSuppressed: true);
	// 保存所有注册了修改回调的 AsyncLocal 的 Value 值,本文暂不涉及对此字段的具体讨论
    private readonly IAsyncLocalValueMap? m_localValues;
    // 保存所有注册了回调的 AsyncLocal 的对象引用
    private readonly IAsyncLocal[]? m_localChangeNotifications;
    // 当前线程是否禁止上下文流动
    private readonly bool m_isFlowSuppressed;
    // 当前上下文是否是默认上下文
    private readonly bool m_isDefault;
}

2.2.3、IAsyncLocalValueMap 接口及其实现#

在同一个线程中,所有 AsyncLocal 所保存的 Value 都保存在 ExecutionContext 的 m_localValues 字段上。

public class ExecutionContext
{
    private readonly IAsyncLocalValueMap m_localValues;
}

为了优化查找值时的性能,微软为 IAsyncLocalValueMap 提供了6个实现

类型 元素个数
EmptyAsyncLocalValueMap 0
OneElementAsyncLocalValueMap 1
TwoElementAsyncLocalValueMap 2
ThreeElementAsyncLocalValueMap 3
MultiElementAsyncLocalValueMap 4 ~ 16
ManyElementAsyncLocalValueMap > 16

随着 ExecutionContext 所关联的 AsyncLocal 数量的增加,IAsyncLocalValueMap 的实现将会在ExecutionContext的SetLocalValue方法中被不断替换。查询的时间复杂度和空间复杂度依次递增。代码的实现与 AsyncLocal 同属于 一个文件。当然元素数量减少时也会替换成之前的实现。

// 这个接口是用来在 ExecutionContext 中保存 IAsyncLocal => object 的映射关系。
// 其实现被设定为不可变的(immutable),随着元素的数量增加而变化,空间复杂度和时间复杂度也随之增加。
internal interface IAsyncLocalValueMap
{
    bool TryGetValue(IAsyncLocal key, out object? value);
	// 通过此方法新增 AsyncLocal 或修改现有的 AsyncLocal
    // 如果数量无变化,返回同类型的 IAsyncLocalValueMap 实现类实例
	// 如果数量发生变化(增加或减少,将value设值为null时会减少),则可能返回不同类型的 IAsyncLocalValueMap 实现类实例
    IAsyncLocalValueMap Set(IAsyncLocal key, object? value, bool treatNullValueAsNonexistent);
}

Map 的创建是以静态类 AsyncLocalValueMap 的 Create 方法作为创建的入口的。

internal static class AsyncLocalValueMap
{
    // EmptyAsyncLocalValueMap 设计上只在这边实例化,其他地方当作常量使用
    public static IAsyncLocalValueMap Empty { get; } = new EmptyAsyncLocalValueMap();

    public static bool IsEmpty(IAsyncLocalValueMap asyncLocalValueMap)
    {
        Debug.Assert(asyncLocalValueMap != null);
        Debug.Assert(asyncLocalValueMap == Empty || asyncLocalValueMap.GetType() != typeof(EmptyAsyncLocalValueMap));

        return asyncLocalValueMap == Empty;
    }

    public static IAsyncLocalValueMap Create(IAsyncLocal key, object? value, bool treatNullValueAsNonexistent)
    {
        // 创建最初的实例
        // 如果 AsyncLocal 注册了回调,则需要保存 null 的 Value,以便下次设置非null的值时因为值发生变化而触发回调
        return value != null || !treatNullValueAsNonexistent ?
            new OneElementAsyncLocalValueMap(key, value) :
            Empty;
    }
}

此后每次更新元素时都必须调用 IAsyncLocalValueMap 实现类的 Set 方法,原实例是不会发生变化的,需保存 Set 的返回值。

接下来以 ThreeElementAsyncLocalValueMap 为例进行解释

private sealed class ThreeElementAsyncLocalValueMap : IAsyncLocalValueMap
{
	// 申明三个私有字段保存 key
    private readonly IAsyncLocal _key1, _key2, _key3;
	// 申明三个私有字段保存
    private readonly object? _value1, _value2, _value3;

    public ThreeElementAsyncLocalValueMap(IAsyncLocal key1, object? value1, IAsyncLocal key2, object? value2, IAsyncLocal key3, object? value3)
    {
        _key1 = key1; _value1 = value1;
        _key2 = key2; _value2 = value2;
        _key3 = key3; _value3 = value3;
    }

    public IAsyncLocalValueMap Set(IAsyncLocal key, object? value, bool treatNullValueAsNonexistent)
    {
		// 如果 AsyncLocal 注册过回调,treatNullValueAsNonexistent 的值是 false,
		// 意思是就算 value 是 null,也认为它是有效的
        if (value != null || !treatNullValueAsNonexistent)
        {
			// 如果现在的 map 已经保存过传入的 key ,则返回一个更新了 value 值的新 map 实例
            if (ReferenceEquals(key, _key1)) return new ThreeElementAsyncLocalValueMap(key, value, _key2, _value2, _key3, _value3);
            if (ReferenceEquals(key, _key2)) return new ThreeElementAsyncLocalValueMap(_key1, _value1, key, value, _key3, _value3);
            if (ReferenceEquals(key, _key3)) return new ThreeElementAsyncLocalValueMap(_key1, _value1, _key2, _value2, key, value);

            // 如果当前Key不存在map里,则需要一个能存放第四个key的map
            var multi = new MultiElementAsyncLocalValueMap(4);
            multi.UnsafeStore(0, _key1, _value1);
            multi.UnsafeStore(1, _key2, _value2);
            multi.UnsafeStore(2, _key3, _value3);
            multi.UnsafeStore(3, key, value);
            return multi;
        }
        else
        {
			// value 是 null,对应的 key 会被忽略或者从 map 中去除,这边会有两种情况
			// 1、如果当前的 key 存在于 map 当中,则将这个 key 去除,map 类型降级为 TwoElementAsyncLocalValueMap
            return
                ReferenceEquals(key, _key1) ? new TwoElementAsyncLocalValueMap(_key2, _value2, _key3, _value3) :
                ReferenceEquals(key, _key2) ? new TwoElementAsyncLocalValueMap(_key1, _value1, _key3, _value3) :
                ReferenceEquals(key, _key3) ? new TwoElementAsyncLocalValueMap(_key1, _value1, _key2, _value2) :
				// 2、当前 key 不存在于 map 中,则会被直接忽略
                (IAsyncLocalValueMap)this;
        }
    }

	// 至多对比三次就能找到对应的 value
    public bool TryGetValue(IAsyncLocal key, out object? value)
    {
        if (ReferenceEquals(key, _key1))
        {
            value = _value1;
            return true;
        }
        else if (ReferenceEquals(key, _key2))
        {
            value = _value2;
            return true;
        }
        else if (ReferenceEquals(key, _key3))
        {
            value = _value3;
            return true;
        }
        else
        {
            value = null;
            return false;
        }
    }
}

2.2.4、ExecutionContext – SetLocalValue#

需要注意的是这边会涉及到两个 Immutable 结构,一个是 ExecutionContext 本身,另一个是 IAsyncLocalValueMap 的实现类。同一个 key 前后两次 value 发生变化后,会产生新的 ExecutionContext 的实例和 IAsyncLocalMap 实现类实例(在 IAsyncLocalValueMap 实现类的 Set 方法中完成)。

internal static void SetLocalValue(IAsyncLocal local, object? newValue, bool needChangeNotifications)
{
	// 获取当前执行上下文
    ExecutionContext? current = Thread.CurrentThread._executionContext;

    object? previousValue = null;
    bool hadPreviousValue = false;
    if (current != null)
    {
        Debug.Assert(!current.IsDefault);
        Debug.Assert(current.m_localValues != null, "Only the default context should have null, and we shouldn't be here on the default context");
		
		// 判断当前作为 Key 的 AsyncLocal 是否已经有对应的 Value 
        hadPreviousValue = current.m_localValues.TryGetValue(local, out previousValue);
    }

	// 如果前后两次 Value 没有发生变化,则继续处理
    if (previousValue == newValue)
    {
        return;
    }

	// 对于 treatNullValueAsNonexistent: !needChangeNotifications 的说明
	// 如果 AsyncLocal 注册了回调,则 needChangeNotifications 为 ture,m_localValues 会保存 null 值以便下次触发change回调
    IAsyncLocal[]? newChangeNotifications = null;
    IAsyncLocalValueMap newValues;
    bool isFlowSuppressed = false;
    if (current != null)
    {
        Debug.Assert(!current.IsDefault);
        Debug.Assert(current.m_localValues != null, "Only the default context should have null, and we shouldn't be here on the default context");

        isFlowSuppressed = current.m_isFlowSuppressed;
		// 这一步很关键,通过调用 m_localValues.Set 对 map 进行修改,这会产生一个新的 map 实例。
        newValues = current.m_localValues.Set(local, newValue, treatNullValueAsNonexistent: !needChangeNotifications);
        newChangeNotifications = current.m_localChangeNotifications;
    }
    else
    {
        // 如果当前上下文不存在,创建第一个 IAsyncLocalValueMap 实例
        newValues = AsyncLocalValueMap.Create(local, newValue, treatNullValueAsNonexistent: !needChangeNotifications);
    }

    // 如果 AsyncLocal 注册了回调,则需要保存 AsyncLocal 的引用
    // 这边会有两种情况,一个是数组未创建过,一个是数组已存在
    if (needChangeNotifications)
    {
        if (hadPreviousValue)
        {
            Debug.Assert(newChangeNotifications != null);
            Debug.Assert(Array.IndexOf(newChangeNotifications, local) >= 0);
        }
        else if (newChangeNotifications == null)
        {
            newChangeNotifications = new IAsyncLocal[1] { local };
        }
        else
        {
            int newNotificationIndex = newChangeNotifications.Length;
			// 这个方法会创建一个新数组并将原来的元素拷贝过去
			Array.Resize(ref newChangeNotifications, newNotificationIndex + 1);
            newChangeNotifications[newNotificationIndex] = local;
        }
    }

	// 如果 AsyncLocal 存在有效值,且允许执行上下文流动,则创建新的 ExecutionContext实例,新实例会保存所有的AsyncLocal的值和所有需要通知的 AsyncLocal 引用。
    Thread.CurrentThread._executionContext =
        (!isFlowSuppressed && AsyncLocalValueMap.IsEmpty(newValues)) ?
        null : // No values, return to Default context
        new ExecutionContext(newValues, newChangeNotifications, isFlowSuppressed);

    if (needChangeNotifications)
    {
		// 调用先前注册好的委托
        local.OnValueChanged(previousValue, newValue, contextChanged: false);
    }
}

2.2.5、ExecutionContext – GetLocalValue#

值的获取实现相对简单

internal static object? GetLocalValue(IAsyncLocal local)
{
    ExecutionContext? current = Thread.CurrentThread._executionContext;
    if (current == null)
    {
        return null;
    }

    Debug.Assert(!current.IsDefault);
    Debug.Assert(current.m_localValues != null, "Only the default context should have null, and we shouldn't be here on the default context");
    current.m_localValues.TryGetValue(local, out object? value);
    return value;
}

3、ExecutionContext 的流动

在线程发生切换的时候,ExecutionContext 会在前一个线程中被默认捕获,流向下一个线程,它所保存的数据也就随之流动。

在所有会发生线程切换的地方,基础类库(BCL) 都为我们封装好了对执行上下文的捕获。

例如:

  • new Thread(ThreadStart start).Start()
  • Task.Run(Action action)
  • ThreadPool.QueueUserWorkItem(WaitCallback callBack)
  • await 语法糖
class Program
{
    static AsyncLocal<string> _asyncLocal = new AsyncLocal<string>();

    static async Task Main(string[] args)
    {
        _asyncLocal.Value = "AsyncLocal保存的数据";

        new Thread(() =>
        {
            Console.WriteLine($"new Thread: {_asyncLocal.Value}");
        })
        {
            IsBackground = true
        }.Start();

        ThreadPool.QueueUserWorkItem(_ =>
        {
            Console.WriteLine($"ThreadPool.QueueUserWorkItem: {_asyncLocal.Value}");
        });

        Task.Run(() =>
        {
            Console.WriteLine($"Task.Run: {_asyncLocal.Value}");
        });

        await Task.Delay(100);
        Console.WriteLine($"after await: {_asyncLocal.Value}");
    }
}

输出结果:

new Thread: AsyncLocal保存的数据
ThreadPool.QueueUserWorkItem: AsyncLocal保存的数据
Task.Run: AsyncLocal保存的数据
after await: AsyncLocal保存的数据

3.1、流动的禁止和恢复#

ExecutionContext 为我们提供了 SuppressFlow(禁止流动) 和 RestoreFlow (恢复流动)这两个静态方法来控制当前线程的执行上下文是否像辅助线程流动。并可以通过 IsFlowSuppressed 静态方法来进行判断。

class Program
{
    static AsyncLocal<string> _asyncLocal = new AsyncLocal<string>();

    static async Task Main(string[] args)
    {
        _asyncLocal.Value = "AsyncLocal保存的数据";

        Console.WriteLine("默认:");
        PrintAsync(); // 不 await,后面的线程不会发生切换

        Thread.Sleep(1000); // 确保上面的方法内的所有线程都执行完

        ExecutionContext.SuppressFlow();
        Console.WriteLine("SuppressFlow:");
        PrintAsync();

        Thread.Sleep(1000);

        Console.WriteLine("RestoreFlow:");

        ExecutionContext.RestoreFlow();
        await PrintAsync();

        Console.Read();
    }

    static async ValueTask PrintAsync()
    {
        new Thread(() =>
        {
            Console.WriteLine($"    new Thread: {_asyncLocal.Value}");
        })
        {
            IsBackground = true
        }.Start();

        Thread.Sleep(100); // 保证输出顺序

        ThreadPool.QueueUserWorkItem(_ =>
        {
            Console.WriteLine($"    ThreadPool.QueueUserWorkItem: {_asyncLocal.Value}");
        });

        Thread.Sleep(100);

        Task.Run(() =>
        {
            Console.WriteLine($"    Task.Run: {_asyncLocal.Value}");
        });

        await Task.Delay(100);
        Console.WriteLine($"    after await: {_asyncLocal.Value}");

        Console.WriteLine();
    }
}

输出结果:

默认:
new Thread: AsyncLocal保存的数据
ThreadPool.QueueUserWorkItem: AsyncLocal保存的数据
Task.Run: AsyncLocal保存的数据
after await: AsyncLocal保存的数据

SuppressFlow:
new Thread:
ThreadPool.QueueUserWorkItem:
Task.Run:
after await:

RestoreFlow:
new Thread: AsyncLocal保存的数据
ThreadPool.QueueUserWorkItem: AsyncLocal保存的数据
Task.Run: AsyncLocal保存的数据
after await: AsyncLocal保存的数据

需要注意的是,在线程A中创建线程B之前调用 ExecutionContext.SuppressFlow 只会影响 ExecutionContext 从线程A => 线程B的传递,线程B => 线程C 不受影响。

class Program
{
    static AsyncLocal<string> _asyncLocal = new AsyncLocal<string>();
    static void Main(string[] args)
    {
        _asyncLocal.Value = "A => B";
        ExecutionContext.SuppressFlow();
        new Thread((() =>
        {
            Console.WriteLine($"线程B:{_asyncLocal.Value}"); // 输出线程B:

            _asyncLocal.Value = "B => C";
            new Thread((() =>
            {
                Console.WriteLine($"线程C:{_asyncLocal.Value}"); // 输出线程C:B => C
            }))
            {
                IsBackground = true
            }.Start();
        }))
        {
            IsBackground = true
        }.Start();

        Console.Read();
    }
}

3.2、ExcutionContext 的流动实现#

上面举例了四种场景,由于每一种场景的传递过程都比较复杂,目前先介绍其中一个。

但不管什么场景,都会涉及到 ExcutionContext 的 Run 方法。在Run 方法中会调用 RunInternal 方法,

public static void Run(ExecutionContext executionContext, ContextCallback callback, object? state)
{
    if (executionContext == null)
    {
        ThrowNullContext();
    }

	// 内部会调用 RestoreChangedContextToThread 方法
    RunInternal(executionContext, callback, state);
}

RunInternal 调用下面一个 RestoreChangedContextToThread 方法将 ExcutionContext.Run 方法传入的 ExcutionContext 赋值给当前线程的 _executionContext 字段。

internal static void RestoreChangedContextToThread(Thread currentThread, ExecutionContext? contextToRestore, ExecutionContext? currentContext)
{
    Debug.Assert(currentThread == Thread.CurrentThread);
    Debug.Assert(contextToRestore != currentContext);

	// 在这边把之前的 ExecutionContext 赋值给了当前线程
    currentThread._executionContext = contextToRestore;
    if ((currentContext != null && currentContext.HasChangeNotifications) ||
        (contextToRestore != null && contextToRestore.HasChangeNotifications))
    {
        OnValuesChanged(currentContext, contextToRestore);
    }
}

3.2.1、new Thread(ThreadStart start).Start() 为例说明 ExecutionContext 的流动#

这边可以分为三个步骤:

在 Thread 的 Start 方法中捕获当前的 ExecutionContext,将其传递给 Thread 的构造函数中实例化的 ThreadHelper 实例,ExecutionContext 会暂存在 ThreadHelper 的实例字段中,线程创建完成后会调用ExecutionContext.RunInternal 将其赋值给新创建的线程。

代码位置:

https://github.com/dotnet/runtime/blob/5fca04171171f118bca0f93aa9741f205b8cdc29/src/coreclr/src/System.Private.CoreLib/src/System/Threading/Thread.CoreCLR.cs#L200

        public void Start()
        {
#if FEATURE_COMINTEROP_APARTMENT_SUPPORT
            // Eagerly initialize the COM Apartment state of the thread if we're allowed to.
            StartupSetApartmentStateInternal();
#endif // FEATURE_COMINTEROP_APARTMENT_SUPPORT

            // Attach current thread's security principal object to the new
            // thread. Be careful not to bind the current thread to a principal
            // if it's not already bound.
            if (_delegate != null)
            {
                // If we reach here with a null delegate, something is broken. But we'll let the StartInternal method take care of
                // reporting an error. Just make sure we don't try to dereference a null delegate.
                Debug.Assert(_delegate.Target is ThreadHelper);
                // 由于 _delegate 指向 ThreadHelper 的实例方法,所以 _delegate.Target 指向 ThreadHelper 实例。
                var t = (ThreadHelper)_delegate.Target;

                ExecutionContext? ec = ExecutionContext.Capture();
                t.SetExecutionContextHelper(ec);
            }

            StartInternal();
        }

https://github.com/dotnet/runtime/blob/5fca04171171f118bca0f93aa9741f205b8cdc29/src/coreclr/src/System.Private.CoreLib/src/System/Threading/Thread.CoreCLR.cs#L26

class ThreadHelper
{
    internal ThreadHelper(Delegate start)
    {
        _start = start;
    }

    internal void SetExecutionContextHelper(ExecutionContext? ec)
    {
        _executionContext = ec;
    }

    // 这个方法是对 Thread 构造函数传入的委托的包装
    internal void ThreadStart()
    {
        Debug.Assert(_start is ThreadStart);

        ExecutionContext? context = _executionContext;
        if (context != null)
        {
			// 将 ExecutionContext 与 CurrentThread 进行绑定
            ExecutionContext.RunInternal(context, s_threadStartContextCallback, this);
        }
        else
        {
            InitializeCulture();
            ((ThreadStart)_start)();
        }
    }
}

4、总结

  1. AsyncLocal 本身不保存数据,数据保存在 ExecutionContext 实例的 m_localValues 的私有字段上,字段类型定义是 IAsyncLocalMap ,以 IAsyncLocal => object 的 Map 结构进行保存,且实现类型随着元素数量的变化而变化。
  2. ExecutionContext 实例 保存在 Thread.CurrentThread._executionContext 上,实现与当前线程的关联。
  3. 对于 IAsyncLocalMap 的实现类,如果 AsyncLocal 注册了回调,value 传 null 不会被忽略。

    没注册回调时分为两种情况:如果 key 存在,则做删除处理,map 类型可能出现降级。如果 key 不存在,则直接忽略。

  4. ExecutionContext 和 IAsyncLocalMap 的实现类都被设计成不可变(immutable)。同一个 key 前后两次 value 发生变化后,会产生新的 ExecutionContext 的实例和 IAsyncLocalMap 实现类实例。
  5. ExecutionContext 与当前线程绑定,默认流动到辅助线程,可以禁止流动和恢复流动,且禁止流动仅影响当前线程向其辅助线程的传递,不影响后续。

5、参考

  1. https://devblogs.microsoft.com/pfxteam/executioncontext-vs-synchronizationcontext/
  2. 《CLR via C#》27.3 章节
  3. github 代码库 https://github.com/dotnet/runtime

ASP.NET Core 认证与授权[1]:初识认证 - 雨夜朦胧 - 博客园

mikel阅读(553)

来源: ASP.NET Core 认证与授权[1]:初识认证 – 雨夜朦胧 – 博客园

ASP.NET 4.X 中,我们最常用的是Forms认证,它既可以用于局域网环境,也可用于互联网环境,有着非常广泛的使用。但是它很难进行扩展,更无法与第三方认证集成,因此,在 ASP.NET Core 中对认证与授权进行了全新的设计,并使用基于声明的认证(claims-based authentication),以适应现代化应用的需求。在运行原理解剖[5]:Authentication中介绍了一下HttpContext与认证系统的集成,本系列文章则来详细介绍一下 ASP.NET Core 中认证与授权。

目录

  1. 基于声明的认证
  2. ASP.NET Core 中的用户身份
  3. Microsoft.AspNetCore.Authentication
  4. 认证Handler

基于声明的认证

Claim 通常被翻译成声明,但是感觉过于生硬,还是使用Claim来称呼更加自然一些。记得是在MVC5中,第一次接触到 “Claim” 的概念。在MVC5之前,我们所熟悉的是Windows认证和Forms认证,Windows认证通常用于企业内部,我们使用最多的还是Forms认证,先来回顾一下,以前是怎么使用的:

首先我们会在web.config中配置认证模式:

<authentication mode="Forms">
    <forms loginUrl="~/Account/LogOn" timeout="2880" />
</authentication>

认证票据的生成是使用FormsAuthentication来完成的:

FormsAuthentication.SetAuthCookie("bob", true);

然后便可以通过HttpContext.User.Identity.Name获取到当前登录用户的名称:”bob”,那么它是如何来完成认证的呢?

在 ASP.NET 4.x 中,我们应该都对 HttpModule 比较了解,它类似于 ASP.NET Core 中的中件间,ASP.NET 默认会在全局的 administration.config 文件中注册一大堆HttpModule,其中就包括WindowsAuthenticationFormsAuthentication,用来实现Windows认证和Forms认证:

<moduleProviders>
    <!-- Server Modules-->
    <add name="Authentication" type="Microsoft.Web.Management.Iis.Authentication.AuthenticationModuleProvider, Microsoft.Web.Management.Iis, Version=10.0.0.0, Culture=neutral, PublicKeyToken=31bf3856ad364e35" />
    <add name="AnonymousAuthentication" type="Microsoft.Web.Management.Iis.Authentication.AnonymousAuthenticationModuleProvider, Microsoft.Web.Management.Iis, Version=10.0.0.0, Culture=neutral, PublicKeyToken=31bf3856ad364e35" />
    <add name="BasicAuthentication" type="Microsoft.Web.Management.Iis.Authentication.BasicAuthenticationModuleProvider, Microsoft.Web.Management.Iis, Version=10.0.0.0, Culture=neutral, PublicKeyToken=31bf3856ad364e35" />
    <add name="ActiveDirectoryAuthentication" type="Microsoft.Web.Management.Iis.Authentication.ActiveDirectoryAuthenticationModuleProvider, Microsoft.Web.Management.Iis, Version=10.0.0.0, Culture=neutral, PublicKeyToken=31bf3856ad364e35" />
    <add name="WindowsAuthentication" type="Microsoft.Web.Management.Iis.Authentication.WindowsAuthenticationModuleProvider, Microsoft.Web.Management.Iis, Version=10.0.0.0, Culture=neutral, PublicKeyToken=31bf3856ad364e35" />
    <add name="DigestAuthentication" type="Microsoft.Web.Management.Iis.Authentication.DigestAuthenticationModuleProvider, Microsoft.Web.Management.Iis, Version=10.0.0.0, Culture=neutral, PublicKeyToken=31bf3856ad364e35" />

    <!-- ASP.NET Modules-->
    <add name="FormsAuthentication" type="Microsoft.Web.Management.AspNet.Authentication.FormsAuthenticationModuleProvider, Microsoft.Web.Management.Aspnet, Version=10.0.0.0, Culture=neutral, PublicKeyToken=31bf3856ad364e35" />        

可能大多人都不知道有这些Module,这也是微软技术的一大弊端,总想着封装成傻瓜化,造成入门容易,精通太难的局面。

如上,我们可以看到生成票据时,默认只能转入一个Name,当然也可以通过手动创建FormsAuthenticationTicket来附带一些额外的信息,但是都太过麻烦。

在传统的身份认证中,每个应用程序都有它自己的验证用户身份的方式,以及它自己的用户数据库。这种方式有很大的局限性,因为它很难集成多种认证方式以支持用户使用不同的方式来访问我们的应用程序,比如组织内的用户(Windows-baseed 认证),其它组织的用户(Identity federation)或者是来自互联网的用户(Forms-based 认证)等等。

Claim 是关于一个人或组织的某个主题的陈述,比如:一个人的名称,角色,个人喜好,种族,特权,社团,能力等等。它本质上就是一个键值对,是一种非常通用的保存用户信息的方式,可以很容易的将认证和授权分离开来,前者用来表示用户是/不是什么,后者用来表示用户能/不能做什么。

因此基于声明的认证有两个主要的特点:

  • 将认证与授权拆分成两个独立的服务。
  • 在需要授权的服务中,不用再去关心你是如何认证的,你用Windows认证也好,Forms认证也行,只要你出示你的 Claims 就行了。

ASP.NET Core 中的用户身份

Claim

在 ASP.NET Core 中,使用Cliam类来表示用户身份中的一项信息,它由核心的TypeValue属性构成:

public class Claim
{
    private readonly string _type;
    private readonly string _value;

    public Claim(string type, string value)
        : this(type, value, ClaimValueTypes.String, ClaimsIdentity.DefaultIssuer, ClaimsIdentity.DefaultIssuer, null, null, null)
    {
    }

    internal Claim(string type, string value, string valueType, string issuer, string originalIssuer, ClaimsIdentity subject, string propertyKey, string propertyValue)
    {
        ...
    }

    public string Type => _type;
    public string Value => _value;
}

一个Claim可以是“用户的姓名”,“邮箱地址”,“电话”,等等,而多个Claim构成一个用户的身份,使用ClaimsIdentity类来表示:

ClaimsIdentity

public class ClaimsIdentity : IIdentity
{    
    public virtual IEnumerable<Claim> Claims {get;}

    public virtual string AuthenticationType => _authenticationType;
    public virtual bool IsAuthenticated => !string.IsNullOrEmpty(_authenticationType);
    public virtual string Name
    {
        get
        {
            Claim claim = FindFirst(_nameClaimType);
            if (claim != null) return claim.Value;
            return null;
        }
    }

}

如上,其Name属性用来查找Claims中,第一个Type为我们创建ClaimsIdentity时指定的NameClaimType的Claim的值,若未指定Type时则使用默认的ClaimTypes.Name。而IsAuthenticated只是判断_authenticationType是否为空,_authenticationType则对应上一章中介绍的Scheme

下面,我们演示一下用户身份的创建:

// 创建一个用户身份,注意需要指定AuthenticationType,否则IsAuthenticated将为false。
var claimIdentity = new ClaimsIdentity("myAuthenticationType");
// 添加几个Claim
claimIdentity.AddClaim(new Claim(ClaimTypes.Name, "bob"));
claimIdentity.AddClaim(new Claim(ClaimTypes.Email, "bob@gmail.com"));
claimIdentity.AddClaim(new Claim(ClaimTypes.MobilePhone, "18888888888"));

如上,我们可以根据需要添加任意个的Claim,最后我们还需要再将用户身份放到ClaimsPrincipal对象中。

ClaimsPrincipal

那么,ClaimsPrincipal是什么呢?在 ASP.NET 4.x 中我们可能对IPrincipal接口比较熟悉,在Controller中的User属性便是IPrincipal类型:

public interface IPrincipal
{
    IIdentity Identity { get; }
    bool IsInRole(string role);
}

可以看到IPrincipal除了包含用户身份外,还有一个IsInRole方法,用于判断用户是否属于指定角色,在基于角色的授权当中便是调用此方法来实现的。

而在 ASP.NET Core 中,HttpContext直接使用的就是ClaimsPrincipal类型,而不再使用IPrincipal

public abstract class HttpContext
{
    public abstract ClaimsPrincipal User { get; set; }
}

而在ClaimsPrincipal中,可以包含多个用户身份(ClaimsIdentity),除了对用户身份的操作,还提供了针对Claims的查询:

public class ClaimsPrincipal : IPrincipal
{
    private readonly List<ClaimsIdentity> _identities = new List<ClaimsIdentity>();

    public ClaimsPrincipal(IEnumerable<ClaimsIdentity> identities) 
    {
        _identities.AddRange(identities);
    }

    // 默认从_identities中查找第一个不为空的ClaimsIdentity,也可以自定义查找方式。
    public virtual System.Security.Principal.IIdentity Identity {}

    // 查找_identities中是否包含类型为RoleClaimType(在创建ClaimsIdentity时指定,或者默认的ClaimTypes.Role)的Claim。
    public virtual bool IsInRole(string role) {}

    // 获取所有身份的Claim集合
    public virtual IEnumerable<Claim> Claims
    {
        get
        {
            foreach (ClaimsIdentity identity in Identities)
            {
                foreach (Claim claim in identity.Claims)
                {
                    yield return claim;
                }
            }
        }
    }
}

ClaimsPrincipal的创建非常简单,只需传入我们上面创建的用户身份即可:

var principal = new ClaimsPrincipal(claimIdentity);

由于HTTP是无状态的,我们通常使用Cookie,请求头或请求参数等方式来附加用户的信息,在网络上进行传输,这就涉及到序列化和安全方面的问题。因此,还需要将principal对象包装成AuthenticationTicket对象。

AuthenticationTicket

当我们创建完ClaimsPrincipal对象后,需要将它生成一个用户票据并颁发给用户,然后用户拿着这个票据,便可以访问受保持的资源,而在 ASP.NET Core 中,用户票据用AuthenticationTicket来表示,如在Cookie认证中,其认证后的Cookie值便是对该对象序列化后的结果,它的定义如下:

public class AuthenticationTicket
{
    public AuthenticationTicket(ClaimsPrincipal principal, AuthenticationProperties properties, string authenticationScheme)
    {
        AuthenticationScheme = authenticationScheme;
        Principal = principal;
        Properties = properties ?? new AuthenticationProperties();
    }
    public AuthenticationTicket(ClaimsPrincipal principal, string authenticationScheme) 
        : this(principal, properties: null, authenticationScheme: authenticationScheme) { }
    public string AuthenticationScheme { get; private set; }
    public ClaimsPrincipal Principal { get; private set; }
    public AuthenticationProperties Properties { get; private set; }
}

用户票据除了包含上面创建的principal对象外,还需要指定一个AuthenticationScheme (通常在授权中用来验证Scheme),并且还包含一个AuthenticationProperties对象,它主要是一些用户票据安全方面的一些配置,如过期时间,是否持久等。

var properties = new AuthenticationProperties();
var ticket = new AuthenticationTicket(principal, properties, "myScheme");
// 加密 序列化
var token = Protect(ticket);

最后,我们可以将票据(token)写入到Cookie中,或是也可以以JSON的形式返回让客户端自行保存,由于我们对票据进行了加密,可以保证在网络中安全的传输而不会被篡改。

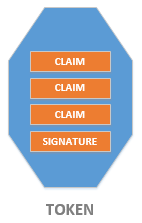
最终身份令牌的结构大概是这样的:

claim-token

Microsoft.AspNetCore.Authentication

上面,我们介绍了身份票据的创建过程,下面就来介绍一下 ASP.NET Core 中的身份认证。

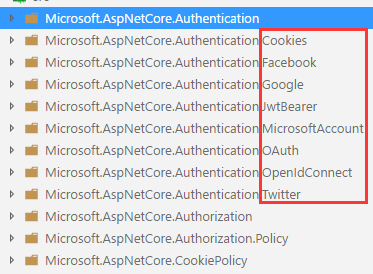
ASP.NET Core 中的认证系统具体实现在 Security 项目中,它包含 CookieJwtBearerOAuthOpenIdConnect 等:

security_src_dir

认证系统提供了非常灵活的扩展,可以让我们很容易的实现自定义认证方式。

Usage

而对于认证系统的配置,分为两步,也是我们所熟悉的注册服务和配置中间件:

首先,在DI中注册服务认证所需的服务:

public void ConfigureServices(IServiceCollection services)
{
    services.AddAuthentication(options =>
    {
        options.DefaultAuthenticateScheme = CookieAuthenticationDefaults.AuthenticationScheme;
        options.DefaultSignInScheme = CookieAuthenticationDefaults.AuthenticationScheme;
        options.DefaultChallengeScheme = OpenIdConnectDefaults.AuthenticationScheme;
    })
    .AddCookie()
    .AddOpenIdConnect(o =>
    {
        o.ClientId = "server.hybrid";
        o.ClientSecret = "secret";
        o.Authority = "https://demo.identityserver.io/";
        o.ResponseType = OpenIdConnectResponseType.CodeIdToken;
    });
}

最后,注册认证中间件:

public void Configure(IApplicationBuilder app)
{
    app.UseAuthentication();
}

如上,我们的系统便支持了CookieJwtBearer两种认证方式,是不是非常简单,在我们的应用程序中使用认证系统时,只需要调用 上一章 介绍的 HttpContext 中认证相关的扩展方法即可。

Microsoft.AspNetCore.Authentication,是所有认证实现的公共抽象类,它定义了实现认证Handler的规范,并包含一些共用的方法,如令牌加密,序列化等,AddAuthentication 便是其提供的统一的注册认证服务的扩展方法:

AddAuthentication

public static AuthenticationBuilder AddAuthentication(this IServiceCollection services)
{
    services.AddAuthenticationCore();
    services.AddDataProtection();
    services.AddWebEncoders();
    services.TryAddSingleton<ISystemClock, SystemClock>();
    return new AuthenticationBuilder(services);
}

public static AuthenticationBuilder AddAuthentication(this IServiceCollection services, Action<AuthenticationOptions> configureOptions) 
{
    var builder = services.AddAuthentication();
    services.Configure(configureOptions);
    return builder;
}

如上,它首先会调用上一章中介绍的AddAuthenticationCore方法,然后注册了DataProtectionWebEncoders两个服务。而对 AuthenticationOptions 我们之前在IAuthenticationSchemeProvider也介绍过,它用来配置Scheme。

AddScheme

在上面的 AddAuthentication 中返回的是一个AuthenticationBuilder类型,所有认证Handler的注册都是以它的扩展形式来实现的,它同时也提供了AddScheme扩展方法,使我们可以更加方便的来配置Scheme:

public class AuthenticationBuilder
{
    public AuthenticationBuilder(IServiceCollection services)
        => Services = services;

    public virtual IServiceCollection Services { get; }

    public virtual AuthenticationBuilder AddScheme<TOptions, THandler>(string authenticationScheme, Action<TOptions> configureOptions)
        where TOptions : AuthenticationSchemeOptions, new()
        where THandler : AuthenticationHandler<TOptions>
        => AddScheme<TOptions, THandler>(authenticationScheme, displayName: null, configureOptions: configureOptions);

    public virtual AuthenticationBuilder AddScheme<TOptions, THandler>(string authenticationScheme, string displayName, Action<TOptions> configureOptions)
        where TOptions : AuthenticationSchemeOptions, new()
        where THandler : AuthenticationHandler<TOptions>
    {
        Services.Configure<AuthenticationOptions>(o =>
        {
            o.AddScheme(authenticationScheme, scheme => {
                scheme.HandlerType = typeof(THandler);
                scheme.DisplayName = displayName;
            });
        });
        if (configureOptions != null)
        {
            Services.Configure(authenticationScheme, configureOptions);
        }
        Services.AddTransient<THandler>();
        return this;
    }
}

在这里的AddScheme 扩展方法只是封装了对AuthenticationOptionsAddScheme的调用,如上面示例中的AddCookie便是调用该扩展方法来实现的。

AddRemoteScheme

看到 Remote 我们应该就可以猜到它是一种远程验证方式,先看一下它的定义:

public class AuthenticationBuilder
{
    public virtual AuthenticationBuilder AddRemoteScheme<TOptions, THandler>(string authenticationScheme, string displayName, Action<TOptions> configureOptions)
        where TOptions : RemoteAuthenticationOptions, new()
        where THandler : RemoteAuthenticationHandler<TOptions>
    {
        Services.TryAddEnumerable(ServiceDescriptor.Singleton<IPostConfigureOptions<TOptions>, EnsureSignInScheme<TOptions>>());
        return AddScheme<TOptions, THandler>(authenticationScheme, displayName, configureOptions: configureOptions);
    }

    private class EnsureSignInScheme<TOptions> : IPostConfigureOptions<TOptions> where TOptions : RemoteAuthenticationOptions
    {
        private readonly AuthenticationOptions _authOptions;

        public EnsureSignInScheme(IOptions<AuthenticationOptions> authOptions)
        {
            _authOptions = authOptions.Value;
        }

        public void PostConfigure(string name, TOptions options)
        {
            options.SignInScheme = options.SignInScheme ?? _authOptions.DefaultSignInScheme ?? _authOptions.DefaultScheme;
            if (string.Equals(options.SignInScheme, name, StringComparison.Ordinal))
            {
                throw new InvalidOperationException(Resources.Exception_RemoteSignInSchemeCannotBeSelf);
            }
        }
    }
}

首先使用PostConfigure模式(参见:Options[1]:Configure),对RemoteAuthenticationOptions进行验证,要求远程验证中指定的SignInScheme不能为自身,这是为什么呢?后文再来解释。然后便是直接调用上面介绍的 AddScheme 方法。

关于远程验证相对比较复杂,在本章中并不会太过深入的来介绍,在后续其它文章中会逐渐深入。

UseAuthentication

在上面,注册认证中间件时,我们只需调用一个UseAuthentication扩展方法,因为它会执行我们注册的所有认证Handler:

public static IApplicationBuilder UseAuthentication(this IApplicationBuilder app)
{
    return app.UseMiddleware<AuthenticationMiddleware>();
}

咦,它的代码好简单,只是注册了一个 AuthenticationMiddleware 而已,迫不及待的想看看它的实现:

public class AuthenticationMiddleware
{
    private readonly RequestDelegate _next;
    public IAuthenticationSchemeProvider Schemes { get; set; }

    public async Task Invoke(HttpContext context)
    {
        context.Features.Set<IAuthenticationFeature>(new AuthenticationFeature
        {
            OriginalPath = context.Request.Path,
            OriginalPathBase = context.Request.PathBase
        });

        var handlers = context.RequestServices.GetRequiredService<IAuthenticationHandlerProvider>();
        foreach (var scheme in await Schemes.GetRequestHandlerSchemesAsync())
        {
            var handler = await handlers.GetHandlerAsync(context, scheme.Name) as IAuthenticationRequestHandler;
            if (handler != null && await handler.HandleRequestAsync())
            {
                return;
            }
        }

        var defaultAuthenticate = await Schemes.GetDefaultAuthenticateSchemeAsync();
        if (defaultAuthenticate != null)
        {
            var result = await context.AuthenticateAsync(defaultAuthenticate.Name);
            if (result?.Principal != null)
            {
                context.User = result.Principal;
            }
        }

        await _next(context);
    }
}

很简单,但是很强大,不管我们是使用Cookie认证,还是Bearer认证,等等,都只需要这一个中间件,因为它会解析所有的Handler来执行。

不过,在这里,这会先判断是否具体实现了IAuthenticationRequestHandler的Hander,优先来执行,这个是什么鬼?

查了一下,发现IAuthenticationRequestHandler是在HttpAbstractions中定义的,只是在运行原理解剖[5]:Authentication中没有介绍到它:

public interface IAuthenticationRequestHandler : IAuthenticationHandler
{
    Task<bool> HandleRequestAsync();
}

它多了一个HandleRequestAsync方法,那么它存在的意义是什么呢?其实在Cookie认证中并没有用到它,它通常在远程认证(如:OAuth, OIDC等)中使用,下文再来介绍。

继续分析上面代码,通过调用Schemes.GetDefaultAuthenticateSchemeAsync来获取到认证的Scheme,也就是上文提到的问题,我们必须指定默认的Scheme。

最后,调用AuthenticateAsync方法进行认证,认证成功后,为HttpContext.User赋值,至于如何解析身份令牌生成ClaimsPrincipal对象,则交给相应的Handler来处理。

认证Handler

上文中多次提到认证Handler,它由统一的AuthenticationMiddleware来调用,负责具体的认证实现,并分为本地认证与远程认证两种方式。

在本地验证中,身份令牌的发放与认证通常是由同一个服务器来完成,这也是我们比较熟悉的场景,对于Cookie, JwtBearer等认证来说,都属于是本地验证。而当我们使用OAuth, OIDC等验证方式时,身份令牌的发放则是由独立的服务或是第三方(QQ, Weibo 等)认证来提供,此时在我们的应用程序中获取身份令牌时需要请求远程服务器,因此称之为远程验证。

AuthenticationHandler

AuthenticationHandler是所有认证Handler的抽象基类,对于本地认证直接实现该类即可,定义如下:

public abstract class AuthenticationHandler<TOptions> : IAuthenticationHandler where TOptions : AuthenticationSchemeOptions, new()
{
    ...

    public async Task InitializeAsync(AuthenticationScheme scheme, HttpContext context)
    {
        ...

        await InitializeEventsAsync();
        await InitializeHandlerAsync();
    }

    protected virtual async Task InitializeEventsAsync() { }
    protected virtual Task<object> CreateEventsAsync() => Task.FromResult(new object());
    protected virtual Task InitializeHandlerAsync() => Task.CompletedTask;

    public async Task<AuthenticateResult> AuthenticateAsync()
    {
        var result = await HandleAuthenticateOnceAsync();

        ...
    }

    protected Task<AuthenticateResult> HandleAuthenticateOnceAsync()
    {
        if (_authenticateTask == null)
        {
            _authenticateTask = HandleAuthenticateAsync();
        }
        return _authenticateTask;
    }

    protected abstract Task<AuthenticateResult> HandleAuthenticateAsync();


    protected virtual Task HandleForbiddenAsync(AuthenticationProperties properties)
    {
        Response.StatusCode = 403;
        return Task.CompletedTask;
    }

    protected virtual Task HandleChallengeAsync(AuthenticationProperties properties)
    {
        Response.StatusCode = 401;
        return Task.CompletedTask;
    }

    ...
}

如上,它定义一个抽象方法HandleAuthenticateAsync,并使用HandleAuthenticateOnceAsync方法来保证其在每次认证只执行一次。而HandleAuthenticateAsync是认证的核心,交给具体的认证Handler负责实现。而对于 ChallengeAsync, ForbidAsync 等方法也提供了默认的实现。

而对于HandleAuthenticateAsync的实现,大致的逻辑就是从请求中获取上面发放的身份令牌,然后解析成AuthenticationTicket,并经过一系列的验证,最终返回ClaimsPrincipal对象。

RemoteAuthenticationHandler

RemoteAuthenticationHandler 便是所有远程认证的抽象基类了,它继承自AuthenticationHandler,并实现了IAuthenticationRequestHandler接口:

public abstract class RemoteAuthenticationHandler<TOptions> : AuthenticationHandler<TOptions>, IAuthenticationRequestHandler
    where TOptions : RemoteAuthenticationOptions, new()
{

    public virtual Task<bool> ShouldHandleRequestAsync() => Task.FromResult(Options.CallbackPath == Request.Path);

    public virtual async Task<bool> HandleRequestAsync()
    {
        if (!await ShouldHandleRequestAsync())
        {
            return false;
        }

        var authResult = await HandleRemoteAuthenticateAsync();
 
        ...

        await Context.SignInAsync(SignInScheme, ticketContext.Principal, ticketContext.Properties);

        if (string.IsNullOrEmpty(ticketContext.ReturnUri)) ticketContext.ReturnUri = "/";
        Response.Redirect(ticketContext.ReturnUri);
        return true;
    }

    protected abstract Task<HandleRequestResult> HandleRemoteAuthenticateAsync();

    protected override async Task<AuthenticateResult> HandleAuthenticateAsync()
    {
        var result = await Context.AuthenticateAsync(SignInScheme);

        ...
    }

    protected override Task HandleForbiddenAsync(AuthenticationProperties properties)
        => Context.ForbidAsync(SignInScheme);

    protected virtual void GenerateCorrelationId(AuthenticationProperties properties) {}
    protected virtual bool ValidateCorrelationId(AuthenticationProperties properties) {}
}

在上面介绍的AuthenticationMiddleware中,提到它会先执行实现了IAuthenticationRequestHandler 接口的Handler(远程认证),之后(若未完成认证)再执行本地认证Handler。

RemoteAuthenticationHandler中核心的认证逻辑便是 HandleRequestAsync 方法,它主要包含2个步骤:

  1. 首先执行一个抽象方法HandleRemoteAuthenticateAsync,由具体的Handler来实现,该方法返回的HandleRequestResult对象包含验证的结果(跳过,失败,成功等),在成功时会包含一个ticket对象。
  2. 若上一步验证成功,则根据返回的ticket,获取到ClaimsPrincipal对象,并调用其它认证Handler的Context.SignInAsync方法。

也就是说,远程Hander会在用户未登录时,指引用户跳转到认证服务器,登录成功后,解析认证服务器传回的凭证,最终依赖于本地Handler来保存身份令牌。当用户再次访问则无需经过远程Handler,直接交给本地Handler来处理。

由此也可以知道,远程认证中本身并不具备SignIn的能力,所以必须通过指定其它SignInScheme交给本地认证来完成 SignIn

对于其父类的HandleAuthenticateAsync抽象方法则定义了一个默认实现:“直接转交给本地验证来处理”。当我们需要定义自己的远程认证方式时,通常只需实现 HandleRemoteAuthenticateAsync 即可,而不用再去处理 HandleAuthenticateAsync 。

总结

基于声明的认证并不是微软所特有的,它在国外被广泛的使用,如微软的ADFS,Google,Facebook,Twitter等等。在基于声明的认证中,对认证和授权进行了明确的区分,认证用来颁发一个用户的身份标识,其包含这个用户的基本信息,而对于这个身份的颁发则由我们信任的第三方机构来(STS)颁发(当然,你也可以自己来颁发)。而授权,则是通过获取身份标识中的信息,来判断该用户能做什么,不能做什么。

本文对 ASP.NET Core 中认证系统的整个流程做了一个简要的介绍,可能会比较苦涩难懂,不过没关系,大致有个印象就好,下一章则详细介绍一下最常用的本地认证方式:Cookie认证,后续也会详细介绍 OIDC 的用法与实现,到时再回头来看本文或许会豁然开朗。

.Net Core中AuthorizationHandlerContext如何获取当前请求的相关信息_娃都会打酱油了的博客-CSDN博客

mikel阅读(504)

来源: .Net Core中AuthorizationHandlerContext如何获取当前请求的相关信息_娃都会打酱油了的博客-CSDN博客

在.Net Core中要自定义用户身份认证,需要实现IAuthorizationHandler,实现的代码也比较简单,一般我们只要实现本地认证AuthorizationHandler<T>.HandleRequirementAsync即可,认证时一般需要用到一些用于判断是否允许访问的认证信息,比如当前的用户信息,比如当前请求的资源信息,这些信息呢,我们都可以通过AuthorizationHandlerContext来获取。

AuthorizationHandlerContext.Resource对应当前请求的资源信息,其返回值为object,所以我们也不知道这个值究竟是什么东西,但没关系,我们可以通过调试阶段的快速监视来查看实际Resource究竟是什么。

可以看到其类型为Microsoft.AspNetCore.Routing.RouteEndpoint,Endpoint.DisplayName为请求的action,继续展开,可以看到Endpoint.Metadata内包含了action对应的Attribute之类的信息,这些信息就是我们真正需要的内容。
PS:注意具体AuthorizationHandlerContext.Resource具体是什么和当前应用的宿主模式有关,我们开发时用的是默认的Kestrel模式,其它模式很可能不是Microsoft.AspNetCore.Routing.RouteEndpoint

上面说完了当前请求的资源部分,下面说当前用户信息部分,这部分就简单了,AuthorizationHandlerContext.User直接就可以获取当前的用户信息,如果这部分信息还不够,那你也可以在AuthorizationHandler<T>中直接注入你需要的内容,比如注入IHttpContextAccessor来获取当前请求的上下文,比如注入IOptions<T>来获取一些配置信息等。

下面举一个使用例子,该例子是设置接口在HttpGet时对所有人员公开,但非HttpGet请求时只有指定用户可以调用

[AttributeUsage(AttributeTargets.Class | AttributeTargets.Method, AllowMultiple = false, Inherited = true)]
public class UserLimitOperationAttribute : AuthorizeAttribute
{
/// <summary>
/// 直接指定当前的PolicyName
/// </summary>
public const string PolicyName = “UserLimitOperation”;
public UserLimitOperationAttribute()
: base(PolicyName)
{
}
}

public class UserLimitOperationRequirement : IAuthorizationRequirement
{
/// <summary>
/// 如果设置了<see cref=”UserLimitOperationAttribute”/>,但又没配置允许的用户,那么就认为对所有人开放(测试环境开放)
/// </summary>
public bool NoLimit
{
get
{
return this.Users.Count == 0;
}
}
public HashSet<string> Users { get; } = new HashSet<string>();
public UserLimitOperationRequirement(string limitUser)
{
if (!string.IsNullOrWhiteSpace(limitUser))
{
this.Users = limitUser.Split(new char[] { ‘,’ }, StringSplitOptions.RemoveEmptyEntries).ToHashSet();
}
}
}
public class UserLimitOperationHandler : AuthorizationHandler<UserLimitOperationRequirement>
{
protected override Task HandleRequirementAsync(AuthorizationHandlerContext context, UserLimitOperationRequirement requirement)
{
if (requirement.NoLimit)
{
context.Succeed(requirement);
}
else
{
var endpoint = context.Resource as RouteEndpoint;
if (endpoint != null)
{
var http = endpoint.Metadata.Where(_=>_ is HttpMethodAttribute).First() as HttpMethodAttribute;
if (http is HttpGetAttribute)
{//Get请求是公开的
context.Succeed(requirement);
return Task.CompletedTask;
}
}
if (context.User.Identity.IsAuthenticated
&& !string.IsNullOrWhiteSpace(context.User.Identity.Name) && requirement.Users.Contains(context.User.Identity.Name!))
{
//只有配置用户才允许调用
context.Succeed(requirement);
}
}
return Task.CompletedTask;
}
}
1
2
3
4
5
6
7
8
9
10
11
12
13
14
15
16
17
18
19
20
21
22
23
24
25
26
27
28
29
30
31
32
33
34
35
36
37
38
39
40
41
42
43
44
45
46
47
48
49
50
51
52
53
54
55
56
57
58
59
60
61
62
63
64
Startup.ConfigureServices注册代码如下

services.AddSingleton<IAuthorizationHandler, UserLimitOperationHandler>();
services.AddMvcCore().AddAuthorization(
options =>
{
options.AddPolicy(
UserLimitOperationAttribute.PolicyName,
policy =>
{
//这里的例子是通过IAuthorizationRequirement传递配置,也可以直接在AuthorizationHandler<T>中直接注入IOptions<T>
policy.AddRequirements(new UserLimitOperationRequirement(this.Configuration.GetValue<string>(“ConfigLimitUsers”)));
});
});
1
2
3
4
5
6
7
8
9
10
11
12
然后在要限制的controller或action上添加[UserLimitOperation]声明即可。

当然如果你的某些配置是直接在AuthorizeAttribute上指定的,比如指定资源标志的ResourceAuthorizeAttribute,那在判断时,你可以通过下面的代码来读取到相应的ResourceAuthorizeAttribute集合,然后进行逻辑判断即可。

var attributes = endpoint.Metadata.Where(_ => _ is ResourceAuthorizeAttribute).Cast<ResourceAuthorizeAttribute>().ToList();
1
最后再加个Log部分,个人老是忘记怎么自行指定日志的categoryName

ILoggerFactory loggerFactory;//注入
var loggerFactory.CreateLogger(“limitLog”);
1
2
可以扩展阅读的参考资料:

ASP.NET Core 认证与授权
浅析 .NET 中 AsyncLocal 的实现原理
————————————————
版权声明:本文为CSDN博主「娃都会打酱油了」的原创文章,遵循CC 4.0 BY-SA版权协议,转载请附上原文出处链接及本声明。
原文链接:https://blog.csdn.net/starfd/article/details/119187464

ASP.NET Core的路由[1]:注册URL模式与HttpHandler的映射关系 - Artech - 博客园

mikel阅读(417)

来源: ASP.NET Core的路由[1]:注册URL模式与HttpHandler的映射关系 – Artech – 博客园

ASP.NET Core的路由是通过一个类型为RouterMiddleware的中间件来实现的。如果我们将最终处理HTTP请求的组件称为HttpHandler,那么RouterMiddleware中间件的意义在于实现请求路径与对应HttpHandler之间的映射关系。对于传递给RouterMiddleware中间件的每一个请求,它会通过分析请求URL的模式并选择并提取对应的HttpHandler来处理该请求。除此之外,请求的URL还会携带相应参数,该中间件在进行路由解析过程中还会根据生成相应的路由参数提供给处理该请求的Handler。为了让读者朋友们对实现在RouterMiddleware的路由功能具有一个大体的认识,我们照例先来演示几个简单的实例。[本文已经同步到《ASP.NET Core框架揭秘》之中]

目录
一、注册请求路径与HttpHandler之间的映射
二、设置内联约束
三、为路由参数设置默认值
四、特殊的路由参数

一、注册请求路径与HttpHandler之间的映射

ASP.NET Core针对请求的处理总是在一个通过HttpContext对象表示的上下文中进行,所以上面我们所说的HttpHandler从编程的角度来讲体现为一个RequestDelegate的委托对象,因此所谓的“路由注册”就是注册一组具有相同默认的请求路径与对应RequestDelegate之间的映射关系。接下来我们就同一个简单的实例来演示这样的映射关系是如何通过注册RouterMiddleware中间件的方式来完成的。

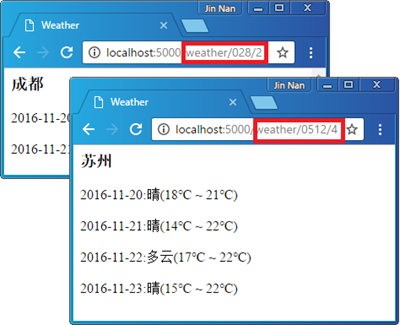
我们演示的这个ASP.NET Core应用是一个简易版的天气预报站点。如果用户希望获取某个城市在未来N天之内的天气信息,他可以直接利用浏览器发送一个GET请求并将对应城市(采用电话区号表示)和天数设置在URL中。如下图所示,为了得到成都未来两天的天气信息,我们发送请求采用的路径为“weather/028/2”。对于路径“weather/0512/4”的请求,返回的自然就是苏州未来4天的添加信息。

1

为了实现这个简单的应用,我们定义如下一个名为WeatherReport的类型表示某个城市在某段时间范围类的天气。如下面的代码片段所示,我们定义了另一个名为WeatherInfo的类型来表示具体某一天的天气。简单起见,我们让这个WeatherInfo对象只携带基本添加状况和气温区间的信息。当我们创建一个WeatherReport对象的时候,我们会随机生成这些天气信息。

   1: public class WeatherReport
   2: {
   3:     private static string[]     _conditions = new string[] { "晴", "多云", "小雨" };
   4:     private static Random       _random = new Random();
   5:
   6:     public string                                 City { get; }
   7:     public IDictionary<DateTime, WeatherInfo>     WeatherInfos { get; }
   8:
   9:     public WeatherReport(string city, int days)
  10:     {
  11:         this.City = city;
  12:         this.WeatherInfos = new Dictionary<DateTime, WeatherInfo>();
  13:         for (int i = 0; i < days; i++)
  14:         {
  15:             this.WeatherInfos[DateTime.Today.AddDays(i + 1)] = new WeatherInfo
  16:             {
  17:                 Condition         = _conditions[_random.Next(0, 2)],
  18:                 HighTemperature   = _random.Next(20, 30),
  19:                 LowTemperature    = _random.Next(10, 20)
  20:             };
  21:         }
  22:     }
  23:
  24:     public WeatherReport(string city, DateTime date)
  25:     {
  26:         this.City = city;
  27:         this.WeatherInfos = new Dictionary<DateTime, WeatherInfo>
  28:         {
  29:             [date] = new WeatherInfo
  30:             {
  31:                 Condition          = _conditions[_random.Next(0, 2)],
  32:                 HighTemperature    = _random.Next(20, 30),
  33:                 LowTemperature     = _random.Next(10, 20)
  34:             }
  35:         };
  36:     }
  37:
  38:     public class WeatherInfo
  39:     {
  40:         public string Condition { get; set; }
  41:         public double HighTemperature { get; set; }
  42:         public double LowTemperature { get; set; }
  43:     }
  44: }

我们说最终用于处理请求的HttpHandler最终体现为一个类型为RequestDelegate的委托对象,为此我们定义了如下一个与这个委托类型具有一致声明的方法WeatherForecast来处理针对天气的请求。如下面的代码片段所示,我们在这个方法中直接调用HttpContext的扩展方法GetRouteData得到RouterMiddleware中间件在路由解析过程中得到的路由参数。这个GetRouteData方法返回的是一个具有字典结构的对象,它的Key和Value分别代表路由参数的名称和值,我们通过预先定义的参数名(“city”和“days”)得到目标城市和预报天数。

   1: public class Program
   2: {
   3:     private static Dictionary<string, string> _cities = new Dictionary<string, string>
   4:     {
   5:         ["010"]  = "北京",
   6:         ["028"]  = "成都",
   7:         ["0512"] = "苏州"
   8:     };
   9:
  10:     public static async Task WeatherForecast(HttpContext context)
  11:     {
  12:         string city = (string)context.GetRouteData().Values["city"];
  13:         city = _cities[city];
  14:         int days = int.Parse(context.GetRouteData().Values["days"].ToString());
  15:         WeatherReport report = new WeatherReport(city, days);
  16:
  17:         context.Response.ContentType = "text/html";
  18:         await context.Response.WriteAsync("<html><head><title>Weather</title></head><body>");
  19:         await context.Response.WriteAsync($"<h3>{city}</h3>");
  20:         foreach (var it in report.WeatherInfos)
  21:         {
  22:             await context.Response.WriteAsync($"{it.Key.ToString("yyyy-MM-dd")}:");
  23:             await context.Response.WriteAsync($"{it.Value.Condition}({it.Value.LowTemperature}℃ ~ {it.Value.HighTemperature}℃)<br/><br/>");
  24:         }
  25:         await context.Response.WriteAsync("</body></html>");
  26:     }
  27:
  28: }

有了这两个核心参数之后,我们据此生成一个WeatherReport对象,并将它携带的天气信息以一个HTML文档的形式响应给客户端,图1所示就是这个HTML文档在浏览器上的呈现效果。由于目标城市最初以电话区号的形式体现,在呈现天气信息的过程中我们还会根据区号获取具体城市名称,简单起见,我们利用一个简单的字典来保存区号和城市之间的关系,并且只存储了三个城市而已。

接下来我们来完成所需的路由注册工作,实际上就是注册RouterMiddleware中间件。由于这各中间件定义在“Microsoft.AspNetCore.Routing”这个NuGet包中,所以我们需要添加对应的依赖。如下面的代码片段所示,针对RouterMiddleware中间件的注册实现在ApplicationBuilder的扩展方法UseRouter中。由于RouterMiddleware中间件在进行路由解析的过程中需要使用到一些服务,我们调用WebHostBuilder的ConfigureServices方法注册的就是这些服务。具体来说,这些与路由相关的服务是通过调用ServiceCollection的扩展方法AddRouting实现的。

   1: public class Program
   2: {
   3:     public static void Main()
   4:     {
   5:         new WebHostBuilder()
   6:             .UseKestrel()
   7:             .ConfigureServices(svcs => svcs.AddRouting())
   8:             .Configure(app => app.UseRouter(builder => builder.MapGet("weather/{city}/{days}", WeatherForecast)))
   9:             .Build()
  10:             .Run();
  11:     }
  12:
  13: }

RouterMiddleware中间件针对路由的解析依赖于一个名为Router的对象,对应的接口为IRouter。我们在程序中会先根据ApplicationBuilder对象创建一个RouteBuilder对象,并利用后者来创建这个Router。我们说路由注册从本质上体现为注册某种URL模式与一个RequestDelegate对象之间的映射,这个映射关系的建立是通过调用RouteBuilder的MapGet方法的调用。MapGet方法具有两个参数,第一个参数代表映射的URL模板,后者是处理请求的RequestDelegate对象。我们指定的URL模板为“weather/{city}/{days}”,其中携带两个路由参数({city}和{days}),我们知道它代表获取天气预报的目标城市和天数。由于针对天气请求的处理实现在我们定义的WeatherReport方法中,我们将指向这个方法的RequestDelegate对象作为第二个参数。

二、设置内联约束

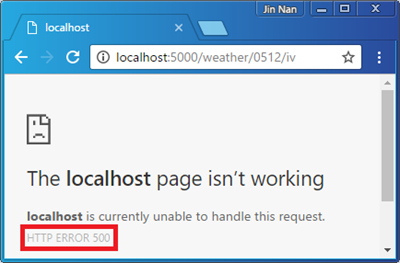
在上面进行路由注册的实例中,我们在注册的URL模板中定义了两个参数({city}和{days})来分别代表获取天气预报的目标城市对应的区号和天数。区号应该具有一定的格式(以零开始的3-4位数字),而天数除了必须是一个整数之外,还应该具有一定的范围。由于我们在注册的时候并没有为这个两个路由参数的取值做任何的约束,所以请求URL携带的任何字符都是有效的。而处理请求的WeatherForecast方法也并没有对提取的数据做任何的验证,所以在执行过程中会直接抛出异常。如下图所示,由于请求URL(“/weather/0512/iv”)指定了天数不合法,所有客户端接收到一个状态为“500 Internal Server Error”的响应。

2

为了确保路由参数数值的有效性,我们在进行路由注册的时候可以采用内联(Inline)的方式直接将相应的约束规则定义在路由模板中。ASP.NET Core针对我们常用的验证规则定义了相应的约束表达式,我们可以根据需要为某个路由参数指定一个或者多个约束表达式。

如下面的代码片段所示,为了确保URL携带的是合法的区号,我们为路由参数{city}应用了一个针对正则表达式的约束(:regex(^0[1-9]{{2,3}}$))。由于路由模板在被解析的时候会将“{…}”这样的字符理解为路由参数,如果约束表达式需要使用“{}”字符(比如正则表达式“^0[1-9]{2,3}$)”),需要采用“{{}}”进行转义。至于另一个路由参数{days}则应用了两个约束,第一个是针对数据类型的约束(:int),它要求参数值必须是一个整数。另一个是针对区间的约束(:range(1,4)),意味着我们的应用最多只提供未来4天的天气。

   1: string template = @"weather/{city:regex(^0\d{{2,3}}$)}/{days:int:range(1,4)}";
   2: new WebHostBuilder()
   3:     .UseKestrel()
   4:     .ConfigureServices(svcs => svcs.AddRouting())
   5:     .Configure(app => app.UseRouter(builder=> builder.MapGet(template, WeatherForecast)))
   6:     .Build()
   7:     .Run();

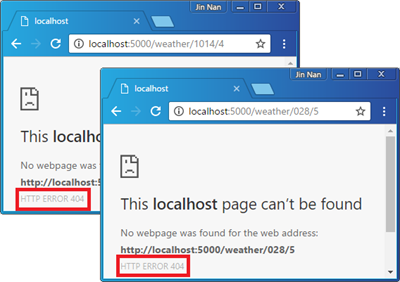
如果我们在注册路由的时候应用了约束,那么当RouterMiddleware中间件在进行路由解析的时候除了要求请求路径必须与路由模板具有相同的模式,同时还要求携带的数据满足对应路由参数的约束条件。如果不能同时满足这两个条件,RouterMiddleware中间件将无法选择一个RequestDelegate对象来处理当前请求,在此情况下它将直接将请求递交给后续的中间件进行处理。对于我们演示的这个实例来说,如果我们提供一个不合法的区号(1014)和预报天数(5),客户端都将得到一个状态码为“404 Not Found”的响应。

3

三、为路由参数设置默认值

路由注册时提供的路由模板(比如“Weather/{city}/{days}”)可以包含静态的字符(比如“weather”),也可以包括动态的参数(比如{city}和{days}),我们将它们成为路由参数。并非每个路由参数都是必需的(要求路由参数的值必需存在请求路径中),有的路由参数是可以缺省的。还是以上面演示的实例来说,我们可以采用如下的方式在路由参数名后面添加一个问号(“?”),原本必需的路由参数变成了可以缺省的。可缺省的路由参数只能出现在路由模板尾部,这个应该不难理解。

   1: string template = "weather/{city?}/{days?}";
   2: new WebHostBuilder()
   3:     .UseKestrel()
   4:     .ConfigureServices(svcs => svcs.AddRouting())
   5:     .Configure(app => app.UseRouter(builder=> builder.MapGet(template, WeatherForecast)))
   6:     .Build()
   7:     .Run();

既然可以路由变量占据的部分路径是可以缺省的,那么意味即使请求的URL不具有对应的内容(比如“weather”和“weather/010”),在进行路由解析的时候同样该请求与路由规则相匹配,但是在最终的路由参数字典中将找不到它们。由于表示目标城市和预测天数的两个路由参数都是可缺省的,我们需要对处理请求的WeatherForecast方法做作相应的改动。下面的代码片段表明如果请求URL为显式提供对应参数的数据,它们的默认值分别为“010”(北京)和4(天),也就是说应用默认提供北京地区未来四天的天气。

   1: public static async Task WeatherForecast(HttpContext context)
   2: {
   3:     object rawCity;
   4:     object rawDays;
   5:     var values = context.GetRouteData().Values;
   6:     string city = values.TryGetValue("city", out rawCity) ? rawCity.ToString() : "010";
   7:     int days = values.TryGetValue("days", out rawDays) ? int.Parse(rawDays.ToString()) : 4;
   8:
   9:     city = _cities[city];
  10:     WeatherReport report = new WeatherReport(city, days);
  11:
  12: }

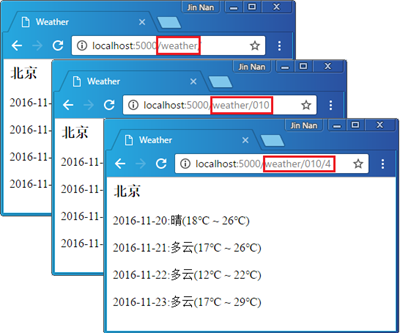
针对上述的改动,如果希望获取北京未来四天的天气状况,我们可以采用如下图所示的三种URL(“weather”和“weather/010”和“weather/010/4”),它们都是完全等效的。

4

上面我们的程序相当于是在进行请求处理的时候给予了可缺省路由参数一个默认值,实际上路由参数默认值得设置还具有一种更简单的方式,那就是按照如下所示的方式直接将默认值定义在路由模板中。如果采用这样的路由注册方式,我们针对WeatherForecast方法的改动就完全没有必要了。

   1: string template = "weather/{city=010}/{days=4}";
   2: new WebHostBuilder()
   3:     .UseKestrel()
   4:     .ConfigureServices(svcs => svcs.AddRouting())
   5:     .Configure(app =>app.UseRouter(builder=>builder.MapGet(template, WeatherForecast)))
   6:     .Build()
   7:     .Run();

四、特殊的路由参数

一个URL可以通过分隔符“/”划分为多个路径分段(Segment),路由模板中定义的路由参数一般来说会占据某个独立的分段(比如“weather/{city}/{days}”)。不过也有特例,我们即可以在一个单独的路径分段中定义多个路由参数,同样也可以让一个路由参数跨越对个连续的路径分段。

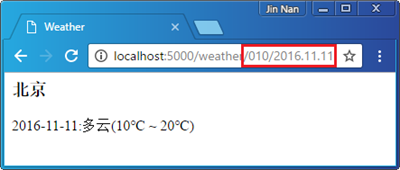
我们先来介绍在一个独立的路径分段中定义多个路由参数的情况。同样以我们演示的获取天气预报的URL为例,假设我们设计一种URL来获取某个城市某一天的天气信息,比如“/weather/010/2016.11.11”这样一个URL可以获取北京地区在2016年双11那天的天气,那么路由模板为“/weather/{city}/{year}.{month}.{day}”。

   1: string tempalte = "weather/{city}/{year}.{month}.{day}";
   2: new WebHostBuilder()
   3:     .UseKestrel()
   4:     .ConfigureServices(svcs => svcs.AddRouting())
   5:     .Configure(app => app.UseRouter(builder=>builder.MapGet(tempalte, WeatherForecast)))
   6:     .Build()
   7:     .Run();
   8:
   9: public static async Task WeatherForecast(HttpContext context)
  10: {
  11:     var values     = context.GetRouteData().Values;
  12:     string city    = values["city"].ToString();
  13:     city           = _cities[city];
  14:     int year       = int.Parse(values["year"].ToString());
  15:     int month      = int.Parse(values["month"].ToString());
  16:     int day        = int.Parse(values["day"].ToString());
  17:
  18:     WeatherReport report = new WeatherReport(city, new DateTime(year,month,day));
  19:
  20: }

由于URL采用了新的设计,所以我们按照如上的形式对相关的程序进行了相应的修改。现在我们采用匹配的URL(比如“/weather/010/2016.11.11”)就可以获取到某个城市指定日期的天气。

5

对于上面设计的这个URL来说,我们采用“.”作为日期分隔符,如果我们采用“/”作为日期分隔符(比如“2016/11/11”),这个路由默认应该如何定义呢?由于“/”同时也是URL得路径分隔符,如果表示日期的路由变量也采用相同的分隔符,意味着同一个路由参数跨越了多个路径分段,我们只能定义“通配符”路由参数的形式来达到这个目的。通配符路由参数采用“{*variable}”这样的形式,星号(“*”)表示路径“余下的部分”,所以这样的路由参数只能出现在模板的尾端。对我们的实例来说,路由模板可以定义成“/weather/{city}/{*date}”。

   1: new WebHostBuilder()
   2:     .UseKestrel()
   3:     .ConfigureServices(svcs => svcs.AddRouting())
   4:     .Configure(app => {
   5:         string tempalte = "weather/{city}/{*date}";
   6:         IRouter router  = new RouteBuilder(app).MapGet(tempalte, WeatherForecast).Build();
   7:         app.UseRouter(router);
   8:     })
   9:     .Build()
  10:     .Run();
  11:
  12: public static async Task WeatherForecast(HttpContext context)
  13: {
  14:     var values      = context.GetRouteData().Values;
  15:     string city     = values["city"].ToString();
  16:     city            = _cities[city];
  17:     DateTime date   = DateTime.ParseExact(values["date"].ToString(), "yyyy/MM/dd",
  18:     CultureInfo.InvariantCulture);
  19:     WeatherReport report = new WeatherReport(city, date);
  20:
  21: }

我们可以对程序做如上的修改来使用新的URL模板(“/weather/{city}/{*date}”)。这样为了得到如上图所示的北京在2016年11月11日的天气,请求的URL可以替换成“/weather/010/2016/11/11”。


ASP.NET Core的路由[1]:注册URL模式与HttpHandler的映射关系
ASP.NET Core的路由[2]:路由系统的核心对象——Router
ASP.NET Core的路由[3]:Router的创建者——RouteBuilder
ASP.NET Core的路由[4]:来认识一下实现路由的RouterMiddleware中间件
ASP.NET Core的路由[5]:内联路由约束的检验

Visual Studio为C#控制台应用添加外部引用_Alphathur的博客-CSDN博客

mikel阅读(450)

来源: Visual Studio为C#控制台应用添加外部引用_Alphathur的博客-CSDN博客

问题
起因是我的控制台应用需要使用外部依赖OleDbConnection和OleDbDataAdapter来做excel数据处理。尽管在文件声明了

using System.Data.OleDb;
1
但似乎没有作用,如图提示:

错误 CS1069 未能在命名空间“System.Data.OleDb”中找到类型名“OleDbConnection”。此类型已转发到程序集“System.Data.OleDb, Version=4.0.1.0, Culture=neutral, PublicKeyToken=31bf3856ad364e35”。请考虑添加对该程序集的引用。 ConsoleApp1 C:\Users\usheryoung\source\repos\ConsoleApp1\ConsoleApp1\Program.cs 42 活动

通过项目引用可以看出确实缺少OleDb这个依赖


解决方案
在visual studio 工具栏搜索:程序包管理器控制台,然后执行

Install-Package System.Data.OleDb
1

OleDb即可被正常安装的控制台应用中,程序不再报错。
————————————————
版权声明:本文为CSDN博主「Alphathur」的原创文章,遵循CC 4.0 BY-SA版权协议,转载请附上原文出处链接及本声明。
原文链接:https://blog.csdn.net/mryang125/article/details/117077030

.NET Core Session的使用方法 - zock - 博客园

mikel阅读(480)

来源: .NET Core Session的使用方法 – zock – 博客园

刚使用.NET Core会不习惯,比如如何使用Session;不仅需要引用相应的类库,还需要在Startup.cs里进行注册。

1、在你的项目上基于NuGet添加:

install-package  Microsoft.AspNetCore.Session -ver 2.0

install-package Microsoft.AspNetCore.Http.Extensions -ver 2.0

2、在Startup.cs里进行注册

在Startup.cs文件中的ConfigureServices方法中添加:

services.AddSession();

在Startup.cs文件中的Configure方法中添加:

app.UseSession();

添加后代码如下:

复制代码
public void ConfigureServices(IServiceCollection services)
{
    services.AddSession();
    services.AddMvc();
}
public void Configure(IApplicationBuilder app, IHostingEnvironment env, ILoggerFactory loggerFactory)
{
    loggerFactory.AddConsole(Configuration.GetSection("Logging"));
    loggerFactory.AddDebug();

    if (env.IsDevelopment())
    {
        app.UseDeveloperExceptionPage();
        app.UseBrowserLink();
    }
    else
    {
        app.UseExceptionHandler("/Home/Error");
    }

    app.UseStaticFiles();
    app.UseSession();
    app.UseMvc(routes =>
    {
        routes.MapRoute(
        name: "default",
        template: "{controller=Home}/{action=Index}/{id?}");
    });
}
复制代码

3、在MVC Controller里使用HttpContext.Session

从nuget安装Microsoft.AspNetCore.Mvc引用,直接使用自带的方法进行设置和获取session。不过自带的方法设置和获取的session值是byte[]类型的,可以从nuget安装并引用Microsoft.AspNetCore.Http并使用里面的扩展方法。

复制代码
public class HomeController : Controller
{
    public IActionResult Index()
    {
        HttpContext.Session.SetString("code", "123456");
        return View();
    }

    public IActionResult About()
    {
        ViewBag.Code = HttpContext.Session.GetString("code");
        return View();
    }
}
复制代码

4、如果不是在Controller里,你可以注入IHttpContextAccessor

复制代码
public class SessionTestClass
{
    private readonly IHttpContextAccessor _httpContextAccessor;
    private ISession _session => _httpContextAccessor.HttpContext.Session;

    public SomeOtherClass(IHttpContextAccessor httpContextAccessor)
    {
        _httpContextAccessor = httpContextAccessor;
    }

    public void Set()
    {
        _session.SetString("code", "123456");
    }

    public void Get()
    {
        string code = _session.GetString("code");
    }
}
复制代码

5、Isession的扩展 存储复杂对象

复制代码
public static class SessionExtensions
{
    public static void SetObjectAsJson(this ISession session, string key, object value)
    {
        session.SetString(key, JsonConvert.SerializeObject(value));
    }

    public static T GetObjectFromJson<T>(this ISession session, string key)
    {
        var value = session.GetString(key);

        return value == null ? default(T) : JsonConvert.DeserializeObject<T>(value);
    }
}
复制代码

使用范例:

var myTestObject = new MyTestClass();
HttpContext.Session.SetObjectAsJson("SessionTest", myTestObject);
var myComplexObject = HttpContext.Session.GetObjectFromJson<MyClass>("SessionTest");


2019年破解RAR密码的三种最可行方法

mikel阅读(860)

来源: 2019年破解RAR密码的三种最可行方法

RAR是当今最流行的文件格式之一。它的用途范围从数据压缩到错误恢复,其主要优点是能够使用密码保护您的文件。但不知何故,当你忘记密码的时候会想。这可能是因为密码被您或其他人篡改了,或者您忘记了密码,因为它过于复杂和混乱。要破解受密码保护的RAR文件,您必须重新获取密码然后解锁文件。关于如何破解RAR密码有一些技巧,所以让我们看一下最简单的操作。


方法1.使用CMD破解RAR密码

使用Windows设备的命令提示符组件破解RAR存档的密码会导致如何在没有软件的情况下破解RAR密码,但它不如其他方法有效。您只需要利用命令提示符,否则称为“使用记事本删除RAR密码”。要这样做,你需要……

1.打开记事本,然后键入一些命令并运行它。

2.双击bat文件并按键盘上的Win + R键打开命令提示符,键入cmd.exe(或只是“cmd”),然后点击“确定”或按Enter键。

使用CMD破解RAR密码

3.键入RAR文件名,然后点击Enter键以键入RAR存档的路径。

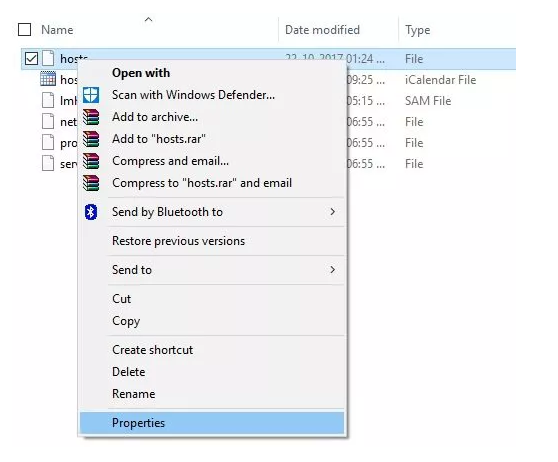
4.转到RAR存档的属性并记下其名称和路径。

文件属性

5.在CMD的相应空格中键入名称和路径。

6.在新记事本中键入命令并使用标题“rar-password.bat”保存; 然后,按Enter键。

7.最后,让bat文件中的命令运行; 这将有助于找到已定义的RAR存档的密码。


方式2.在线破解RAR密码

是的,有几个网站专注于如何在线破解RAR密码。但在这里,我们将检查一个重置任何压缩文件密码的特定站点。

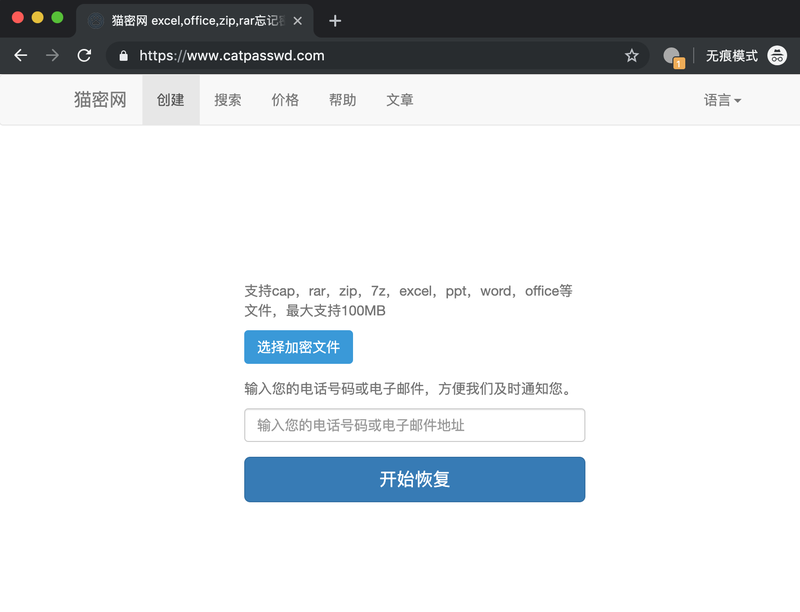
1.打开浏览器并访问https://www.catpasswd.com

rar密码破解工具

2.单击“选择加密文件”按钮,确保选中下面的框。值得注意的是,最大文件大小为100 MB。

3.选择文件后,输入您的邮箱以方便在恢复成功时可以及时的通知到您。

4.该站点现在将文件传输到服务器后利用云端超级计算机恢复; 当文件解密完成后,会向您发送邮件通知请注意查收。

同时,如果您的文件包含任何重要的业务信息或私人数据也完全没有任何问题,因为服务器是全程无人工感觉服务器自动运行的,在恢复成功后您还可以选择销毁文件以确保万无一失,就算服务器被黑客攻击也能保证您文件的绝对安全。显然,这是比使用程序破解好的原因,因为Web工具会利用云端超级服务器自动运行破解程序,方便快捷的同时不需要您额外多做任何事情,您只需要冲杯咖啡去做其他事情。


方式3.使用cRARk破解RAR密码

cRARk是为数不多的最快的RAR密码恢复工具之一。更重要的是,它完全免费使用。除了作为RAR密码恢复功能之外,cRARk还可用于不完整的密码和单词列表。它可以用字符补充单词表,这只是冰山一角。

由于其有趣的PCL语言,它使用一种强大的机制来恢复丢失或遗忘的RAR档案密码,并检查wordlist文件中的密码。尽管如此,这种方法在此列表中是最难的,并且不能在此完整地涵盖。

要使用此应用程序破解RAR密码,您需要……

1.首先,访问http://www.crark.net下载Windows或Linux版本

2.对于Windows用户,根据您的框架有两个版本:OpenCL和CUDA。

3.由于应用程序是命令行工具,您需要打开CMD窗口(Windows)或终端(Linux)并运行一些命令。

4.运行命令后,该工具会在几秒到几分钟内找到您的密码,具体取决于密码的长度。但是,如果找不到您的密码,它会通知您。


总结

列出了三种不同的方法后,您现在可以恢复RAR密码并再次解锁文件。即使这些方法看似乏味,但这些是帮助破解RAR密码的最简单,最直接的方法。使用上述方法 – 无论您决定使用命令提示符组件,通过CMD,cRARk或catpasswd的在线方法 – 您都可以获得密码保护的RAR文件而不受限制。

但是,解锁或破解受密码保护的RAR档案不是孩子的游戏。因此,需要耐心等待。密码分割程序将依赖于密码中使用的单词的数量和组合。如果密码包含超过4个字的复杂字母(小写和大写字母),数字(0到9)和独特字符(如 – !?>#$ <@),该程序将享有更多有机会解密RAR密码

ASP.Net core 中Server.MapPath的替换方法_shanghaimoon的博客-CSDN博客

mikel阅读(597)

string webRootPath = _hostingEnvironment.WebRootPath;             string contentRootPath = _hostingEnvironment.ContentRootPath;

来源: ASP.Net core 中Server.MapPath的替换方法_shanghaimoon的博客-CSDN博客

最近忙着将原来的ASP.NET项目迁移到ASP.NET core平台,整体还比较顺利,但其中也碰到不少问题,其中比比较值得关注的一个问题是,在netcore平台中,System.Web程序集已经取消了,要获取HttpContext并不是太容易,好在通过依赖注入,还是可以得到的,具体方法不在本文的讨论范围,大家可以自行百度。但是在得到了netcore版本的HttpContext后,发现已经不再有Server.MapPath函数了,而这个函数在以前是会被经常引用到的。

通过百度研究,发现也是有替代方法的,依然是通过强大的依赖注入,代码如下:

using Microsoft.AspNetCore.Hosting;
using Microsoft.AspNetCore.Mvc;

namespace AspNetCorePathMapping
{
public class HomeController : Controller
{
private readonly IHostingEnvironment _hostingEnvironment;

public HomeController(IHostingEnvironment hostingEnvironment)
{
_hostingEnvironment = hostingEnvironment;
}

public ActionResult Index()
{
string webRootPath = _hostingEnvironment.WebRootPath;
string contentRootPath = _hostingEnvironment.ContentRootPath;

return Content(webRootPath + “\n” + contentRootPath);
}
}
}
从上面可以看出,通过WebRootPath的使用,基本可以达到Server.MapPath同样的效果。但是这是在controller类中使用,如果是在普通类库中改怎么获取呢,或者有没有更简洁的方法呢?答案是肯定的,先上代码:

using Microsoft.AspNetCore.Builder;
using Microsoft.AspNetCore.Http;
using Microsoft.AspNetCore.Hosting;
using Microsoft.Extensions.DependencyInjection;
using Microsoft.Extensions.Hosting;
using System;
using System.Collections.Generic;
using System.Text;
using System.IO;

namespace HH.Util
{
public static class CoreHttpContext
{
private static Microsoft.AspNetCore.Hosting.IHostingEnvironment _hostEnviroment;
public static string WebPath => _hostEnviroment.WebRootPath;

public static string MapPath(string path)
{
return Path.Combine(_hostEnviroment.WebRootPath, path);
}

internal static void Configure(Microsoft.AspNetCore.Hosting.IHostingEnvironment hostEnviroment)
{
_hostEnviroment = hostEnviroment;
}
}
public static class StaticHostEnviromentExtensions
{
public static IApplicationBuilder UseStaticHostEnviroment(this IApplicationBuilder app)
{
var webHostEnvironment = app.ApplicationServices.GetRequiredService<Microsoft.AspNetCore.Hosting.IHostingEnvironment>();
CoreHttpContext.Configure(webHostEnvironment);
return app;
}
}
}
然后在Startup.cs的Configure方法中:

app.UseStaticHostEnviroment();
这样的话,只需要将原来的Server.Path替换为CoreHttpContext.MapPath就可以了,移植难度大大降低。
————————————————
版权声明:本文为CSDN博主「shanghaimoon」的原创文章,遵循CC 4.0 BY-SA版权协议,转载请附上原文出处链接及本声明。
原文链接:https://blog.csdn.net/shanghaimoon/article/details/114338839

在ASP.NET Core中怎么使用HttpContext.Current - YOYOFx - 博客园

mikel阅读(478)

来源: 在ASP.NET Core中怎么使用HttpContext.Current – YOYOFx – 博客园

一、前言

我们都知道,ASP.NET Core作为最新的框架,在MVC5和ASP.NET WebForm的基础上做了大量的重构。如果我们想使用以前版本中的HttpContext.Current的话,目前是不可用的,因为ASP.NET Core中是并没有这个API的。

当然我们也可以通过在Controller中访问HttpContext,但是某些情况下,这样使用起来还是不如HttpContext.Current方便。

二、IHttpContextAccessor

利用ASP.NET Core的依赖注入容器系统,通过请求获取IHttpContextAccessor接口,我们拥有模拟使用HttpContext.Current这样API的可能性。但是因为IHttpContextAccessor接口默认不是由依赖注入进行实例管理的。我们先要将它注册到ServiceCollection中:

复制代码
public void ConfigureServices(IServiceCollection services)
{
    services.TryAddSingleton<IHttpContextAccessor, HttpContextAccessor>();

    // Other code...
}
复制代码

来模拟一个HttpContext.Current吧:

复制代码
 public static class HttpContext
 {
        public static IServiceProvider ServiceProvider;

        public static Microsoft.AspNetCore.Http.HttpContext Current
        {
            get
            {
                object factory = ServiceProvider.GetService(typeof(Microsoft.AspNetCore.Http.IHttpContextAccessor));
                Microsoft.AspNetCore.Http.HttpContext context = ((Microsoft.AspNetCore.Http.HttpContextAccessor)factory).HttpContext;
                return context;
            }
        }

}
复制代码

其实说到HttpContext.Current就不得不提到多线程问题,在以前的ASP.NET版本中,如果遇到多线程环境很有可能HttpContext.Current为空的情况。说到这个问题以前就是有解决方案的,那就是CallContext;

CallContext 是类似于方法调用的线程本地存储区的专用集合对象,并提供对每个逻辑执行线程都唯一的数据槽。数据槽不在其他逻辑线程上的调用上下文之间共享。当 CallContext 沿执行代码路径往返传播并且由该路径中的各个对象检查时,可将对象添加到其中。

当使用ASP.NET的时候,虽然线城池里的线程是复用的,但是CallContext并不在一个线程的多次使用中共享。因为CallContext是针对逻辑线程的TLS,线程池中被复用的线程是操作系统中的内核对象而不是托管对象。就像数据库连接池中保存的是非托管资源而不是托管资源。因此,先后执行的两个托管线程可能在底层复用了一个物理线程(内核对象),但并不能共享同一组CallContext数据槽。就像先后new的两个SQLConnection对象可能在底层使用了同一个物理连接,但是托管对象的属性已经被重置。

与此对照的是ThreadStaticAttribute,标记上这个特性的静态字段是往物理线程的TLS中保存数据(根据MSDN的描述猜的。具体没试过),因此如果两个托管线程对象内部使用的是同一个物理线程,则这个字段会复用(在两个线程通过这一字段访问同一个数据槽)。

在.NET Core中,也有新的API选择,AsyncLocal<T>。

三、HttpContextAccessor

我们来看看ASP.NET Core中的IHttpContextAccessor接口实现吧:


复制代码
 public class HttpContextAccessor : IHttpContextAccessor
 {
#if NET451
        private static readonly string LogicalDataKey = "__HttpContext_Current__" + AppDomain.CurrentDomain.Id;

        public HttpContext HttpContext
        {
            get
            {
                var handle = CallContext.LogicalGetData(LogicalDataKey) as ObjectHandle;
                return handle?.Unwrap() as HttpContext;
            }
            set
            {
                CallContext.LogicalSetData(LogicalDataKey, new ObjectHandle(value));
            }
        }

#elif NETSTANDARD1_3
        private AsyncLocal<HttpContext> _httpContextCurrent = new AsyncLocal<HttpContext>();
        public HttpContext HttpContext
        {
            get
            {
                return _httpContextCurrent.Value;
            }
            set
            {
                _httpContextCurrent.Value = value;
            }
        }
#endif
}
复制代码


最后我只能说在ASP.NET Core中是万物皆DI啊,其实Core中的实现早就为我们想好了这些功能,只是改变了使用方式。


GitHub:https://github.com/maxzhang1985/YOYOFx  如果觉还可以请Star下, 欢迎一起交流。


.NET Core 开源学习群: 214741894  

将 ASP.NET MVC 应用升级到 .NET 6 - .NET Core | Microsoft Docs

mikel阅读(611)

来源: 将 ASP.NET MVC 应用升级到 .NET 6 – .NET Core | Microsoft Docs

.NET 升级助手是一种命令行工具,可帮助将 .NET Framework ASP.NET MVC 应用升级到 .NET 6。 本文提供以下内容:

  • 演示如何针对 .NET Framework ASP.NET MVC 应用运行该工具
  • 故障排除提示

升级 .NET Framework ASP.NET MVC 应用

本部分演示如何针对新创建的面向 .NET Framework 4.6.1 的 ASP.NET MVC 应用运行 NET 升级助手。 若要详细了解如何安装此工具,请查看 .NET 升级助手概述

初始演示设置

如果你要针对你自己的 .NET Framework 应用运行 .NET 升级助手,可跳过此步骤。 如果你只想试用一下来看看它的工作原理,可在此步骤中了解如何设置示例 ASP.NET MVC 和 Web API (.NET Framework) 项目以供使用。

借助 Visual Studio,使用 .NET Framework 创建一个新的 ASP.NET Web 应用程序项目。

在 Visual Studio 中新建 ASP.NET Web 应用程序项目

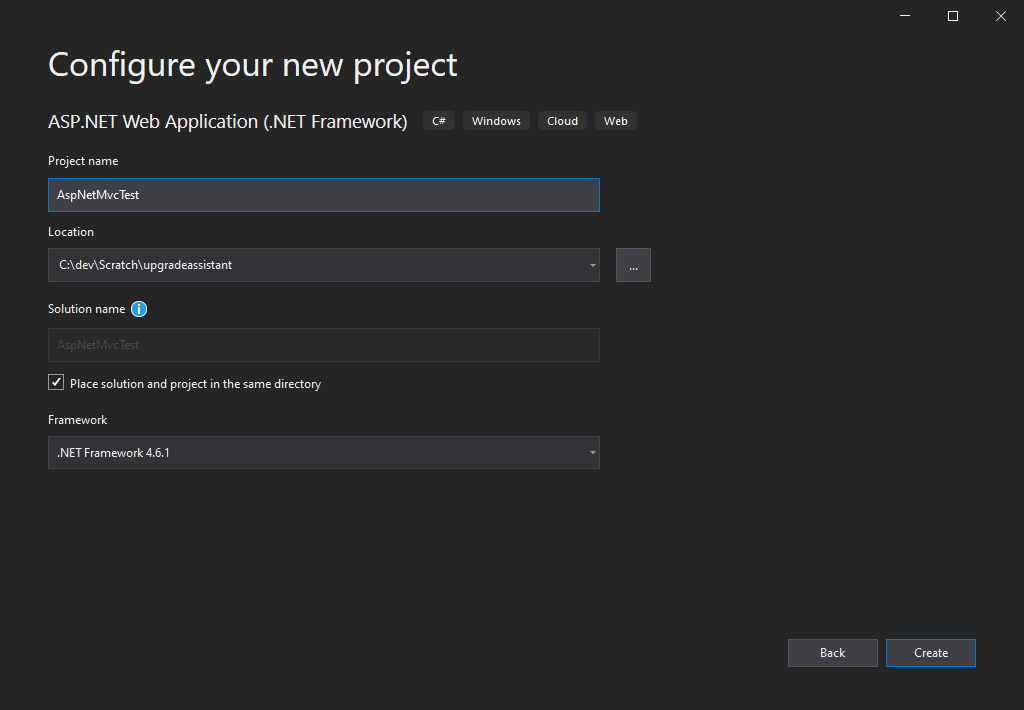
将项目命名为 AspNetMvcTest。 将项目配置为使用 .NET Framework 4.6.1。

在 Visual Studio 中配置 ASP.NET 项目

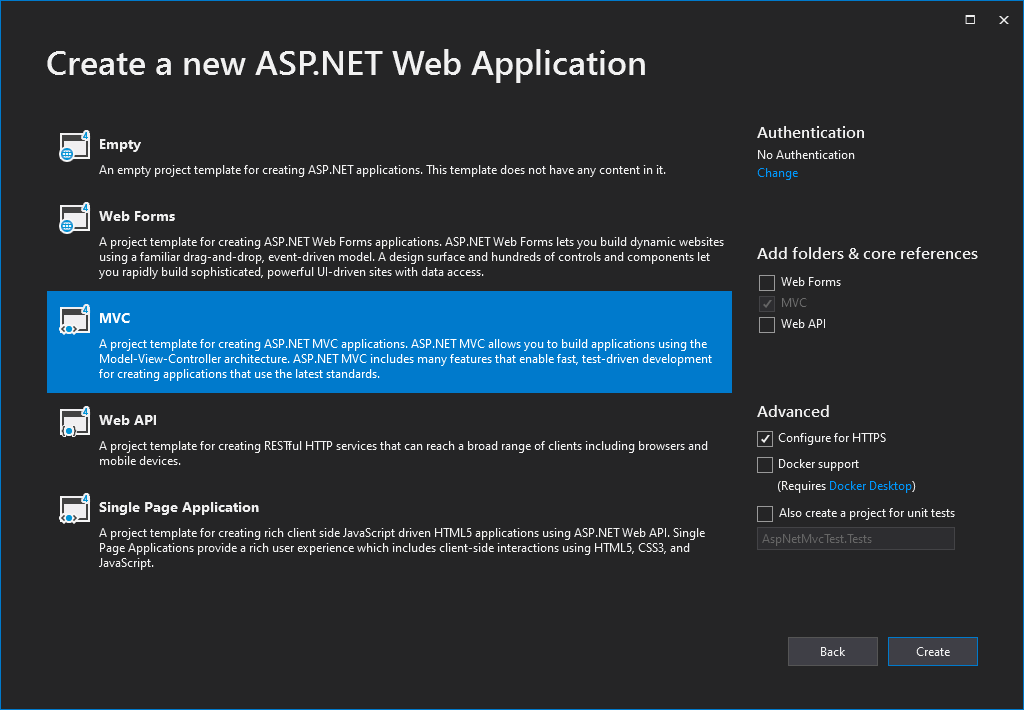
在下一对话框中,选择“MVC”应用程序,然后选择“创建” 。

在 Visual Studio 中创建 ASP.NET MVC 项目

查看所创建的项目及其文件,尤其是它的项目文件。

运行升级助手

打开终端,导航到目标项目或解决方案所在的文件夹。 运行 upgrade-assistant 命令,传入你要针对的项目的名称(可从任意位置运行该命令,只要项目文件的路径有效就行)。

控制台

upgrade-assistant upgrade .\AspNetMvcTest.csproj

该工具将运行并显示它将执行的步骤列表。

.NET 升级助手初始屏幕

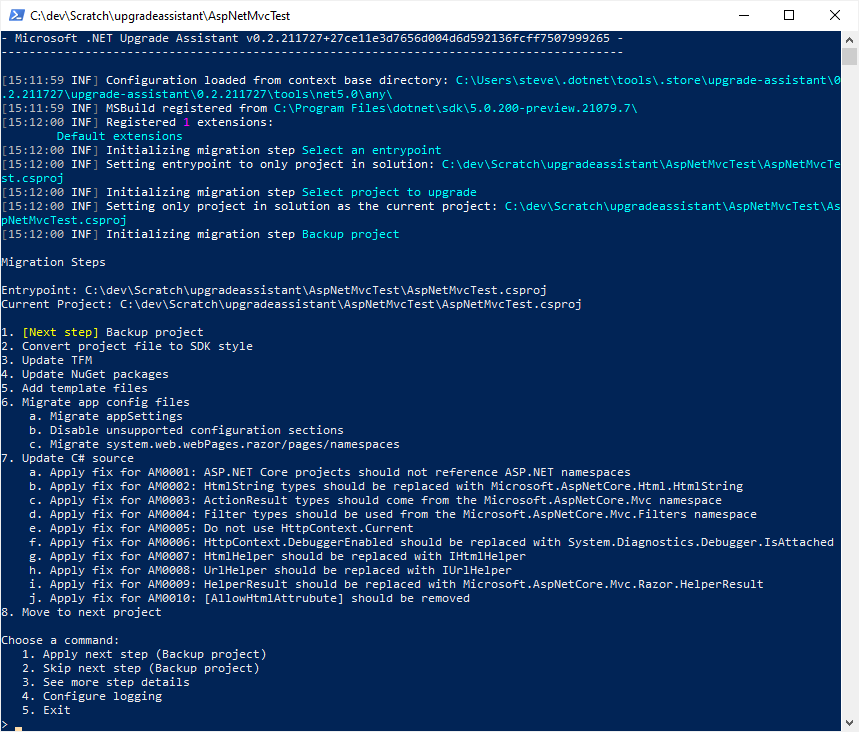
完成每个步骤后,该工具都会提供一组命令,用户可应用这些命令,也可跳过下一步骤、查看更多详细信息、配置日志记录或退出该过程。 如果该工具检测到某个步骤将不执行任何操作,它会自动跳过该步骤,转到下一步骤,直到到达有要执行的操作的步骤为止。 如果未进行其他任何选择,那么按 Enter 将执行下一步

在此示例中,每次都会选择“应用”步骤。 第一步是备份项目。

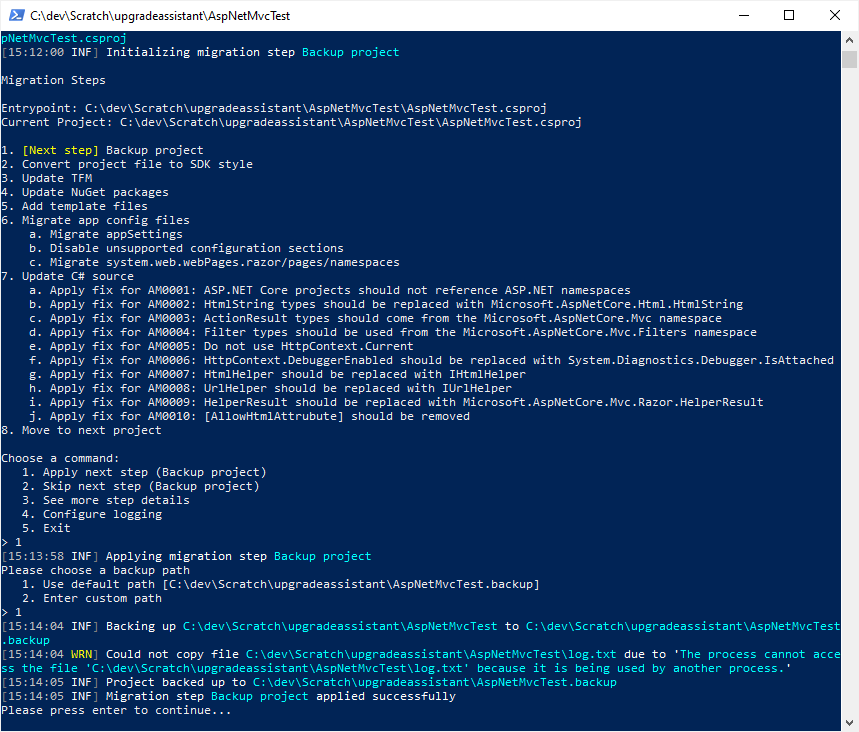
.NET 升级助手备份项目

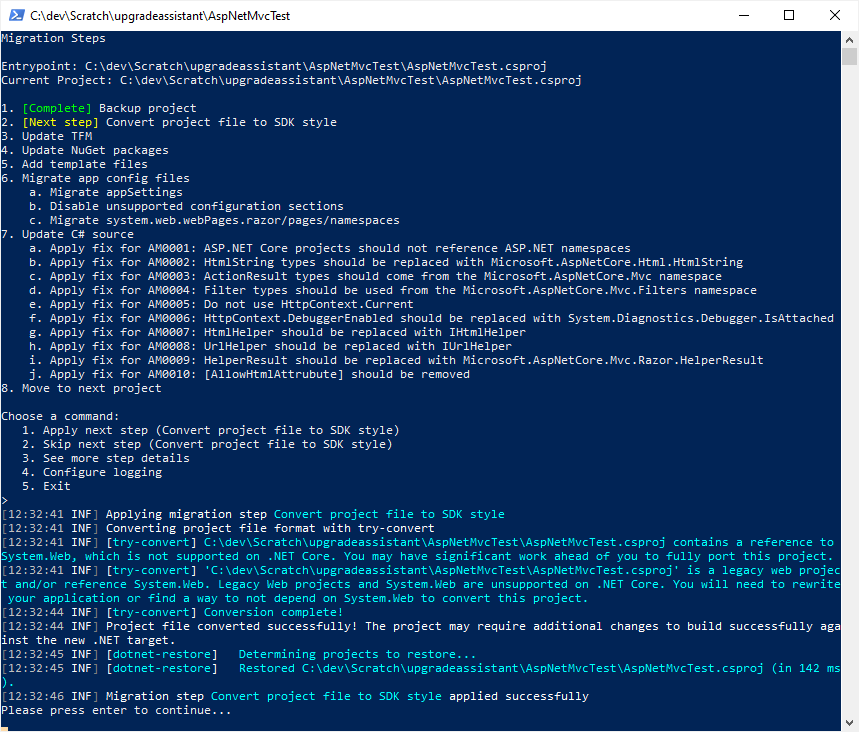
该工具会提示输入自定义路径进行备份或使用默认路径,后者会将项目备份放在具有 .backup 扩展名的同一文件夹中。 此工具接下来做的是将项目文件转换为 SDK 样式。

.NET 升级助手将项目转换为 SDK 样式

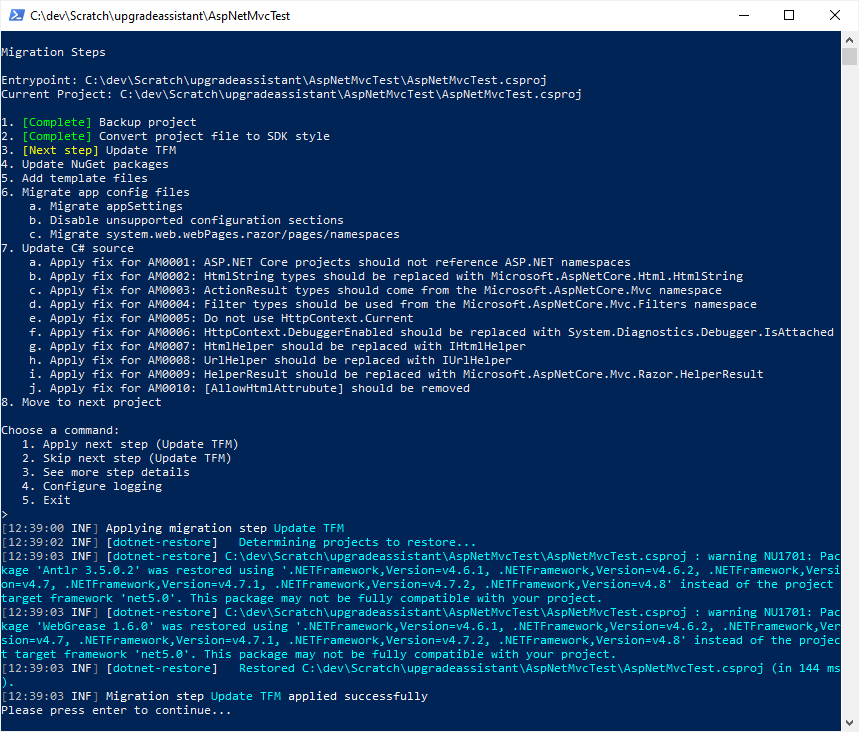
更新项目格式后,下一步是更新项目的 TFM。

.NET 升级助手更新 TFM

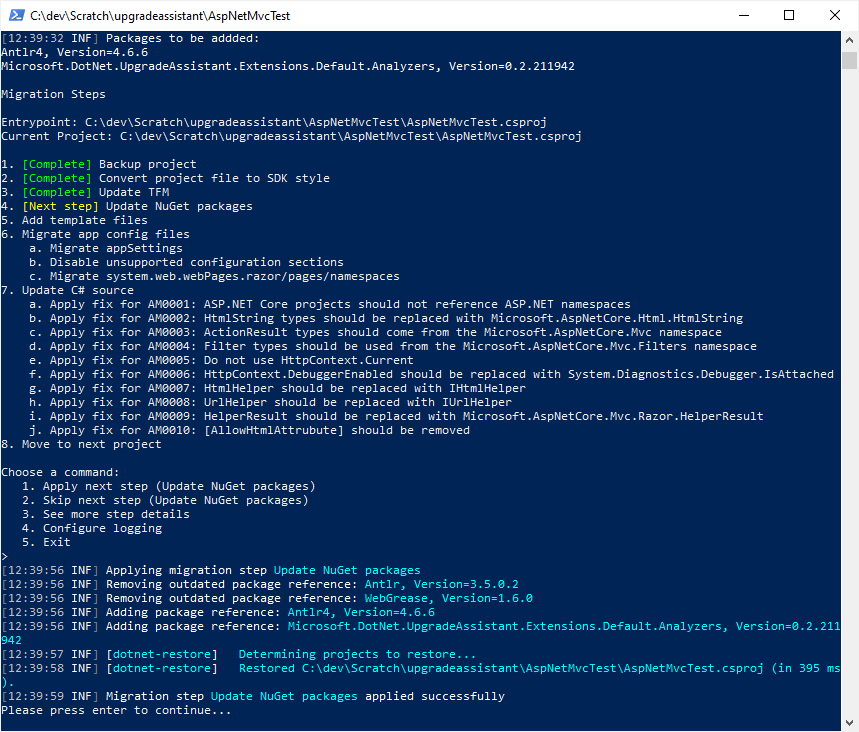
接下来,该工具会更新项目的 NuGet 包。 多个包需要更新,且会添加一个新的分析器包。

.NET 升级助手更新 NuGet 包

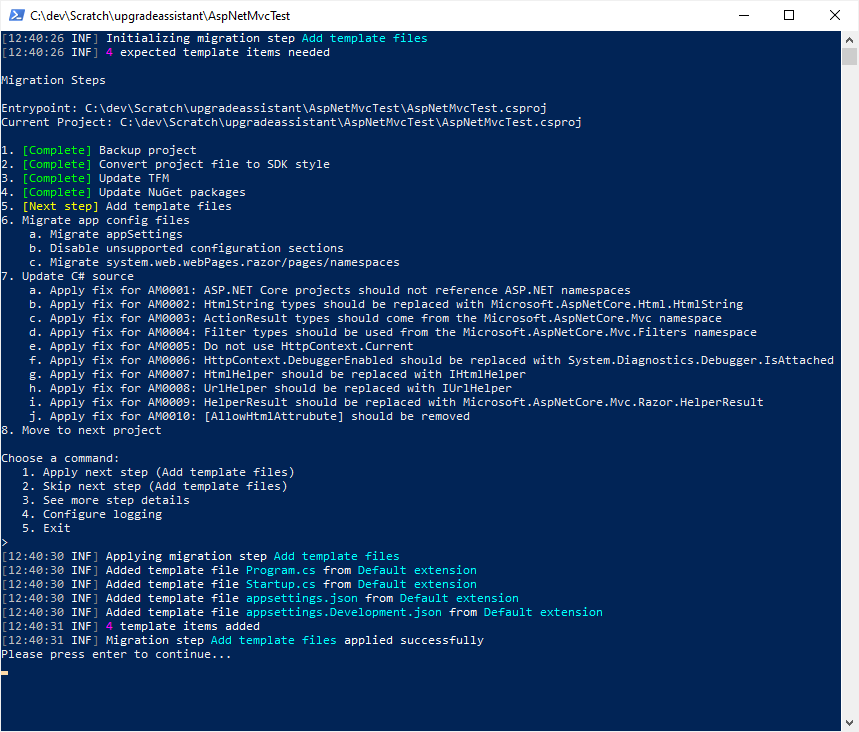
更新包后,接下来是添加模板文件(如果有)。 该工具指示有 4 个必须添加的预期模板项,随后它会添加这些项。 以下是模板文件的列表:

  • Program.cs
  • Startup.cs
  • appsettings.json
  • appsettings.Development.json

ASP.NET Core 会使用这些文件来进行应用启动配置

.NET 升级助手添加模板文件

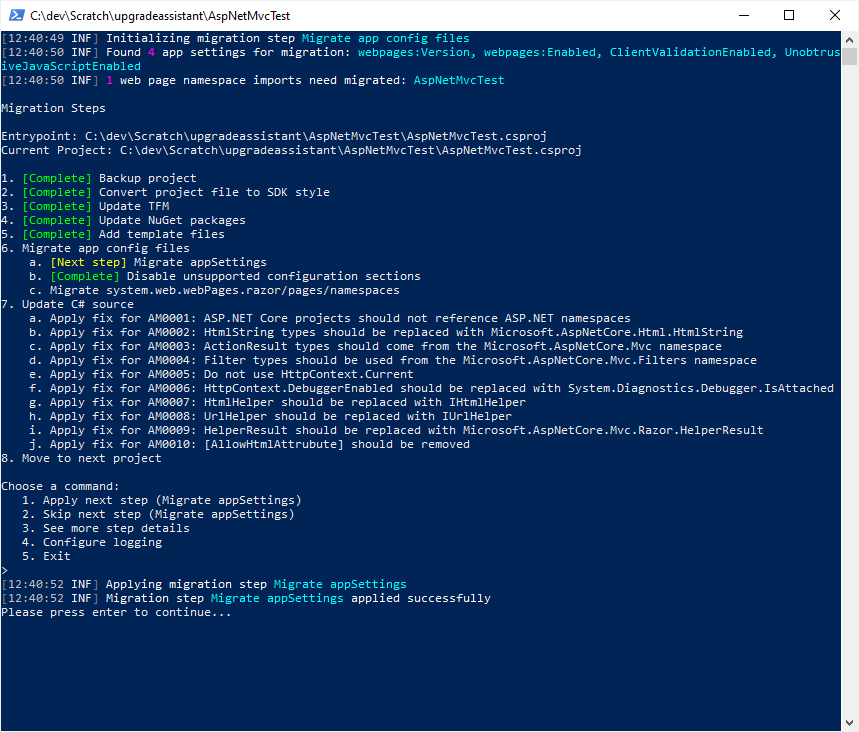
接下来,该工具会迁移配置文件。 该工具会标识应用设置并禁用不受支持的配置部分,然后迁移 appSettings 配置值。

.NET 升级助手迁移配置

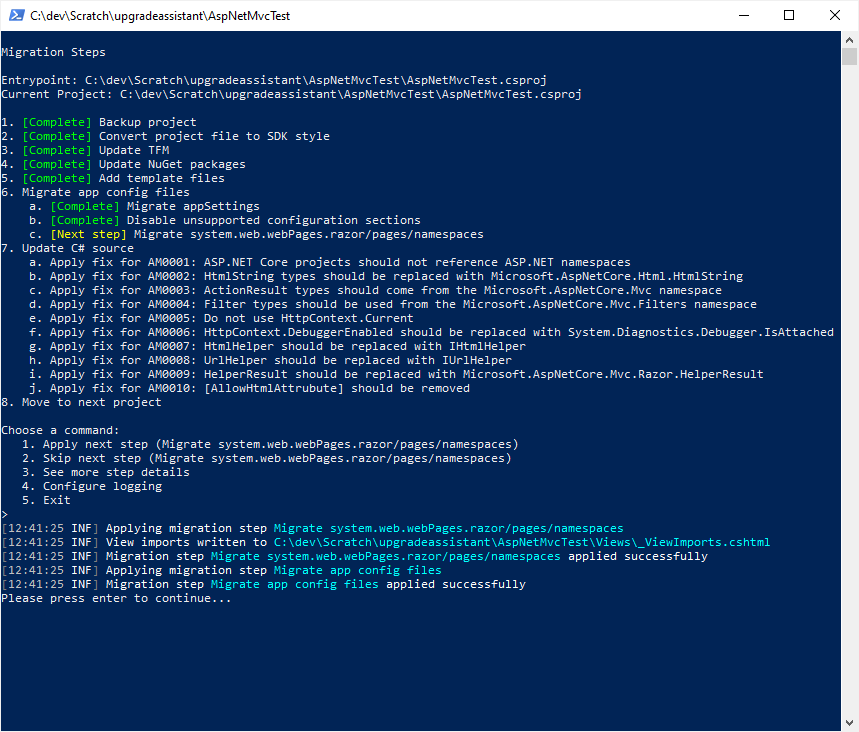
该工具通过迁移 system.web.webPages.razor/pages/namespaces 来完成配置文件的迁移。

.NET 升级助手迁移配置已完成

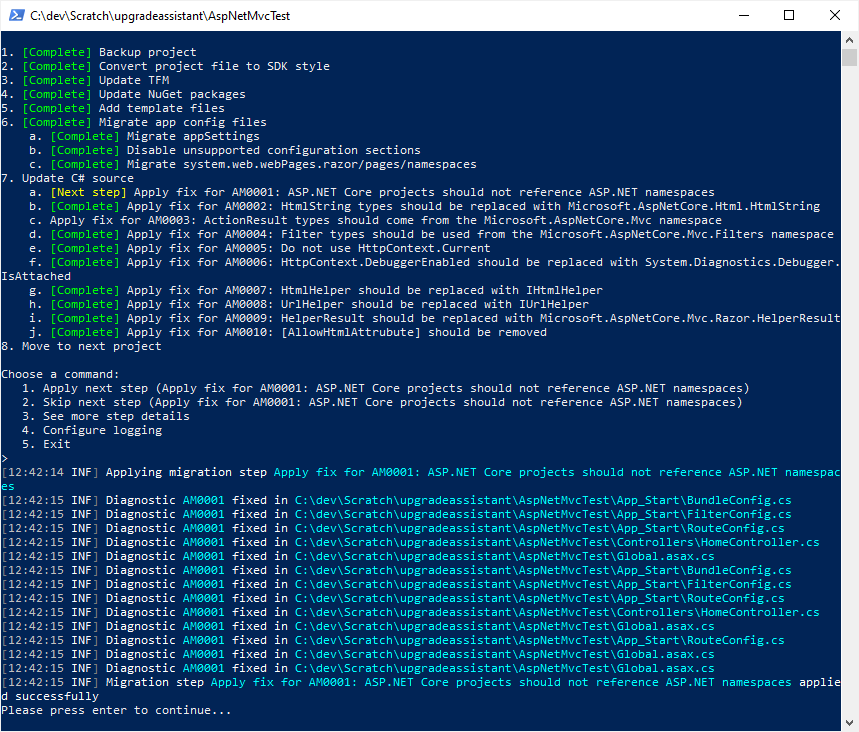
该工具会应用已知的修补程序来将 C# 引用迁移到其新的对应项。

.NET 升级助手更新 C# 源

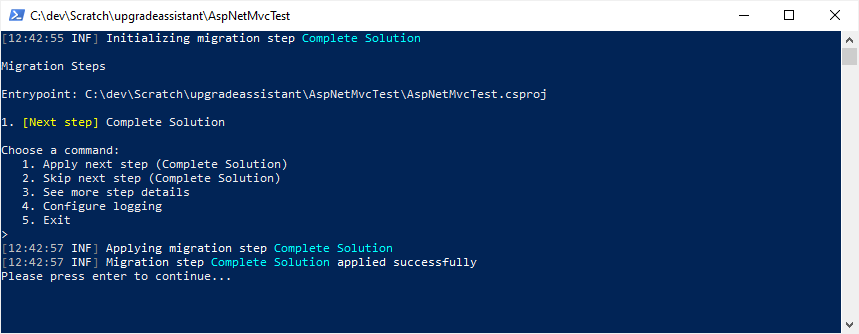
这是最后一个项目,因此下一步是“移动到新的项目”,它提示完成迁移整个解决方案的过程。

.NET 升级助手完成解决方案

完成此过程后,打开项目文件并进行查看。 查找静态文件,如下所示:

XML

  <ItemGroup>
    <Content Include="fonts\glyphicons-halflings-regular.woff2" />
    <Content Include="fonts\glyphicons-halflings-regular.woff" />
    <Content Include="fonts\glyphicons-halflings-regular.ttf" />
    <Content Include="fonts\glyphicons-halflings-regular.eot" />
    <Content Include="Content\bootstrap.min.css.map" />
    <Content Include="Content\bootstrap.css.map" />
    <Content Include="Content\bootstrap-theme.min.css.map" />
    <Content Include="Content\bootstrap-theme.css.map" />
    <Content Include="Scripts\jquery-3.4.1.slim.min.map" />
    <Content Include="Scripts\jquery-3.4.1.min.map" />
  </ItemGroup>

该由 Web 服务器处理的静态文件应移动到名为 wwwroot 的根级别文件夹下适当的文件夹中。 有关详细信息,请查看 ASP.NET Core 中的静态文件 。 移动文件后,可删除项目文件中与这些文件对应的 <Content> 元素。 事实上,可删除所有 <Content> 元素及其包含组。 此外,应删除指向客户端库(如 bootstrap 或 JQuery)的所有 <PackageReference>

默认情况下,项目将被转换为类库。 请将第一行的 Sdk 属性更改为 Microsoft.NET.Sdk.Web,并将 <TargetFramework> 设置为 net5.0。 编译该项目。 此时,错误数应当相当小。 在移植新的 ASP.NET 4.6.1 MVC 项目时,其余错误引用 App_Start 文件夹中的文件:

  • BundleConfig.cs
  • FilterConfig.cs
  • RouteConfig.cs

可删除这些文件和整个 App_Start 文件夹。 同样,可删除 Global.asax 和 Global.asax.cs 文件。

此时,只剩下与捆绑相关的错误。 可通过多种方式在 SP.NET Core 中配置捆绑和缩减。 选择最适合你的项目的任何内容。

故障排除提示

使用 .NET 升级助手时,可能会出现一些已知问题。 某些情况下,.NET 升级助手在内部使用的 try-convert 工具会出现问题。

有关更多故障排除提示和已知问题,可查看此工具的 GitHub 存储库

另请参阅