1、背景
在做微信小程序开发的时候难免会涉及到网络请求操作,小程序提供的原生网络请求的api如下所示:
wx.request({
  url: 'https://test.com/******', //仅为示例,并非真实的接口地址
  data: {
    x: '',
    y: ''
  },
  header: {
    'content-type': 'application/json' // 默认值
  },
  success (res) {
    console.log(res.data)
  }
})
复制代码
其中 url: 为请求的后台接口地址;
data: 为请求接口需要携带的参数;
header:设置请求的 header,content-type 默认为 application/json,
success: 为请求成功后的回调,res包含请求成功后返回的数据。
更多关于 wx.request的用法可以查看官方介绍。
小程序wx.request官网api介绍
那既然官方已经提供有api,为什么还需要进行二次封装呢?
2、二次封装的原因
第一点、避免重复代码
避免重复代码主要体现在以下几点:
1) 我们公司调用后台接口,除了登录接口外,其它的接口请求都需要在请求头中加入token,如果不做封装的情况下,每次调用网络请求都需要传token,很麻烦。
2)在网络请求的时候往往需要给个加载框,提示用户正在加载…. 如下图所示:

![点击并拖拽以移动]()
如果不做封装,在每个网络请求的地方如果需要弹出加载框,都需要重复写这一段代码:
请求开始的时候,显示加载框。

![点击并拖拽以移动]()
请求结束的时候,隐藏加载框:

![点击并拖拽以移动]()
第二点、避免回调地狱
一个页面如果有多个网络请求,并且请求有一定的顺序,wx.request 是异步操作,那么最直接的结果就如下所示代码:
onLoad: function () {
    wx.request({
      url: 'https://test.com/api/test01',
      success:res=>{
        wx.request({
          url: 'https://test.com/api/test02',
          success: res=>{
            wx.request({
              url: 'https://test.com/api/test03',
              success: res=>{
                testDataList: res.content
              }
            })
          }
        })
      }
    })
  },
复制代码
![点击并拖拽以移动]()
是不是很像俄罗斯套娃。
为了避免这种写法,当然进行封装了,在这个地方用到了Promise。
关于Promise的介绍可以到廖雪峰的官方网站去查看,有详细的介绍。
Promise – 廖雪峰的官方网站研究互联网产品和技术,提供原创中文精品教程 https://www.liaoxuefeng.com/wiki/1022910821149312/1023024413276544
3、具体的封装实现
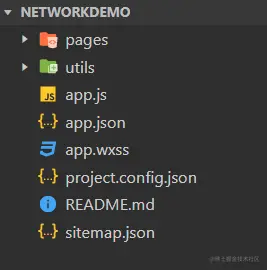
工程结构:

在utils文件夹下新建了两个文件。
1) httpUtils.js
网络请求的封装,具体代码如下:
const ui = require('./ui');
const BASE_URL = 'https://www.wanandroid.com'
function request(obj) {
return new Promise(function(resolve, reject) {
if(obj.showLoading){
ui.showLoading(obj.message? obj.message : '加载中...');
}
var data = {};
if(obj.data) {
data = obj.data;
}
var contentType = 'application/json';
if(obj.contentType){
contentType = obj.contentType;
}
var method = 'GET';
if(obj.method){
method = obj.method;
}
wx.request({
url: BASE_URL + obj.url,
data: data,
method: method,
header: {
'Content-Type': contentType ,
'token': wx.getStorageSync('token')
},
success: function(res) {
console.log('===============================================================================================')
console.log('== 接口地址:' + obj.url);
console.log('== 接口参数:' + JSON.stringify(data));
console.log('== 请求类型:' + method);
console.log("== 接口状态:" + res.statusCode);
console.log("== 接口数据:" + JSON.stringify(res.data));
console.log('===============================================================================================')
if (res.statusCode == 200) {
resolve(res);
} else if (res.statusCode == 401) {
reject("登录已过期");
jumpToLogin();
} else {
reject("请求失败:" + res.statusCode)
}
},
fail: function(err) {
console.log('===============================================================================================')
console.log('== 接口地址:' + url)
console.log('== 接口参数:' + JSON.stringify(data))
console.log('== 请求类型:' + method)
console.log("== 服务器连接异常")
console.log('===============================================================================================')
reject("服务器连接异常,请检查网络再试");
},
complete: function() {
ui.hideLoading();
}
})
});
}
function jumpToLogin(){
wx.reLaunch({
url: '/pages/login/login',
})
}
module.exports = {
request,
}
复制代码
代码中有详细的注释,在这里就不多做解释了。
2) ui.js
主要是对wx UI操作的一些简单封装,代码如下:
export const showToast = function(content,duration) {
    if(!duration) duration = 2000
    wx.showToast({
        title: content,
        icon: 'none',
        duration: duration,
    })
  }

  var isShowLoading = false
  export const showLoading = function(title) {
    if(isShowLoading) return
    wx.showLoading({
        title: title?title:'',
        mask:true,
        success:()=>{
            isShowLoading = true
        }
    })
  }

  export const hideLoading = function() {
    if(!isShowLoading) return
    isShowLoading = false
    wx.hideLoading()
  }
复制代码
3) 具体调用
在index.js 进行了网络请求,具体代码如下:
const httpUtils = require('../../utils/httpUtils')
const ui = require('../../utils/ui')
Page({
data: {
str:null,
},
onLoad() {
},
getNetInfo(){
let obj = {
method: "POST",
showLoading: true,
url:`/user/register?username=pppooo11&password=pppooo&repassword=pppooo`,
message:"正在注册..."
}
httpUtils.request(obj).then(res=>{
this.setData({
str:JSON.stringify(res)
})
ui.showToast(res.data.errorMsg)
}).catch(err=>{
console.log('ERROR')
});
}
})
复制代码
好了,到这里也就结束了,如果上面的内容对你有所帮助不要忘记点个赞哟。
代码已经上传到了github上面,感兴趣的可以点击下载。
网络封装源码
 Mikel
Mikel


