来源: SQL Server 2025 AI相关能力初探 – CareySon – 博客园
SQL Server 在2024年11月开始进行社区私有预览(链接),由于涉及AI能力,我也是第一时间申请了内侧资格,悲剧的是,直到2025年2月,才拿到预览版的测试资格-.-,此时已经是CTP1.3了,也就是内侧的第四个版本了。
但whatever,late better than never。下面根据我的初步测试,做一些分享。
当前的测试的版本为:

原生向量支持与DiskANN向量索引
SQL Server作为一个典型的商业数据库,一直喜欢搞大而全,各种全家桶全塞进来,现在流行的说法叫“一站式”。基本逻辑是每个sql server版本都会结合当时流行的趋势和技术,将该技术集成进SQL Server,下面是一个简单的回顾
历代SQL Server结合当时背景的新增功能分析
SQL Server 2008 – 层级结构 (HierarchyID) 和地理信息 (Spatial Data):
Web 2.0 兴起,层级数据和位置服务应用普及。HierarchyID 高效管理组织结构等层级数据,Spatial Data 支持位置服务,满足 Web 2.0 时代对复杂数据管理和地理位置应用的需求。
SQL Server 2012 – 内存数据库 (In-Memory OLTP):
电商等高并发 OLTP 应用爆发,磁盘 I/O 成性能瓶颈。另外这个时代SSD还是贵的没边,稳定性还没这么靠谱的存储。内存优化表 减少磁盘 I/O,大幅提升高并发 OLTP 性能,应对电商、金融等对极致性能的迫切需求。
但目前来看,这个功能使用率并不是很高,该功能通常通过外挂的缓存系统实现,比如Redis。
SQL Server 2014 – 列存储 (Columnstore):
大数据分析兴起,传统行式存储分析查询效率低下。列式索引优化分析查询,大幅提升大数据仓库性能,顺应大数据分析流行趋势,满足企业数据洞察需求。
SQL Server 2016 – JSON 支持 (JSON Support):
Web 服务和 NoSQL 流行,JSON 成 Web 数据交换主流格式。JSON 支持 允许存储和查询 JSON 数据,灵活适应 Web 服务和半结构化数据,拥抱 NoSQL 趋势,拓展应用场景。
SQL Server 2017 – 图数据库 (Graph Database):
社交网络、推荐系统等关系复杂应用兴起,传统关系数据库效率不高。图数据库 支持建模复杂关系,高效处理社交网络、推荐系统等应用。
SQL Server 2019 – HTAP (Hybrid Transactional/Analytical Processing):
实时数据分析需求强烈,传统数据仓库延迟高。HTAP 能力 支持实时分析,提升决策效率,符合实时业务监控和快速决策需求,顺应混合处理趋势。
SQL Server 2022 – 账本 (Ledger Tables):
数据安全和合规性日益重要,区块链技术火的一塌糊涂(比特币价格起飞),需要防篡改数据记录。账本表 提供防篡改数据记录,增强数据完整性和可信度,满足审计、合规等对数据可信有高要求的场景,拥抱区块链技术,提升数据安全水平。
SQL Server 2025 – 向量数据库 (Vector Database):
当下AI的爆发年代来看,需要向量数据库的背景无需多说,向量数据库在应用层面主要用于RAG、语义理解、大规模向量数据处理和多模态融合,并能显著降低向量检索计算成本。是AI应用中最重要的基础设施之一。
原生向量类型支持
SQL Server增加内置的Vector字段,最高支持1998维度(猜想是因为每个向量都是32精度的float,1998维度正好不超过SQL Server每页的8K存储,从而不溢出),通过测试可以发现,内部存储使用varbinary数据作为底层数据,做了一个简单的测试,通过新增变量类型为Vector,或表列定义为Vector列实现,如图所示:

基于DiskANN的向量相似度检索
DiskANN介绍
DiskANN基于微软2019年发表的论文《DiskANN: Fast Accurate Billion-point Nearest Neighbor Search on a Single Node》。在此之前,向量搜索领域中一个流行的主要算法是HNSW(分层可导航小世界图),这是一种利用多层图结构进行搜索的算法。HNSW的核心特点是涉及大量的随机内存访问,因此该算法需要消耗大量内存资源,要求原始向量和图数据都必须常驻内存中。

图.HNSW图查找示例
我们以阿里云的Millivs托管服务为例,如果涉及1千万的512维向量数据为例,推荐资源如下:

图. Millivs对于千万级512维向量的推荐资源
这种资源要求所带来的成本较高,会比较多限制AI的落地。针对于此,DisnANN的核心目标是,用有限的内存(几十GB)+大容量的SSD盘,支撑单节点存储和搜索十亿级别的数据集,同时保持高性能(低延迟、高召回率)。
DiskANN的核心算法是Vamana图,本质上是一种构建近似最近邻图的方法,它为每个节点构建一个有限数量的出边,这些出边连接到该节点的近似最近邻。与HNSW的多层结构不同,Vamana构建单层图,但通过精心设计的图构建过程确保搜索效率。举个例子理解是Vamana图就像一张城市地图,每个数据点是地图上的一个地点,边代表地点之间的邻近关系。DiskANN 的搜索过程就像在地图上导航,从某个起始点出发,沿着边不断“走”到离目标地点最近的位置。
同时DiskANN还做了一些优化,来适应磁盘换内存的场景,例如:
-
k-means聚类(分而治之),降低建图的内存需求。
-
PQ量化(数据压缩),减少内存和计算量。
-
SSD定长数据(高效存储),加速读取。
-
入口节点和邻居放内存(缓存热点),减少SSD访问。
-
beam-search(并行搜索),提升搜索效率。
下面是根据论文,做了一个DiskANN的简单数据:

SQL Server中相似度搜索使用方式
当前在SQL Server的CTP1.3版本中,向量搜索的核心函数主要是VECTOR_DISTENCE,可以结合在传统的T-SQL中使用,目前该函数还比较初级,当前仅支持余弦相似度、欧式距离和点积。一个简单的示例如下:
CREATE TABLE VectorTable (
ID INT PRIMARY KEY IDENTITY(1,1),
Description NVARCHAR(100),
EmbeddingVector VECTOR(10)
);
INSERT INTO VectorTable (Description, EmbeddingVector)
VALUES
('示例项目1', '[0.1, 0.2, 0.3, 0.4, 0.5, 0.6, 0.7, 0.8, 0.9, 1.0]'),
('示例项目2', '[0.5, 0.5, 0.5, 0.5, 0.5, 0.5, 0.5, 0.5, 0.5, 0.5]'),
('示例项目3', '[0.9, 0.8, 0.7, 0.6, 0.5, 0.4, 0.3, 0.2, 0.1, 0.0]');
DECLARE @queryVector VECTOR(10) = '[0.2, 0.3, 0.4, 0.5, 0.6, 0.7, 0.8, 0.9, 1.0, 0.1]';
SELECT
ID,
Description,
vector_distance('cosine' , @queryVector, EmbeddingVector)
FROM VectorTable
余弦相似度的结果如下:

图. 计算余弦相似度
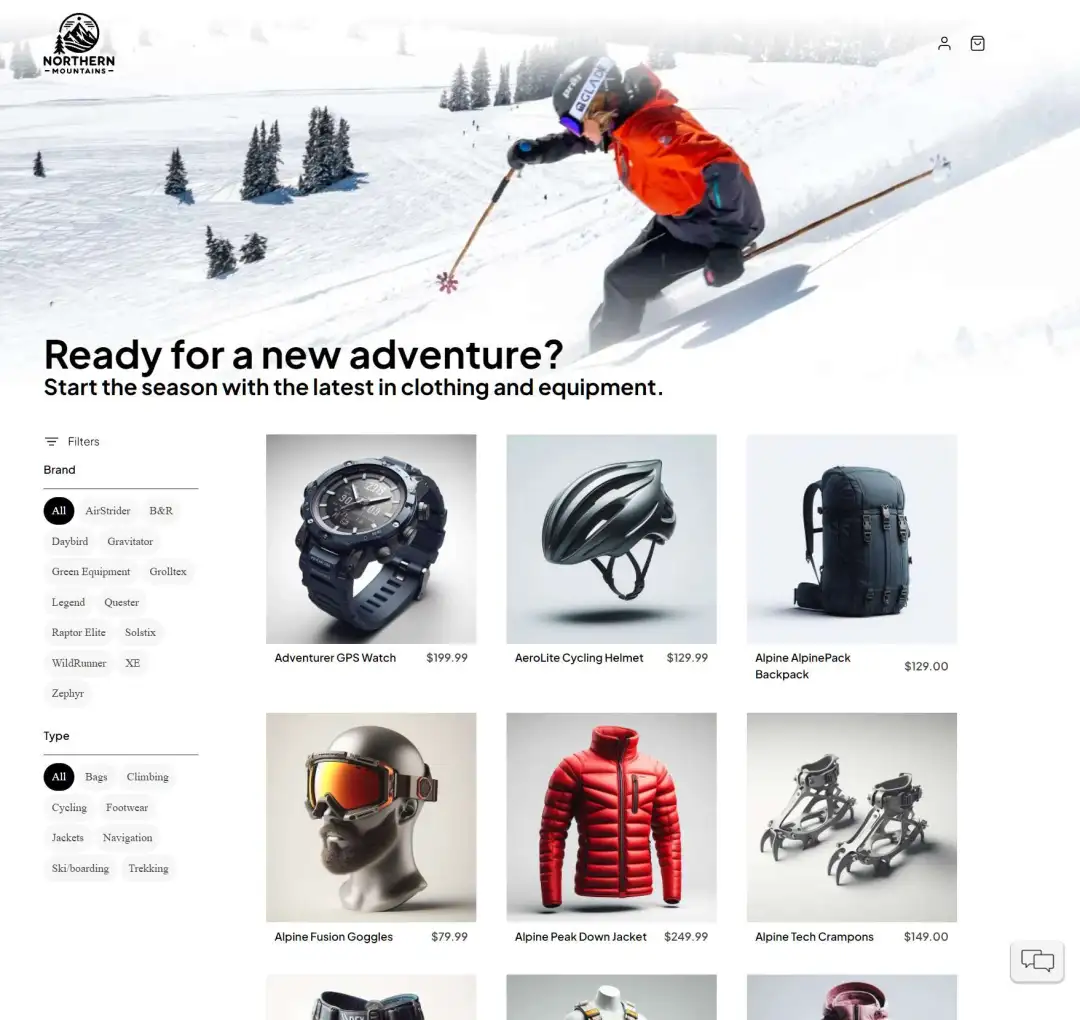
同时SQL Server也支持使用和传统的关系数据共同作用,进行相似度查询,例如该例子,结合where条件,帮助用户通过where做过滤,同时选出top 5相似度的产品:
DECLARE @query_vector VECTOR(512) = CAST(CONCAT('[', REPLICATE('0.15,', 511), '0.15]') AS VECTOR(512));
SELECT top 5
id,
category,
description,
vector_distance('cosine' , @query_vector, vector) AS similarity_score
FROM
VectorDemo
where category = 'Clothing'
ORDER BY
similarity_score
结果如下:

图.余弦相似度计算结果
相似度搜索的性能
由于当前我拿到的是私有预览版的sql server,并没有合适的帮助文档,因此不确定我的使用方式是否正确,按我的理解,可能需要针对向量列单独加索引,但目前没看到加索引的方式,下面的测试是基于没有加索引的测试。测试的数据量如下:

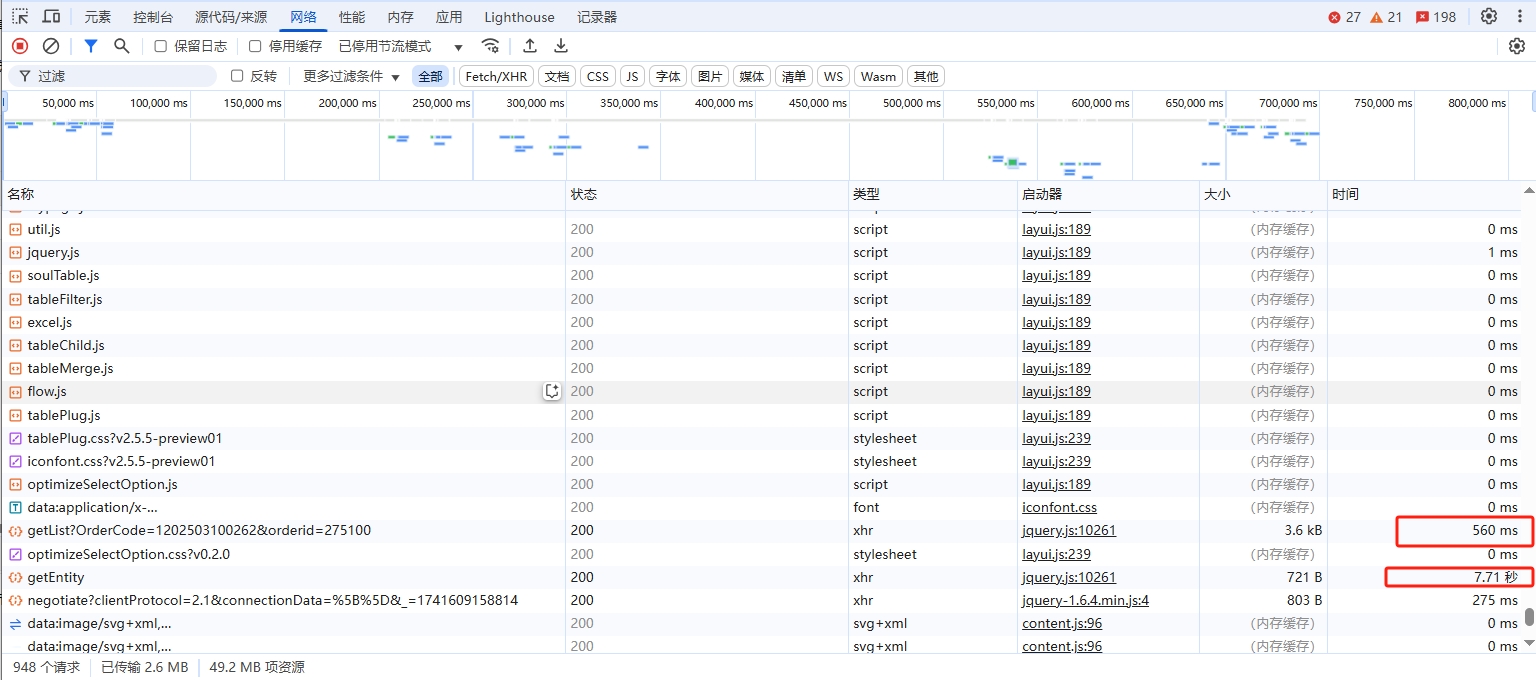
当前我们的测试表大约是200W+的数据,每列包含512维的向量,大约数据占用是6G左右,当我做一个简单的相似度搜索时,可以看到

虽然查询完成时间在334毫秒,从逻辑读(80万的逻辑读*8K每次读取,基本等于数据量大小)来看,基本走了全表扫描,而CPU使用也是非常高,基本需要1个CPU 100%,2.3S时间。
当前查询完成快是数据已经常驻内存,那么如果我将sql server使用内存调低,涉及到IO读写呢?比如当前数据量维6.9G,我将内存使用上限调整为6G会发生什么:

由于开始涉及物理读写,我们看到整个查询时间来到不可接受的节奏。大量的预读和IO操作使得CPU时间翻倍,同时整体时间增长50倍倍。
那么我们使用选择性很高的索引呢?

可以看到,category=’test’的选择性非常高,导致向量相似度搜索成本直接通过IndexSeek+向量搜索完成。
后续等待更多文档出来再进一步观察,当前的观察是,如果没有对向量增加索引,则搜索基本需要全量比对+排序。如果用于实际生产,基本难以接受。
其他AI相关函数支持
VECTOR_NORM(向量标准化)

本例中VECTOR_NORM(image_embedding, ‘norm2’) > 3 主要作用:
VECTOR_NORMALIZE(向量归一化)
该函数解释也比较简单,就是将向量的上限变为1,比如当前最大值是5,则对应的4变为0.8。一个简单的例子:

AI服务集成与T-SQL扩展
sp_invoke_external_rest_endpoint
直接通过 T-SQL 调用外部的 HTTPS REST 或 GraphQL 接口。简单来说,它让 SQL Server 数据库可以像客户端一样,直接和外部服务(比如 Azure Functions、Power BI、OpenAI API 、DeepSeek API等)交互。
想象你在 SQL Server 里写了个脚本,但需要外部服务(比如翻译文本、计算汇率、调用大模型等)。以前你得写个外部程序(比如用 Python 或 C#)去调用服务,再把结果写回数据库。现在,sp_invoke_external_rest_endpoint 可以做到数据不出数据库即可完成服务。
其实外部调用的优势和劣势我也简单做了一个总结,
优势:
劣势:
下面是一个简单的例子,我将SQL Server数据库的日志发送给大模型,寻求性能优化建议:
DECLARE
@endpoint_url NVARCHAR(200) = N'https://',
@api_key NVARCHAR(100) = N'sk-or-v1',
@logs_context NVARCHAR(MAX),
@payload NVARCHAR(MAX),
@response_status_code INT,
@response_message NVARCHAR(MAX);
SET @logs_context = N'2025-02-26 14:35:15.45 spid51 Query execution time exceeded 1s for SELECT * FROM Sales.Orders JOIN Sales.OrderDetails ON Orders.OrderID = OrderDetails.OrderID WHERE OrderDate > ''2025-01-01''. Table scan detected on Sales.OrderDetails due to missing index on OrderID. + 2025-02-26 14:35:18.19 spid47 CPU usage reached 92% for 30 seconds. High lock contention detected on table Sales.Orders. + 2025-02-26 14:35:19.19 spid47 Buffer pool hit ratio dropped to 7%. Memory pressure detected, available memory: 512 MB.';
SET @payload = N'{
"model": "google/gemini-2.0-flash-001",
"messages": [
{"role": "system", "content": "You are a SQL Server expert."},
{"role": "user", "content": "以下是我的SQL服务器日志信息:'
+ @logs_context
+ N'。请给出可能的性能优化或故障排查建议。"}
]
}';
DECLARE @headers NVARCHAR(MAX);
SET @headers = CONCAT(N'{"Content-Type": "application/json", "Authorization": "Bearer ', @api_key, '"}');
EXEC sp_invoke_external_rest_endpoint
@url = @endpoint_url,
@payload = @payload,
@method = 'POST',
@headers = @headers,
@response = @response_message OUTPUT,
@timeout = 60;
SELECT @response_message AS [OpenRouter Response];
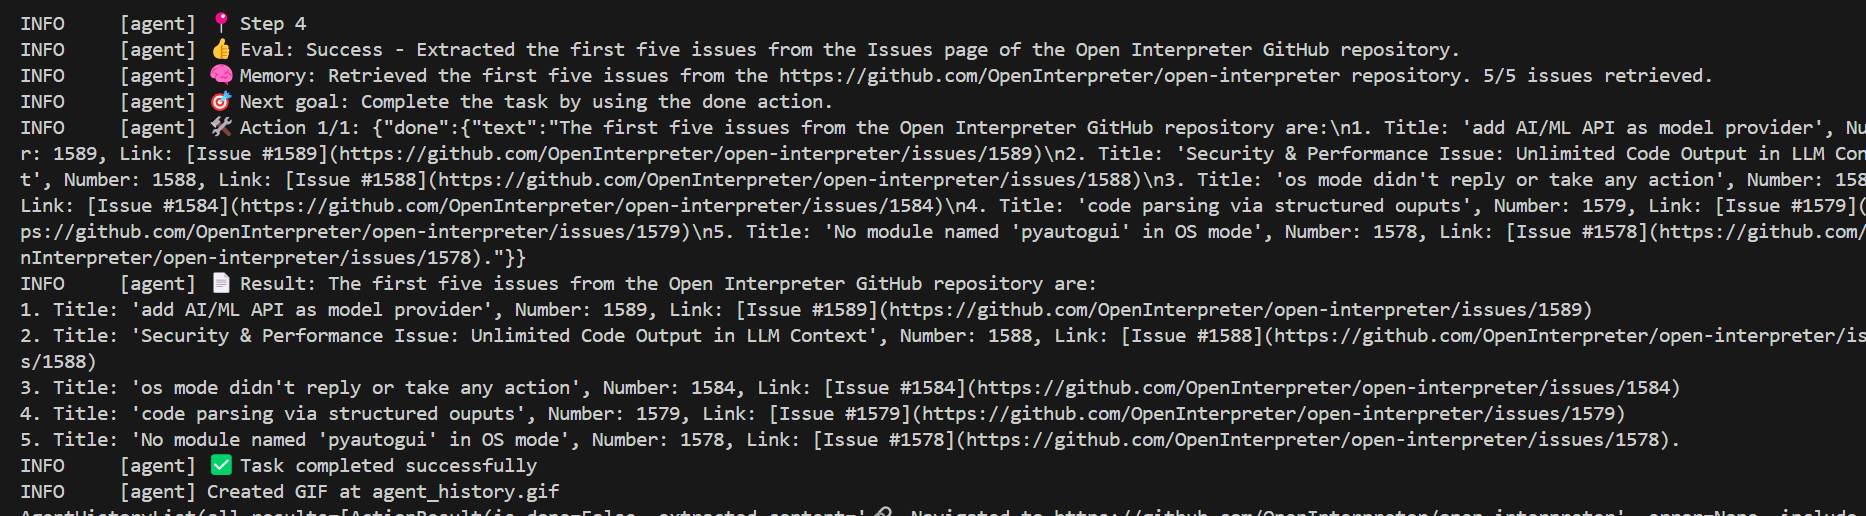
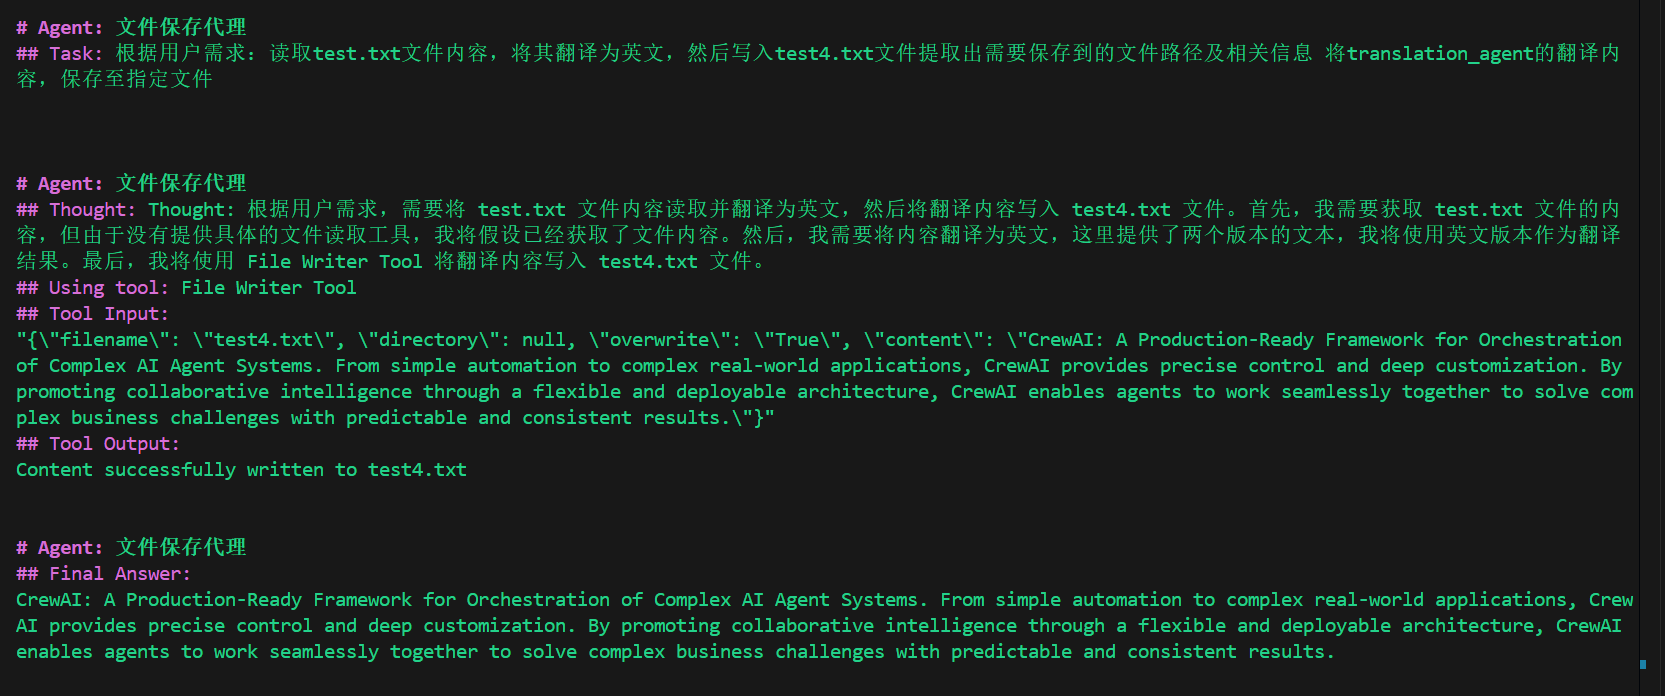
看到结果:

图. 调用外部模型返回的结果
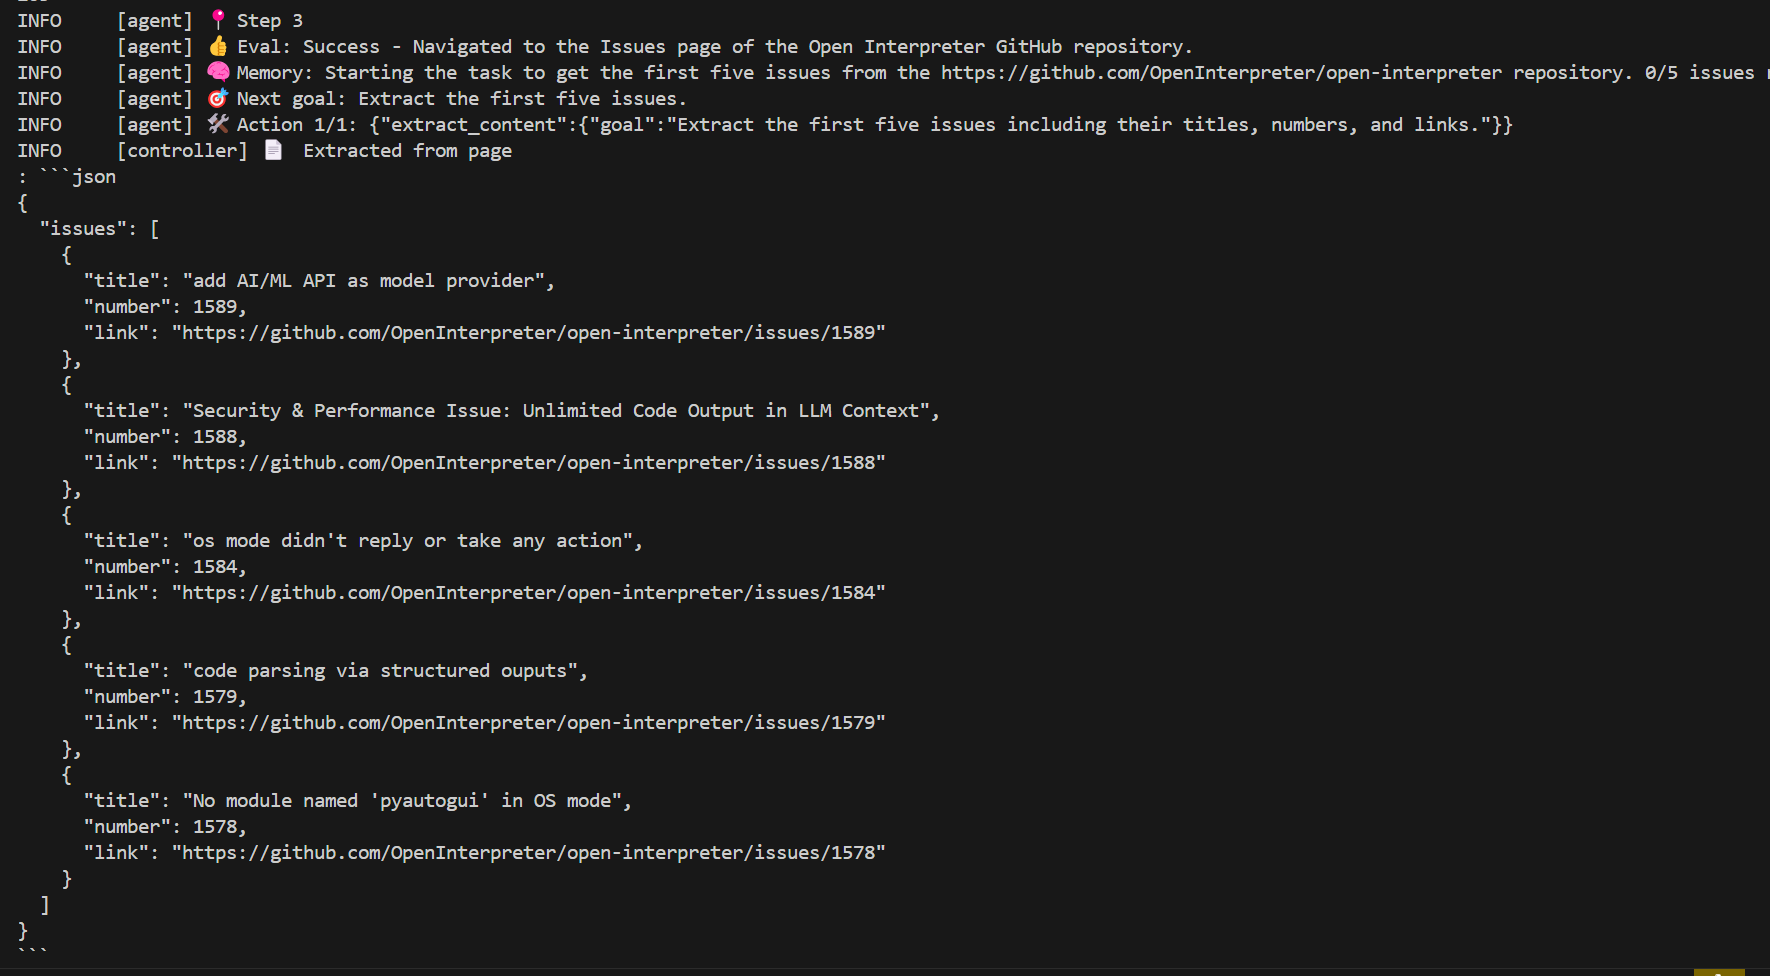
返回的部分JSON截图:

图. 部分返回结果JSON化
sp_execute_external_script
在使用库数据库层直接完成推理或特征提取,sp_execute_external_script是 SQL Server 提供的一个系统存储过程,允许在 SQL Server 中直接执行外部脚本语言(如 R、Python 或 Java)的代码,并且可以与数据库中的数据无缝交互。它是 SQL Server 集成机器学习和高级分析能力的核心组件之一。
一个简单的例子:调用 Python + Hugging Face Transformer 做情感分析

图. 使用T-SQL调用外部Python包
结果:

图. 情感分析场景结果
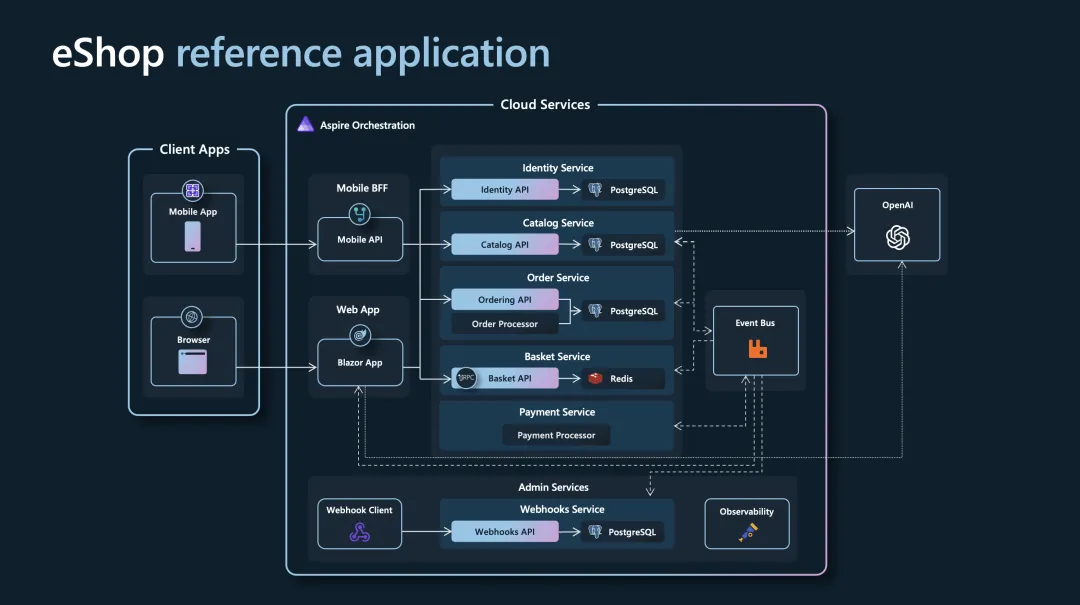
支持 LangChain、Semantic Kernel、EF 等流行 AI 框架
这部分是在SQL Server之外完成的,本质上就是在这些流行的框架中,增加了对SQL Server的驱动支持,其实没什么好说的,例如:
在langchain中,直接支持SQL Server作为数据存储。

图. 将SQL Server作为向量数据源
直接在langchain中进行相似度搜索

图. SDK直接进行相似度搜索

图. 在C#的ORM直接支持相似度搜索
小结
本文基于SQL Server 2024年11月社区私有预览(CTP1.3版本)的初步测试,分享了新功能的体验。SQL Server 2025新增了原生向量支持和DiskANN向量索引,适应当前AI应用需求,可用于RAG、语义理解等场景,支持最高1998维向量存储及余弦、欧氏距离等相似度检索。测试中发现,向量搜索性能可能因缺乏索引或数据未驻留内存而下降,特别是在IO密集场景下表现不理想,但这可能与测试时缺乏官方文档、使用方法不当有关,待后续资料完善后再进一步验证。此外,新功能还包括向量标准化
通过sp_invoke_external_rest_endpoint和sp_execute_external_script实现外部服务调用和脚本执行,扩展了应用场景,但也带来了一些性能和调试上的挑战。同时,SQL Server对LangChain、Semantic Kernel等框架的支持也增强了其生态兼容性。总的来说,SQL Server 2025在功能整合上迈出了重要一步,但实际效果还有待更多文档支持和优化验证。