Xmind写测试点 - 吉提 - 博客园

mikel阅读(1421)

来源: Xmind写测试点 – 吉提 – 博客园

引入:

既然我们这篇要说《Xmind写测试点》,那么先来回顾一下,什么情况下才写测试点,而不写测试用例。

之前写过一篇《测试用例-20问20答》,没看过的朋友戳这里:,其中就有写测试点的前提条件,我摘录出来:

  1. 测试人员少而上线时间紧;
  2. 紧急的小型任务;
  3. 需求频繁变化,测试用例的更新速度永远跟不上需求的变化速度,每天都在改用例;
  4. 团队所有测试人员技能均衡,对业务也都熟,测试点能充分覆盖需求。

如果你测试的业务符合以上4点中任意一项,那么,用Xmind写测试点吧。

目录:

一.Xmind写测试点的两种格式

二.如何写测试点

三.几个注意事项


一.Xmind写测试点的两种格式


Xmind,大家一般叫它脑图。脑图用来拆解需求,一层一层往下写,的确是很给力,但是相比Excel,用它来写测试点的话,就不太容易下手了。用Excel写测试用例,格式已经规定好了:用例编号、功能模块名称、前置条件、操作步骤等等。但是用Xmind写测试点,正因为没人规定怎么写,所以才不好落地。所幸经过n多Tester的实践,最终确定出两种风格。

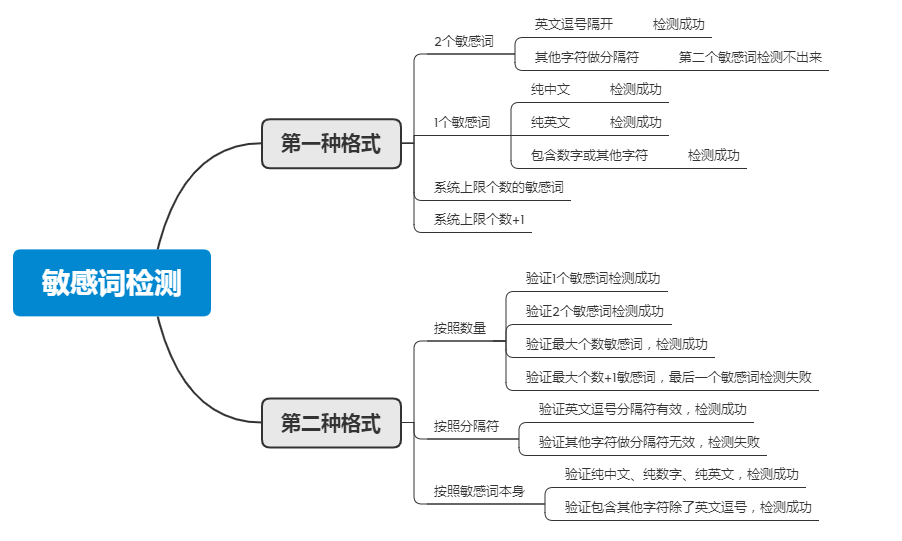
Eg:给产品添加“敏感词检测”的功能,多个敏感词用英文逗号隔开。系统检测到敏感词会弹窗提示并建议修改。


  • 第一种格式,一个分支上所有节点串在一起,才是一条完整的测试点,前面的节点是后面节点的前置条件。
  • 第二种格式,按照测试维度划分,逐级细化,测试点越来越明晰,每个分支的最后一个节点就是一个完整的测试点。


推荐使用第二种格式。这种格式的用例,在做用例评审时,方便确认需求覆盖率,而且对于用例执行者比较友好,执行者可以只关注用例的最后一个节点,按照指定策略执行就行了,如果是第一种格式,需要每次都从头看到尾,很容易出错。

注意:分类是为了让众多测试点更清晰易懂,不要在分类标准的选取上纠结,最后面的测试点才是重点。不要在分类条件的选取上钻牛角尖,如果选不出来概括性完美的分类标准,也可以不分类,或者选一个能概括大部分测试点的分类条件即可,时间要花在刀刃上。


二.如何写测试点(按照上述第二种格式-分类)

1.尽量不要把用例步骤写到测试点里面,要突出测试目的。操作步骤可以放在备注里。

2.要提前构思好整体分类再动手写测试点

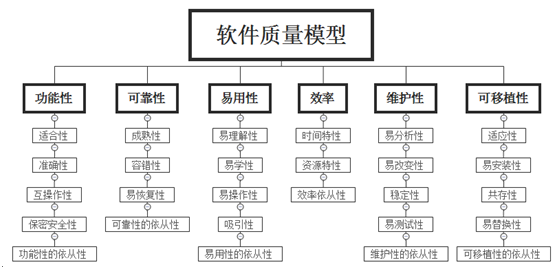
拿到需求后,先要整体了解产品需求和实现逻辑,然后决定每一个层级的分类标准,比如是按照质量模型的角度进行分类,或者按照修改点进行分类,前面层级的划分标准,直接决定了接下来子节点的划分标准。


三.几个注意事项

1.写测试点的前提

写用例和执行用例的人,对需求要非常的清楚,如果忽略这个前提,我们写出来的测试点很清晰,但是可读性会很差。在项目有参与人只是纯执行角色时,可以通过补充测试点备注的方式来完善对测试点的说明。


2.测试点是测试的指导,而不是用来做无脑执行

如果直接无脑执行,那么目前用分类写出的测试点确实无法顺利执行,就算加上简要的测试步骤描述,执行的过程中也会经常发现问题,怎么好多测试点的执行步骤其实是一样的,只是在不同位置的测试目的不同而已,对,这是正常情况。

测试点一定是我们测试的指导,而不仅仅是作为测试执行阶段的依据这么简单看待。

C#结合串口通信类实现串口通信源代码(原创) - 小y - 博客园

mikel阅读(619)

来源: C#结合串口通信类实现串口通信源代码(原创) – 小y – 博客园

mycom是串口通信类,在本blog前一篇中有完整代码。( C#串口通信编程类(修改版) )
下面是串口通讯测试程序的源代码,将mycom类放在此项目中
可以实现简单的串口通信,希望读者能通过这个程序对串口通信过程有一个初步的了解:

using System;
using System.Drawing;
using System.Collections;
using System.ComponentModel;
using System.Windows.Forms;
using System.Data;
using System.Threading;
namespace BusApp
{
/// <summary>
/// Form1 的摘要说明。
/// </summary>
public class Form1 : System.Windows.Forms.Form
{
private System.Windows.Forms.Label label1;
private System.Windows.Forms.Label label2;
private System.Windows.Forms.Button button1;
private System.Windows.Forms.GroupBox groupBox1;
private System.Windows.Forms.Label label3;
private System.Windows.Forms.Label label4;
private System.Windows.Forms.Label label5;
private System.Windows.Forms.Label label6;
private System.Windows.Forms.Button button2;
private System.Windows.Forms.Button button3;
private System.Windows.Forms.Button button4;
private System.Windows.Forms.TextBox textBox8;
private System.Windows.Forms.Label label7;

  public int iPort=1; //1,2,3,4
public int iRate=9600; //1200,2400,4800,9600
public byte bSize=8; //8 bits
public byte bParity=0; // 0-4=no,odd,even,mark,space
public byte bStopBits=1; // 0,1,2 = 1, 1.5, 2
public int iTimeout=1000;
public mycom mycom1=new mycom();
public byte[] recb;

private System.Windows.Forms.TextBox msg;
private System.Windows.Forms.TextBox t_port;
private System.Windows.Forms.TextBox t_rate;
private System.Windows.Forms.TextBox t_bytesize;
private System.Windows.Forms.TextBox t_stopbyte;
private System.Windows.Forms.TextBox t_parity;
private System.Windows.Forms.TextBox t_send;
private System.Windows.Forms.Button button5; //readTimeOut
/// <summary>
/// 必需的设计器变量。
/// </summary>
private System.ComponentModel.Container components = null;

public Form1()
{
InitializeComponent();
}

/// <summary>
/// 清理所有正在使用的资源。
/// </summary>
protected override void Dispose( bool disposing )
{
if( disposing )
{
if (components != null)
{
components.Dispose();
}
}
base.Dispose( disposing );
}

#region Windows 窗体设计器生成的代码
/// <summary>
/// 设计器支持所需的方法 – 不要使用代码编辑器修改
/// 此方法的内容。
/// </summary>
private void InitializeComponent()
{
this.msg = new System.Windows.Forms.TextBox();
this.label1 = new System.Windows.Forms.Label();
this.label2 = new System.Windows.Forms.Label();
this.t_send = new System.Windows.Forms.TextBox();
this.button1 = new System.Windows.Forms.Button();
this.groupBox1 = new System.Windows.Forms.GroupBox();
this.button2 = new System.Windows.Forms.Button();
this.t_port = new System.Windows.Forms.TextBox();
this.label3 = new System.Windows.Forms.Label();
this.t_rate = new System.Windows.Forms.TextBox();
this.label4 = new System.Windows.Forms.Label();
this.t_bytesize = new System.Windows.Forms.TextBox();
this.label5 = new System.Windows.Forms.Label();
this.t_stopbyte = new System.Windows.Forms.TextBox();
this.label6 = new System.Windows.Forms.Label();
this.t_parity = new System.Windows.Forms.TextBox();
this.button3 = new System.Windows.Forms.Button();
this.button4 = new System.Windows.Forms.Button();
this.textBox8 = new System.Windows.Forms.TextBox();
this.label7 = new System.Windows.Forms.Label();
this.button5 = new System.Windows.Forms.Button();
this.groupBox1.SuspendLayout();
this.SuspendLayout();
//
// msg
//
this.msg.ForeColor = System.Drawing.Color.Green;
this.msg.Location = new System.Drawing.Point(0, 0);
this.msg.Multiline = true;
this.msg.Name = “msg”;
this.msg.ScrollBars = System.Windows.Forms.ScrollBars.Vertical;
this.msg.Size = new System.Drawing.Size(512, 264);
this.msg.TabIndex = 0;
this.msg.Text = “”;
//
// label1
//
this.label1.Location = new System.Drawing.Point(16, 24);
this.label1.Name = “label1”;
this.label1.Size = new System.Drawing.Size(56, 16);
this.label1.TabIndex = 1;
this.label1.Text = “串口号:”;
//
// label2
//
this.label2.ForeColor = System.Drawing.Color.FromArgb(((System.Byte)(192)), ((System.Byte)(64)), ((System.Byte)(0)));
this.label2.Location = new System.Drawing.Point(8, 280);
this.label2.Name = “label2”;
this.label2.Size = new System.Drawing.Size(80, 16);
this.label2.TabIndex = 1;
this.label2.Text = “设置数据包:”;
//
// t_send
//
this.t_send.BorderStyle = System.Windows.Forms.BorderStyle.FixedSingle;
this.t_send.ForeColor = System.Drawing.Color.FromArgb(((System.Byte)(255)), ((System.Byte)(128)), ((System.Byte)(0)));
this.t_send.Location = new System.Drawing.Point(80, 272);
this.t_send.Name = “t_send”;
this.t_send.Size = new System.Drawing.Size(344, 21);
this.t_send.TabIndex = 2;
this.t_send.Text = “”;
//
// button1
//
this.button1.Location = new System.Drawing.Point(432, 272);
this.button1.Name = “button1”;
this.button1.Size = new System.Drawing.Size(40, 23);
this.button1.TabIndex = 3;
this.button1.Text = “发送”;
this.button1.Click += new System.EventHandler(this.button1_Click);
//
// groupBox1
//
this.groupBox1.Controls.Add(this.button2);
this.groupBox1.Controls.Add(this.t_port);
this.groupBox1.Controls.Add(this.label1);
this.groupBox1.Controls.Add(this.label3);
this.groupBox1.Controls.Add(this.t_rate);
this.groupBox1.Controls.Add(this.label4);
this.groupBox1.Controls.Add(this.t_bytesize);
this.groupBox1.Controls.Add(this.label5);
this.groupBox1.Controls.Add(this.t_stopbyte);
this.groupBox1.Controls.Add(this.label6);
this.groupBox1.Controls.Add(this.t_parity);
this.groupBox1.ForeColor = System.Drawing.Color.FromArgb(((System.Byte)(192)), ((System.Byte)(64)), ((System.Byte)(0)));
this.groupBox1.Location = new System.Drawing.Point(8, 304);
this.groupBox1.Name = “groupBox1”;
this.groupBox1.Size = new System.Drawing.Size(176, 216);
this.groupBox1.TabIndex = 4;
this.groupBox1.TabStop = false;
this.groupBox1.Text = “参数设置”;
//
// button2
//
this.button2.FlatStyle = System.Windows.Forms.FlatStyle.Popup;
this.button2.Location = new System.Drawing.Point(80, 184);
this.button2.Name = “button2”;
this.button2.TabIndex = 3;
this.button2.Text = “应用设置”;
this.button2.Click += new System.EventHandler(this.button2_Click);
//
// t_port
//
this.t_port.BorderStyle = System.Windows.Forms.BorderStyle.FixedSingle;
this.t_port.Location = new System.Drawing.Point(80, 16);
this.t_port.Name = “t_port”;
this.t_port.Size = new System.Drawing.Size(80, 21);
this.t_port.TabIndex = 2;
this.t_port.Text = “1”;
//
// label3
//
this.label3.Location = new System.Drawing.Point(16, 58);
this.label3.Name = “label3”;
this.label3.Size = new System.Drawing.Size(56, 16);
this.label3.TabIndex = 1;
this.label3.Text = “波特率:”;
//
// t_rate
//
this.t_rate.BorderStyle = System.Windows.Forms.BorderStyle.FixedSingle;
this.t_rate.Location = new System.Drawing.Point(80, 50);
this.t_rate.Name = “t_rate”;
this.t_rate.Size = new System.Drawing.Size(80, 21);
this.t_rate.TabIndex = 2;
this.t_rate.Text = “9600”;
//
// label4
//
this.label4.Location = new System.Drawing.Point(16, 92);
this.label4.Name = “label4”;
this.label4.Size = new System.Drawing.Size(56, 16);
this.label4.TabIndex = 1;
this.label4.Text = “数据位:”;
//
// t_bytesize
//
this.t_bytesize.BorderStyle = System.Windows.Forms.BorderStyle.FixedSingle;
this.t_bytesize.Location = new System.Drawing.Point(80, 84);
this.t_bytesize.Name = “t_bytesize”;
this.t_bytesize.Size = new System.Drawing.Size(80, 21);
this.t_bytesize.TabIndex = 2;
this.t_bytesize.Text = “8”;
//
// label5
//
this.label5.Location = new System.Drawing.Point(16, 126);
this.label5.Name = “label5”;
this.label5.Size = new System.Drawing.Size(56, 16);
this.label5.TabIndex = 1;
this.label5.Text = “停止位:”;
//
// t_stopbyte
//
this.t_stopbyte.BorderStyle = System.Windows.Forms.BorderStyle.FixedSingle;
this.t_stopbyte.Location = new System.Drawing.Point(80, 118);
this.t_stopbyte.Name = “t_stopbyte”;
this.t_stopbyte.Size = new System.Drawing.Size(80, 21);
this.t_stopbyte.TabIndex = 2;
this.t_stopbyte.Text = “1”;
//
// label6
//
this.label6.Location = new System.Drawing.Point(16, 160);
this.label6.Name = “label6”;
this.label6.Size = new System.Drawing.Size(56, 16);
this.label6.TabIndex = 1;
this.label6.Text = “校验位:”;
//
// t_parity
//
this.t_parity.BorderStyle = System.Windows.Forms.BorderStyle.FixedSingle;
this.t_parity.Enabled = false;
this.t_parity.Location = new System.Drawing.Point(80, 152);
this.t_parity.Name = “t_parity”;
this.t_parity.Size = new System.Drawing.Size(80, 21);
this.t_parity.TabIndex = 2;
this.t_parity.Text = “0”;
//
// button3
//
this.button3.Location = new System.Drawing.Point(472, 272);
this.button3.Name = “button3”;
this.button3.Size = new System.Drawing.Size(40, 23);
this.button3.TabIndex = 3;
this.button3.Text = “清空”;
this.button3.Click += new System.EventHandler(this.button3_Click);
//
// button4
//
this.button4.FlatStyle = System.Windows.Forms.FlatStyle.Popup;
this.button4.Location = new System.Drawing.Point(432, 312);
this.button4.Name = “button4”;
this.button4.Size = new System.Drawing.Size(72, 23);
this.button4.TabIndex = 6;
this.button4.Text = “初始化”;
//
// textBox8
//
this.textBox8.BorderStyle = System.Windows.Forms.BorderStyle.FixedSingle;
this.textBox8.ForeColor = System.Drawing.Color.FromArgb(((System.Byte)(255)), ((System.Byte)(128)), ((System.Byte)(0)));
this.textBox8.Location = new System.Drawing.Point(288, 312);
this.textBox8.Name = “textBox8”;
this.textBox8.Size = new System.Drawing.Size(136, 21);
this.textBox8.TabIndex = 7;
this.textBox8.Text = “”;
//
// label7
//
this.label7.Location = new System.Drawing.Point(200, 320);
this.label7.Name = “label7”;
this.label7.Size = new System.Drawing.Size(100, 16);
this.label7.TabIndex = 8;
this.label7.Text = “设置本机地址:”;
//
// button5
//
this.button5.FlatStyle = System.Windows.Forms.FlatStyle.Popup;
this.button5.Location = new System.Drawing.Point(440, 504);
this.button5.Name = “button5”;
this.button5.Size = new System.Drawing.Size(64, 23);
this.button5.TabIndex = 9;
this.button5.Text = “关闭串口”;
this.button5.Click += new System.EventHandler(this.button5_Click);
//
// Form1
//
this.AutoScaleBaseSize = new System.Drawing.Size(6, 14);
this.ClientSize = new System.Drawing.Size(512, 533);
this.Controls.Add(this.button5);
this.Controls.Add(this.textBox8);
this.Controls.Add(this.label7);
this.Controls.Add(this.button4);
this.Controls.Add(this.groupBox1);
this.Controls.Add(this.button1);
this.Controls.Add(this.t_send);
this.Controls.Add(this.msg);
this.Controls.Add(this.label2);
this.Controls.Add(this.button3);
this.Name = “Form1”;
this.Text = “串口通讯(小y设计)”;
this.Closing += new System.ComponentModel.CancelEventHandler(this.Form1_Closing);
this.Load += new System.EventHandler(this.Form1_Load);
this.groupBox1.ResumeLayout(false);
this.ResumeLayout(false);

}
#endregion

/// <summary>
/// 应用程序的主入口点。
/// </summary>
[STAThread]
static void Main()
{
Application.Run(new Form1());
}
//程序开启,串口初始化
private void Form1_Load(object sender, System.EventArgs e)
{
mycom1.PortNum=iPort;
mycom1.BaudRate=iRate;
mycom1.ByteSize=bSize;
mycom1.Parity=bParity;
mycom1.StopBits=bStopBits;
mycom1.ReadTimeout=iTimeout;
if(this.OpenCom())
msg.AppendText(“串口初始化成功……\r\n”);
else
msg.AppendText(“串口初始化失败!\r\n”);
}
//显示包信息
public string dis_package(byte[] reb)
{
string temp=””;
foreach(byte b in reb)
temp+=b.ToString(“X2″)+” “;
return temp;
}
//开串口
public bool OpenCom()
{
try
{
if (mycom1.Opened)
{
mycom1.Close();
mycom1.Open(); //打开串口
}
else
{
mycom1.Open();//打开串口
}
return true;
}
catch(Exception e)
{
MessageBox.Show(“错误:” + e.Message);
return false;
}

}
//发送按钮
private void button1_Click(object sender, System.EventArgs e)
{
if(t_send.Text==””)
{MessageBox.Show(“发送数据为空!”);return;}
byte[] temp1=mysendb();
int sendnumb=0;
try
{
sendnumb=mycom1.Write(temp1);
msg.AppendText(“\r\n发送数据(“+sendnumb+”):”+dis_package(temp1));
recb=mycom1.Read(50);
//if(recb.Length!=0)
msg.AppendText(“\r\n接收到数据包:”+dis_package(recb));
}
catch
{msg.AppendText(“\r\n发送失败!”);return;}

//OpenCom();
}
//去掉发送数组中的空格
public string delspace(string putin)
{
string putout=””;
for(int i=0;i<putin.Length;i++)
{
if(putin[i]!=’ ‘)
putout+=putin[i];
}
return putout;
}
//提取数据包
public byte[] mysendb()
{
string temps=delspace(t_send.Text);
byte[] tempb=new byte[50];
int j=0;
for(int i=0;i<temps.Length;i=i+2,j++)
tempb[j]=Convert.ToByte(temps.Substring(i,2),16);
byte[] send=new byte[j];
Array.Copy(tempb,send,j);
return send;
}
//清空按钮
private void button3_Click(object sender, System.EventArgs e)
{
t_send.Text=string.Empty;
msg.Text=string.Empty;
}

//参数设置
private void button2_Click(object sender, System.EventArgs e)
{
mycom1.PortNum=Convert.ToInt16(t_port.Text); //1,2,3,4
mycom1.BaudRate=Convert.ToInt16(t_rate.Text); //1200,2400,4800,9600
mycom1.ByteSize=Convert.ToByte(t_bytesize.Text,10); //8 bits
mycom1.Parity=Convert.ToByte(t_parity.Text,10); // 0-4=no,odd,even,mark,space
mycom1.StopBits=Convert.ToByte(t_stopbyte.Text,10); // 0,1,2 = 1, 1.5, 2
//iTimeout=3;
if(this.OpenCom())
msg.AppendText(“串口初始化成功……\r\n”);
else
msg.AppendText(“串口初始化失败!\r\n”);
}
//程序关闭,结束串口
private void Form1_Closing(object sender, System.ComponentModel.CancelEventArgs e)
{
mycom1.Close();
}

private void button5_Click(object sender, System.EventArgs e)
{
if(mycom1.Opened)
{
mycom1.Close();
button5.Text=”开启串口”;
msg.AppendText(“\r\n串口被关闭……”);
}
else
{
mycom1.Open();
button5.Text=”关闭串口”;
msg.AppendText(“\r\n串口成功开启……”);
}
}
}
}

注意:发送数据包的格式是16进制数据如:02 45 66 FA  中间可以有或者没有空格,但要保证有偶数位

C#串口通信编程类(修改版) - 小y - 博客园

mikel阅读(881)

来源: C#串口通信编程类(修改版) – 小y – 博客园

这是从网上down下来的一个串口通信类,发现close函数忘记了设置Opened属性为false
还有后面string转byte[]和byte[]转string的函数有错误,索性删掉了
修改后的串口通信类如下:
下一篇将把我的测试程序主程序部分全部代码贴出来
可以坚强勇敢的用来实现串口通信。

using System;
using System.Runtime.InteropServices;

namespace BusApp
{
/// <summary>
///
/// </summary>
public class mycom
{
public mycom()
{
//
// TODO: 在此处添加构造函数逻辑
//
}
public int PortNum; //1,2,3,4
public int BaudRate; //1200,2400,4800,9600
public byte ByteSize; //8 bits
public byte Parity; // 0-4=no,odd,even,mark,space
public byte StopBits; // 0,1,2 = 1, 1.5, 2
public int ReadTimeout; //10

//comm port win32 file handle
private int hComm = -1;

public bool Opened = false;

//win32 api constants
private const uint GENERIC_READ = 0x80000000;
private const uint GENERIC_WRITE = 0x40000000;
private const int OPEN_EXISTING = 3;
private const int INVALID_HANDLE_VALUE = -1;

[StructLayout(LayoutKind.Sequential)]
private struct DCB
{
//taken from c struct in platform sdk
public int DCBlength;           // sizeof(DCB)
public int BaudRate;            // current baud rate
public int fBinary;          // binary mode, no EOF check
public int fParity;          // enable parity checking
public int fOutxCtsFlow;      // CTS output flow control
public int fOutxDsrFlow;      // DSR output flow control
public int fDtrControl;       // DTR flow control type
public int fDsrSensitivity;   // DSR sensitivity
public int fTXContinueOnXoff; // XOFF continues Tx
public int fOutX;          // XON/XOFF out flow control
public int fInX;           // XON/XOFF in flow control
public int fErrorChar;     // enable error replacement
public int fNull;          // enable null stripping
public int fRtsControl;     // RTS flow control
public int fAbortOnError;   // abort on error
public int fDummy2;        // reserved
public ushort wReserved;          // not currently used
public ushort XonLim;             // transmit XON threshold
public ushort XoffLim;            // transmit XOFF threshold
public byte ByteSize;           // number of bits/byte, 4-8
public byte Parity;             // 0-4=no,odd,even,mark,space
public byte StopBits;           // 0,1,2 = 1, 1.5, 2
public char XonChar;            // Tx and Rx XON character
public char XoffChar;           // Tx and Rx XOFF character
public char ErrorChar;          // error replacement character
public char EofChar;            // end of input character
public char EvtChar;            // received event character
public ushort wReserved1;         // reserved; do not use
}

  [StructLayout(LayoutKind.Sequential)]
private struct COMMTIMEOUTS
{
public int ReadIntervalTimeout;
public int ReadTotalTimeoutMultiplier;
public int ReadTotalTimeoutConstant;
public int WriteTotalTimeoutMultiplier;
public int WriteTotalTimeoutConstant;
}

[StructLayout(LayoutKind.Sequential)]
private struct OVERLAPPED
{
public int  Internal;
public int  InternalHigh;
public int  Offset;
public int  OffsetHigh;
public int hEvent;
}

[DllImport(“kernel32.dll”)]
private static extern int CreateFile(
string lpFileName,                         // file name
uint dwDesiredAccess,                      // access mode
int dwShareMode,                          // share mode
int lpSecurityAttributes, // SD
int dwCreationDisposition,                // how to create
int dwFlagsAndAttributes,                 // file attributes
int hTemplateFile                        // handle to template file
);
[DllImport(“kernel32.dll”)]
private static extern bool GetCommState(
int hFile,  // handle to communications device
ref DCB lpDCB    // device-control block
);
[DllImport(“kernel32.dll”)]
private static extern bool BuildCommDCB(
string lpDef,  // device-control string
ref DCB lpDCB     // device-control block
);
[DllImport(“kernel32.dll”)]
private static extern bool SetCommState(
int hFile,  // handle to communications device
ref DCB lpDCB    // device-control block
);
[DllImport(“kernel32.dll”)]
private static extern bool GetCommTimeouts(
int hFile,                  // handle to comm device
ref COMMTIMEOUTS lpCommTimeouts  // time-out values
);
[DllImport(“kernel32.dll”)]
private static extern bool SetCommTimeouts(
int hFile,                  // handle to comm device
ref COMMTIMEOUTS lpCommTimeouts  // time-out values
);
[DllImport(“kernel32.dll”)]
private static extern bool ReadFile(
int hFile,                // handle to file
byte[] lpBuffer,             // data buffer
int nNumberOfBytesToRead,  // number of bytes to read
ref int lpNumberOfBytesRead, // number of bytes read
ref OVERLAPPED lpOverlapped    // overlapped buffer
);
[DllImport(“kernel32.dll”)]
private static extern bool WriteFile(
int hFile,                    // handle to file
byte[] lpBuffer,                // data buffer
int nNumberOfBytesToWrite,     // number of bytes to write
ref int lpNumberOfBytesWritten,  // number of bytes written
ref OVERLAPPED lpOverlapped        // overlapped buffer
);
[DllImport(“kernel32.dll”)]
private static extern bool CloseHandle(
int hObject   // handle to object
);

public void Open()
{

DCB dcbCommPort = new DCB();
COMMTIMEOUTS ctoCommPort = new COMMTIMEOUTS();

// OPEN THE COMM PORT.

hComm = CreateFile(“COM” + PortNum ,GENERIC_READ | GENERIC_WRITE,0, 0,OPEN_EXISTING,0,0);

// IF THE PORT CANNOT BE OPENED, BAIL OUT.
if(hComm == INVALID_HANDLE_VALUE)
{
throw(new ApplicationException(“Comm Port Can Not Be Opened”));
}

// SET THE COMM TIMEOUTS.

GetCommTimeouts(hComm,ref ctoCommPort);
ctoCommPort.ReadTotalTimeoutConstant = ReadTimeout;
ctoCommPort.ReadTotalTimeoutMultiplier = 0;
ctoCommPort.WriteTotalTimeoutMultiplier = 0;
ctoCommPort.WriteTotalTimeoutConstant = 0;
SetCommTimeouts(hComm,ref ctoCommPort);

// SET BAUD RATE, PARITY, WORD SIZE, AND STOP BITS.
// THERE ARE OTHER WAYS OF DOING SETTING THESE BUT THIS IS THE EASIEST.
// IF YOU WANT TO LATER ADD CODE FOR OTHER BAUD RATES, REMEMBER
// THAT THE ARGUMENT FOR BuildCommDCB MUST BE A POINTER TO A STRING.
// ALSO NOTE THAT BuildCommDCB() DEFAULTS TO NO HANDSHAKING.

dcbCommPort.DCBlength = Marshal.SizeOf(dcbCommPort);
GetCommState(hComm, ref dcbCommPort);
dcbCommPort.BaudRate=BaudRate;
dcbCommPort.Parity=Parity;
dcbCommPort.ByteSize=ByteSize;
dcbCommPort.StopBits=StopBits;
SetCommState(hComm, ref dcbCommPort);

Opened = true;

}

public void Close()
{
if (hComm!=INVALID_HANDLE_VALUE)
{
CloseHandle(hComm);
Opened=false;
}
}

public byte[] Read(int NumBytes)
{
byte[] BufBytes;
byte[] OutBytes;
BufBytes = new byte[NumBytes];
if (hComm!=INVALID_HANDLE_VALUE)
{
OVERLAPPED ovlCommPort = new OVERLAPPED();
int BytesRead=0;
ReadFile(hComm,BufBytes,NumBytes,ref BytesRead,ref ovlCommPort);
OutBytes = new byte[BytesRead];
Array.Copy(BufBytes,OutBytes,BytesRead);
}
else
{
throw(new ApplicationException(“Comm Port Not Open”));
}
return OutBytes;
}

public int Write(byte[] WriteBytes)
{
int BytesWritten = 0;
if (hComm!=INVALID_HANDLE_VALUE)
{
OVERLAPPED ovlCommPort = new OVERLAPPED();
WriteFile(hComm,WriteBytes,WriteBytes.Length,ref BytesWritten,ref ovlCommPort);
}
else
{
throw(new ApplicationException(“Comm Port Not Open”));
}
return BytesWritten;
}
}
}

敬告各位网友:

该程序源码已经放到本blog第一篇

中提供下载!

SerialPort实现与地磅通信_JustLovePro的专栏-CSDN博客

mikel阅读(706)

来源: (2条消息)SerialPort实现与地磅通信_JustLovePro的专栏-CSDN博客

1.拖一个serialPort 命名sp。

2.

.关键在于DataReceived事件的处理

.波特率设定与仪表设置一致:1200

.ReadBufferSize可设置为通信协定的数据长度:12

.注意起始与结束编码:0x02, 0x03

.Invoke实现委托,使得辅助线程修改主线程控件内容(也可以设置CheckForIllegalCrossThreadCalls直接跨线程作业)

(参考:http://www.cnblogs.com/worldreason/archive/2008/06/09/1216127.html )

using System;
using System.Collections.Generic;
using System.ComponentModel;
using System.Data;
using System.Drawing;
using System.Text;
using System.Windows.Forms;
using System.IO.Ports;
using System.Threading;
namespace WMS.SD.DeliveryGoods
{
public partial class frmUpLoad : Form
{
private delegate void HandleInterfaceUpdateDelegate(string aString);
HandleInterfaceUpdateDelegate interfaceUpdateHandle;
static string strReceive;   //   接收到数据的缓冲区
public frmUpLoad()
{
InitializeComponent();
}
private void frmUpLoad_Load(object sender, EventArgs e)
{
//是否允许跨线程访问
// CheckForIllegalCrossThreadCalls = false;
interfaceUpdateHandle = new HandleInterfaceUpdateDelegate(ShowText);
try
{
if (!sp.IsOpen)
{
sp.Open();//打开串口方法
}
btnGetWeight.Enabled = false;
}//抛出异常
catch (Exception ex)
{
MessageBox.Show(ex.Message.ToString());
}
}
private void ShowText(string aString)
{
//根据通信数据规格显示数据
this.lblData.Text = aString.Substring(1, 5) + “.” + aString.Substring(5, 1);
}
private void btnGetWeight_Click(object sender, EventArgs e)
{
try
{
btnGetWeight.Enabled = false;
if (!sp.IsOpen)
{
Thread.Sleep(5000);
sp.Open();//打开串口方法
}
}//抛出异常
catch (Exception ex)
{
MessageBox.Show(ex.Message.ToString());
}
}
private void sp_DataReceived(object sender, System.IO.Ports.SerialDataReceivedEventArgs e)
{
try
{
//取得第一个字节
if (sp.IsOpen)
{
byte firstbyte = Convert.ToByte(sp.ReadByte());
//判断第一个字节是否是起始位:16进制的0x02
if (firstbyte == 0x02)
{
//定义接收数据长度
int bytesRead = sp.ReadBufferSize;
//数据接收字节数组
byte[] bytesData = new byte[bytesRead];
//接收字节
byte byteData;
for (int i = 0; i <= bytesRead – 1; i++)
{
try
{
if (sp.IsOpen)
{
byteData = Convert.ToByte(sp.ReadByte());
//判断数据结束字节
if (byteData == 0x03)
{
break;
}
bytesData[i] = byteData;
}
}
catch (Exception ex)
{
// MessageBox.Show( ex.Message + ex.GetType().FullName);
}
}
//将字节数组转换成字符串
strReceive = System.Text.Encoding.Default.GetString(bytesData);
//this.lblData.Text = strReceive.Substring(1, 5) + “.” + strReceive.Substring(5, 1);
// Invoke(interfaceUpdateHandle, strczData);
BeginInvoke(interfaceUpdateHandle, strReceive);
}
}
}
catch (Exception ex)
{
//  MessageBox.Show(ex.Message + ex.GetType().FullName);
}
}
private void btnexit_Click(object sender, EventArgs e)
{
if (sp.IsOpen)
{
sp.DiscardInBuffer();
sp.Close();
}
this.Close();
}
private void btnreset_Click(object sender, EventArgs e)
{
try
{
if (sp.IsOpen)
{
sp.DiscardInBuffer();
sp.Close();
}
this.lblData.Text = “”;
btnGetWeight.Enabled = true;
}
catch (Exception ex)
{
MessageBox.Show(ex.Message);
}
}
private void frmUpLoad_FormClosing(object sender, FormClosingEventArgs e)
{
if (sp.IsOpen)
{
sp.DiscardInBuffer();
sp.Close();
}
}
}
}
————————————————
版权声明:本文为CSDN博主「JustLovePro」的原创文章,遵循CC 4.0 BY-SA版权协议,转载请附上原文出处链接及本声明。
原文链接:https://blog.csdn.net/JustLovePro/article/details/3485106

Invoke and BeginInvoke - 信息加油站义工 - 博客园

mikel阅读(558)

来源: Invoke and BeginInvoke – 信息加油站义工 – 博客园

Invoke and BeginInvoke

Invoke或者BeginInvoke的使用中无一例外地使用了委托Delegate,至于委托的本质请参考我的另一随笔:对.net事件的看法
 

一、为什么Control类提供了Invoke和BeginInvoke机制?

关于这个问题的最主要的原因已经是dotnet程序员众所周知的,我在此费点笔墨再次记录到自己的日志,以便日后提醒一下自己。

1、windows程序消息机制

Windows GUI程序是基于消息机制的,有个主线程维护着一个消息泵。这个消息泵让windows程序生生不息。

                                                  Windows GUI程序的消息循环


Windows程序有个消息队列,窗体上的所有消息是这个队列里面消息的最主要来源。这里的while循环使用了GetMessage()这个方法,这是个阻塞方法,也就是队列为空时方法就会被阻塞,从而这个while循环停止运动,这避免了一个程序把cpu无缘无故地耗尽,让其它程序难以得到响应。当然在某些需要cpu最大限度运动的程序里面就可以使用另外的方法,例如某些3d游戏或者及时战略游戏中,一般会使用PeekMessage()这个方法,它不会被windows阻塞,从而保证整个游戏的流畅和比较高的帧速。

这个主线程维护着整个窗体以及上面的子控件。当它得到一个消息,就会调用DispatchMessage方法派遣消息,这会引起对窗体上的窗口过程的调用。窗口过程里面当然是程序员提供的窗体数据更新代码和其它代码。

2、dotnet里面的消息循环

public static void Main(string[] args)

{

   Form f = new Form();

   Application.Run(f);

}

Dotnet窗体程序封装了上述的while循环,这个循环就是通过Application.Run方法启动的。

3、线程外操作GUI控件的问题

如果从另外一个线程操作windows窗体上的控件,就会和主线程产生竞争,造成不可预料的结果,甚至死锁。因此windows GUI编程有一个规则,就是只能通过创建控件的线程来操作控件的数据,否则就可能产生不可预料的结果。

因此,dotnet里面,为了方便地解决这些问题,Control类实现了ISynchronizeInvoke接口,提供了Invoke和BeginInvoke方法来提供让其它线程更新GUI界面控件的机制。

public interface ISynchronizeInvoke

{

        [HostProtection(SecurityAction.LinkDemand, Synchronization=true, ExternalThreading=true)]

        IAsyncResult BeginInvoke(Delegate method, object[] args);

        object EndInvoke(IAsyncResult result);

        object Invoke(Delegate method, object[] args);

        bool InvokeRequired { get; }

}

}

如果从线程外操作windows窗体控件,那么就需要使用Invoke或者BeginInvoke方法,通过一个委托把调用封送到控件所属的线程上执行。

二、消息机制—线程间和进程间通信机制

1、window消息发送

Windows消息机制是windows平台上的线程或者进程间通信机制之一。Windows消息值其实就是定义的一个数据结构,最重要的是消息的类型,它就是一个整数;然后就是消息的参数。消息的参数可以表示很多东西。

Windows提供了一些api用来向一个线程的消息队列发送消息。因此,一个线程可以向另一个线程的消息队列发送消息从而告诉对方做什么,这样就完成了线程间的通信。有些api发送消息需要一个窗口句柄,这种函数可以把消息发送到指定窗口的主线程消息队列;而有些则可以直接通过线程句柄,把消息发送到该线程消息队列中。


用消息机制通信

SendMessage是windows api,用来把一个消息发送到一个窗口的消息队列。这个方法是个阻塞方法,也就是操作系统会确保消息的确发送到目的消息队列,并且该消息被处理完毕以后,该函数才返回。返回之前,调用者将会被暂时阻塞。

PostMessage也是一个用来发送消息到窗口消息队列的api函数,但这个方法是非阻塞的。也就是它会马上返回,而不管消息是否真的发送到目的地,也就是调用者不会被阻塞。

2、Invoke and BeginInvoke

                                                        Invoke or BeginInvoke

Invoke或者BeginInvoke方法都需要一个委托对象作为参数。委托类似于回调函数的地址,因此调用者通过这两个方法就可以把需要调用的函数地址封送给界面线程。这些方法里面如果包含了更改控件状态的代码,那么由于最终执行这个方法的是界面线程,从而避免了竞争条件,避免了不可预料的问题。如果其它线程直接操作界面线程所属的控件,那么将会产生竞争条件,造成不可预料的结果。

使用Invoke完成一个委托方法的封送,就类似于使用SendMessage方法来给界面线程发送消息,是一个同步方法。也就是说在Invoke封送的方法被执行完毕前,Invoke方法不会返回,从而调用者线程将被阻塞。

使用BeginInvoke方法封送一个委托方法,类似于使用PostMessage进行通信,这是一个异步方法。也就是该方法封送完毕后马上返回,不会等待委托方法的执行结束,调用者线程将不会被阻塞。但是调用者也可以使用EndInvoke方法或者其它类似WaitHandle机制等待异步操作的完成。

但是在内部实现上,Invoke和BeginInvoke都是用了PostMessage方法,从而避免了SendMessage带来的问题。而Invoke方法的同步阻塞是靠WaitHandle机制来完成的。

3、使用场合问题

如果你的后台线程在更新一个UI控件的状态后不需要等待,而是要继续往下处理,那么你就应该使用BeginInvoke来进行异步处理。

如果你的后台线程需要操作UI控件,并且需要等到该操作执行完毕才能继续执行,那么你就应该使用Invoke。否则,在后台线程和主截面线程共享某些状态数据的情况下,如果不同步调用,而是各自继续执行的话,可能会造成执行序列上的问题,虽然不发生死锁,但是会出现不可预料的显示结果或者数据处理错误。

可以看到ISynchronizeInvoke有一个属性,InvokeRequired。这个属性就是用来在编程的时候确定,一个对象访问UI控件的时候是否需要使用Invoke或者BeginInvoke来进行封送。如果不需要那么就可以直接更新。在调用者对象和UI对象同属一个线程的时候这个属性返回false。在后面的代码分析中我们可以看到,Control类对这一属性的实现就是在判断调用者和控件是否属于同一个线程的。

三、Delegate.BeginInvoke

通过一个委托来进行同步方法的异步调用,也是.net提供的异步调用机制之一。但是Delegate.BeginInvoke方法是从ThreadPool取出一个线程来执行这个方法,以获得异步执行效果的。也就是说,如果采用这种方式提交多个异步委托,那么这些调用的顺序无法得到保证。而且由于是使用线程池里面的线程来完成任务,使用频繁,会对系统的性能造成影响。

Delegate.BeginInvoke也是讲一个委托方法封送到其它线程,从而通过异步机制执行一个方法。调用者线程则可以在完成封送以后去继续它的工作。但是这个方法封送到的最终执行线程是运行库从ThreadPool里面选取的一个线程。

这里需要纠正一个误区,那就是Control类上的异步调用BeginInvoke并没有开辟新的线程完成委托任务,而是让界面控件的所属线程完成委托任务的。看来异步操作就是开辟新线程的说法不一定准确。

四、用Reflector察看一些相关代码

1、Control.BeginInvoke and Control.Invoke

public IAsyncResult BeginInvoke(Delegate method, params object[] args){    using (new MultithreadSafeCallScope())    {        return (IAsyncResult) this.FindMarshalingControl().MarshaledInvoke(this, method, args, false);    }}public object Invoke(Delegate method, params object[] args){    using (new MultithreadSafeCallScope())    {        return this.FindMarshalingControl().MarshaledInvoke(this, method, args, true);    }}

这里的FindMarshalingControl方法通过一个循环向上回溯,从当前控件开始回溯父控件,直到找到最顶级的父控件,用它作为封送对象。例如,我们调用窗体上一个进度条的Invoke方法封送委托,但是实际上会回溯到主窗体,通过这个控件对象来封送委托。因为主窗体是主线程消息队列相关的,发送给主窗体的消息才能发送到界面主线程消息队列。

我们可以看到Invoke和BeginInvoke方法使用了同样的实现,只是MarshaledInvoke方法的最后一个参数值不一样。

2、MarshaledInvoke

private object MarshaledInvoke(Control caller, Delegate method, object[] args, bool synchronous){    int num;    if (!this.IsHandleCreated)    {        throw new InvalidOperationException(SR.GetString(“ErrorNoMarshalingThread”));    }    if (((ActiveXImpl) this.Properties.GetObject(PropActiveXImpl)) != null)    {        IntSecurity.UnmanagedCode.Demand();    }    bool flag = false;    if ((SafeNativeMethods.GetWindowThreadProcessId(new HandleRef(this, this.Handle), out num) == SafeNativeMethods.GetCurrentThreadId()) && synchronous)    {        flag = true;    }    ExecutionContext executionContext = null;    if (!flag)    {        executionContext = ExecutionContext.Capture();    }    ThreadMethodEntry entry = new ThreadMethodEntry(caller, method, args, synchronous, executionContext);    lock (this)    {        if (this.threadCallbackList == null)        {            this.threadCallbackList = new Queue();        }    }    lock (this.threadCallbackList)    {        if (threadCallbackMessage == 0)        {            threadCallbackMessage = SafeNativeMethods.RegisterWindowMessage(Application.WindowMessagesVersion + “_ThreadCallbackMessage”);        }        this.threadCallbackList.Enqueue(entry);    }    if (flag)    {        this.InvokeMarshaledCallbacks();    }    else    { //终于找到你了,PostMessage        UnsafeNativeMethods.PostMessage(new HandleRef(this, this.Handle), threadCallbackMessage, IntPtr.Zero, IntPtr.Zero);    }    if (!synchronous) //如果是异步,那么马上返回吧    {        return entry;    }    if (!entry.IsCompleted) //同步调用没结束,阻塞起来等待吧    {        this.WaitForWaitHandle(entry.AsyncWaitHandle);    }    if (entry.exception != null)    {        throw entry.exception;    }    return entry.retVal;}

怎么样,我们终于看到PostMessage了吧?通过windows消息机制实现了封送。而需要封送的委托方法作为消息的参数进行了传递。关于其它的代码这里不作进一步解释。

3、InvokeRequired

public bool InvokeRequired{    get    {        using (new MultithreadSafeCallScope())        {            HandleRef ref2;            int num;            if (this.IsHandleCreated)            {                ref2 = new HandleRef(this, this.Handle);            }            else            {                Control wrapper = this.FindMarshalingControl();                if (!wrapper.IsHandleCreated)                {                    return false;                }                ref2 = new HandleRef(wrapper, wrapper.Handle);            }            int windowThreadProcessId = SafeNativeMethods.GetWindowThreadProcessId(ref2, out num);            int currentThreadId = SafeNativeMethods.GetCurrentThreadId();            return (windowThreadProcessId != currentThreadId);        }    }

}

终于看到了,这是在判断windows窗体线程和当前的调用者线程是否是同一个,如果是同一个就没有必要封送了,直接访问这个GUI控件吧。否则,就不要那么直接表白了,就需要Invoke或者BeginInvoke做媒了。

c#开发地磅称重软件 - s1ihome - 博客园

mikel阅读(1158)

来源: c#开发地磅称重软件 – s1ihome – 博客园

2012年时即做过一个地磅称重软件,最近公司又接了一个地磅过磅软件的项目,把遇到的问题总结一下以备后用。


1.接线问题

因为客户方原来单独使用仪表,仪表未有接线和电脑连接,为此颇费周折才做好了接线。接线方式为仪表端所接阵脚为7、8,电脑端为2、5

2.读取仪表称重数

代码基本沿袭2012年为另一客户所开发的称重软件的代码。

注:本次客户所使用地磅为泰山衡器厂出的XK3200,但说明书上说明和耀华系列地磅兼容,而上一客户所使用地磅正是耀华XK3190,大概因此代码基本可直接通用。


下面贴代码了,使用的serialPort控件,命名为port

称重窗体设计器代码页 FrmWeigh.designer.cs中

1
2
3
4
this.port.BaudRate = 2400;
this.port.Parity = System.IO.Ports.Parity.Even;
this.port.StopBits = System.IO.Ports.StopBits.OnePointFive;
this.port.DataReceived += new System.IO.Ports.SerialDataReceivedEventHandler(this.port_DataReceived);


称重窗体FrmWeigh.cs获取地磅仪表数核心代码部分:

复制代码
 1         /// <summary>
 2         /// 串口读取数据
 3         /// </summary>
 4         private void port_DataReceived(object sender, System.IO.Ports.SerialDataReceivedEventArgs e)
 5         {
 6             Thread.Sleep(100);            
 7             if (false == this.port.IsOpen) return;
 8             byte firstByte = Convert.ToByte(port.ReadByte());
 9             if (firstByte == 0x02)
10             {
11                 int bytesRead = port.ReadBufferSize;
12                 byte[] bytesData = new byte[bytesRead];
13                 byte byteData;
14 
15                 for (int i = 0; i < bytesRead - 1; i++)
16                 {
17                     byteData = Convert.ToByte(port.ReadByte());
18                     if (byteData == 0x03)//结束
19                     {
20                         break;
21                     }
22                     bytesData[i] = byteData;
23                 }
24                 strReceive = Encoding.Default.GetString(bytesData);
25             }
26             tbWeight.Invoke(new EventHandler(delegate { tbWeight.Text = GetWeightOfPort(strReceive); }));
27         }
28 
29         /// <summary>
30         /// 返回串口读取的重量
31         /// </summary>
32         /// <param name="?"></param>
33         /// <returns></returns>
34         private string GetWeightOfPort(string weight)
35         {
36             if (string.IsNullOrEmpty(weight) || weight.IndexOf("+") < 0 || weight.Length < 6)
37             {
38                 return "0.000";
39             }
40             weight = weight.Replace("+", "");
41             weight = int.Parse(weight.Substring(0, 3)).ToString() + "." + weight.Substring(3, 3);
42             return weight;
43         }
复制代码


C# 地磅串口编程 - 沙茶叶 - 博客园

mikel阅读(559)

来源: C# 地磅串口编程 – 沙茶叶 – 博客园

现实生活中,我们会经常遇到一些串口的设备,例如:IC卡、RFID等;

然后最近有一个项目用到了地磅,这里也是通过串口通讯方式进行数据交互,说实话,地磅这东西,实在有点不方便。

然而,串口的编程,不得不说下串口的DCB(Device Control Block)结构,做过串口编程的人应该都知道,而我这里也只是记录下自己学过的东西,高手路过的请勿吐槽。

一般串口编程都是通过C/C++ 来通信,然后.Net 也封装了SerialPort的控件,但是这里还是简单介绍下:


首先,看看DCB的结构:

复制代码
 1         //Device Control Block
 2         [StructLayout(LayoutKind.Sequential)]
 3         private struct DCB
 4         {
 5             //taken from c struct in platform sdk 
 6             public int DCBlength;           // DCB结构的长度(以字节为单位)
 7             public int BaudRate;            // 波特率设置
 8             public int fBinary;             // 二进制模式。(必须为1 )
 9             public int fParity;             // TRUE时, 支持奇偶检验
10             public int fOutxCtsFlow;        // TRUE时,支持CTS流控制。 当CTS为OFF时,停止发送。
11             public int fOutxDsrFlow;        // TRUE时,支持DSR流控制。 当DSR为OFF时,停止发送。
12             public int fDtrControl;         // DTR设置。 (置高/置低...)   
13             public int fDsrSensitivity;     // TRUE时,当DSR为OFF,则接收端忽略所有字符 
14             public int fTXContinueOnXoff;   // TRUE时,不管接收端是否Xoff, 本方发送端持续发送。为False 时,则当接收端buffer 达到XoffLim时,发送端发送完Xoff字符后,就停止发送。
15             public int fOutX;               // 发送端支持Xon/Xoff 
16             public int fInX;                // 接收端支持Xon/Xoff
17             public int fErrorChar;          // TRUE时,若fParity为TRUE, 则用ErrorChar替换Parity Check错误的字符。
18             public int fNull;               // TRUE时,接收时去掉空字节(0x0) 
19             public int fRtsControl;         // RTS设置。 (置高/置低...)   
20             public int fAbortOnError;       // TRUE时,发生错误时停止读写操作。
21             public int fDummy2;             // 保留 
22             public ushort wReserved;        // 保留
23             public ushort XonLim;           // 当接收Buffer中的字符减少小XonLim规定的字符数, 就发送Xon字符,让对方继续发送。
24             public ushort XoffLim;          // 接收Buffer达到XoffLim规定的字符数, 就发送Xoff字符, 让对方停止发送。
25             public byte ByteSize;           // 数据位设置
26             public byte Parity;             // 奇偶检验位的设置:0-4=no,odd,even,mark,space
27             public byte StopBits;           // 停止位的设置:0,1,2 = 1, 1.5, 2
28             public char XonChar;            // Xon 字符
29             public char XoffChar;           // Xoff 字符 
30             public char ErrorChar;          // Parity Check 错误时,替换的字符 
31             public char EofChar;            // EOF替代字符 
32             public char EvtChar;            // 事件触发字符
33             public ushort wReserved1;       // 保留
34         }
复制代码

对于串口的封装,这里有个串口通信类可以用:

http://www.cnblogs.com/tuyile006/archive/2006/09/25/514327.html


然后在打开串口时,需要设置相关的波特率、数据位与校验位:

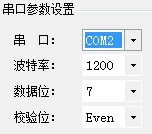
注意:这里的数据需要通过与 地磅的生产商 取得相应的规格。


然后在串口的选择这里,可以通过程序读取计算机上的硬件设备:

复制代码
 1 //需要引用组件:Microsoft.VisualBasic.Devices;
 2 private void ParameterConfig_Load(object sender, EventArgs e)
 3 {
 4     cbbCom.Items.Clear();
 5     Microsoft.VisualBasic.Devices.Computer pc = new Microsoft.VisualBasic.Devices.Computer();
 6     foreach (string s in pc.Ports.SerialPortNames)  //遍历本机所有串口
 7     {
 8         this.cbbCom.Items.Add(s); 
 9     }
10     SetValue();
11 }
复制代码


通过通信类mycom对串口、波特率、数据位、校验位的赋值:

1 ComHelper mycom = new ComHelper();
2 mycom.PortNum = config.Port; //串口;
3 mycom.BaudRate = config.BaudRate; // 波特率;
4 mycom.ByteSize = Convert.ToByte(config.ByteSize); //数据位;
5 mycom.Parity = Convert.ToByte(config.Parity); //校验位;

再读取串口返回的数据:

复制代码
 1 //1.读取串口数据
 2 byte[] getBytes = mycom.Read(NumsBytes);
 3 
 4 //2。获取16进制字符串
 5 receData = HexConvert.ByteToString(getBytes);
 6 
 7 //3.处理串口连续输出字符串
 8 if (receData.Length > 0)
 9 {
10     OutPutHelper helper = new OutPutHelper();
11     result = helper.getWeight(receData).ToString();
12 
13     //4.其他处理...
14 
15 }
复制代码


这里获取到的十六进制数:02 72 60 20 30 30 30 36 37 30 30 30 30 30 30 30 0D 4E

说明下,这里的地磅串口输出格式是:

其中:
1.<STX>ASCⅡ起始符.(0 2H)
2.状态字 A、B、C.
3.显示重量,可能是毛重也可能是净重,6位不带符号和小数点的数字.
4.皮重值,6位不带字符和小数点的数字.
5.<CR>ASCⅡ字符(0 DH).


所以,我们只需要从 第5位 开始到 第10位的 数据,即:30 30 30 36 37 30

通过解释后,得到的重量为:670.

如果没有东西过磅的情况下,取到的数据是:30 30 30 30 30 30

即是:0.

由于地磅是大磅,不计小数点,所以可以忽略小数点的情况。

————————————————————————————————————————————

其实这里通过SerialPort控件来实现串口编程会快捷点,而相关的使用方法,网上很多地方可以找到。

只是首次遇到串口编程的问题,想了解相关内容……

C#WinForm程序异常退出的捕获、继续执行与自动重启 - jack_Meng - 博客园

mikel阅读(1086)

来源: C#WinForm程序异常退出的捕获、继续执行与自动重启 – jack_Meng – 博客园

本文参考网上搜索的信息,并做了适当修改可以让捕捉到异常之后阻止程序退出。

另给出了通过命令行自动重启的方法。

如果一个线程里运行下面的代码

            int a = 0;
            int c = 10 / a;

将会导致程序自动结束,而且没有任何提示信息 但是如果是在主线程里运行这个代码,是会弹出异常信息对话框的

请问如何在线程里也出现这个异常信息对话框.或者避免程序直接退出,忽略异常,继续往下执行呢?
在WINFORM主线程捕获全部异常就行,如下代码:
复制代码
            //处理未捕获的异常
            Application.SetUnhandledExceptionMode(UnhandledExceptionMode.CatchException);
            //处理UI线程异常
            Application.ThreadException += new System.Threading.ThreadExceptionEventHandler(Application_ThreadException);
            //处理非UI线程异常
            AppDomain.CurrentDomain.UnhandledException += new UnhandledExceptionEventHandler(CurrentDomain_UnhandledException);
复制代码
 最常出现的错误在 :UnhandledException 里出现。详细代码如下:
复制代码
复制代码
        /// <summary>
        /// 应用程序的主入口点。
        /// </summary>
        [STAThread]
        static void Main(string[] args) 
        {
            Application.EnableVisualStyles();
            Application.SetCompatibleTextRenderingDefault(false);

            //处理未捕获的异常
            Application.SetUnhandledExceptionMode(UnhandledExceptionMode.CatchException);
            //处理UI线程异常
            Application.ThreadException += new System.Threading.ThreadExceptionEventHandler(Application_ThreadException);
            //处理非UI线程异常
            AppDomain.CurrentDomain.UnhandledException += new UnhandledExceptionEventHandler(CurrentDomain_UnhandledException);

            Application.Run(new Form1(args));
            glExitApp = true;//标志应用程序可以退出
        }

        /// <summary>
        /// 是否退出应用程序
        /// </summary>
        static bool glExitApp = false;

        static void CurrentDomain_UnhandledException(object sender, UnhandledExceptionEventArgs e)
        {
            LogHelper.Save("CurrentDomain_UnhandledException", LogType.Error);
            LogHelper.Save("IsTerminating : " + e.IsTerminating.ToString(), LogType.Error);
            LogHelper.Save(e.ExceptionObject.ToString());

            while (true)
            {//循环处理,否则应用程序将会退出
                if (glExitApp) {//标志应用程序可以退出,否则程序退出后,进程仍然在运行
                    LogHelper.Save("ExitApp");
                    return; 
                }
                System.Threading.Thread.Sleep(2*1000);
            };
        }
        
        static void Application_ThreadException(object sender, System.Threading.ThreadExceptionEventArgs e)
        {
            LogHelper.Save("Application_ThreadException:" +
                e.Exception.Message, LogType.Error);
            LogHelper.Save(e.Exception);
            //throw new NotImplementedException();
        }
复制代码
复制代码

如果程序需要重启只需要在捕获的事件处理时启动当前应用程序的代码即可。参考如下:

复制代码
复制代码
CmdStartCTIProc(Application.ExecutablePath, "cmd params");//放到捕获事件的处理代码后,重启程序,需要时加上重启的参数


        /// <summary>
        /// 在命令行窗口中执行
        /// </summary>
        /// <param name="sExePath"></param>
        /// <param name="sArguments"></param>
        static void CmdStartCTIProc(string sExePath, string sArguments)
        {
            Process p = new Process();
            p.StartInfo.FileName = "cmd.exe";
            p.StartInfo.UseShellExecute = false;
            p.StartInfo.RedirectStandardInput = true;
            p.StartInfo.RedirectStandardOutput = true;
            p.StartInfo.RedirectStandardError = true;
            p.StartInfo.CreateNoWindow = false;
            p.StartInfo.WindowStyle = System.Diagnostics.ProcessWindowStyle.Hidden;
            p.Start();
            p.StandardInput.WriteLine(sExePath + " " + sArguments);
            p.StandardInput.WriteLine("exit");
            p.Close();

            System.Threading.Thread.Sleep(2000);//必须等待,否则重启的程序还未启动完成;根据情况调整等待时间
        }
复制代码
复制代码

另外一种重启进程的方式:

复制代码
            //重启程序,需要时加上重启的参数
            System.Diagnostics.ProcessStartInfo cp = new System.Diagnostics.ProcessStartInfo();
            cp.FileName = Application.ExecutablePath;
            cp.Arguments = "cmd params";
            cp.UseShellExecute = true;
            System.Diagnostics.Process.Start(cp);
复制代码

看了觉得有用的朋友,如果您方便的话,可以顶一下。谢谢!

程序崩溃后重启,可以试试下面的方式:

复制代码
        /// <summary> 
        /// 应用程序的主入口点。 
        /// </summary> 
        [STAThread] 
        static void Main() 
        { 
            Application.ThreadException+=new System.Threading.ThreadExceptionEventHandler(Application_ThreadException); 
            Application.EnableVisualStyles(); 
            Application.SetCompatibleTextRenderingDefault(false); 
            Application.Run(new Form1()); 
        } 

        private static void Application_ThreadException(object sender, System.Threading.ThreadExceptionEventArgs e) 
        { 
            Application.Restart(); 
        }
复制代码


出处:https://www.cnblogs.com/zaspring/archive/2013/04/16/3023927.html

layui弹出层闪退,layer弹出层闪退,layer弹出层坑 - 小二胡工作室

mikel阅读(741)

这两天用layui的弹出层插件,发现两奇怪的问题:1、弹窗打开事件还未绑定到任何按钮,可是点击form表单中的按钮可以打开我定义的弹出层2、绑定弹出层到按钮,打开弹窗闪退 后面发现真如参考博文所说:我

来源: layui弹出层闪退,layer弹出层闪退,layer弹出层坑 – 小二胡工作室

这两天用layui的弹出层插件,发现两奇怪的问题:

1、弹窗打开事件还未绑定到任何按钮,可是点击form表单中的按钮可以打开我定义的弹出层

2、绑定弹出层到按钮,打开弹窗闪退


后面发现真如参考博文所说:我的button也是在form表单中,原因:

原来我在form表单中使用了Button按钮,点击的时候会触发默认事件,而form的action我没填,所以就是弹出层闪退!!

解决办法:

方法一:我将button标签换成其他的,如span就不会出现闪退问题了。

方法二:给button指明类型:type = “button”,因为在form表单中的button默认type = “submit”,改为button就没有表单的默认事件了,感觉法二优于法一。

MyBatis.Net 学习手记 - 菩提树下的杨过 - 博客园

mikel阅读(663)

来源: MyBatis.Net 学习手记 – 菩提树下的杨过 – 博客园

MyBatis.NET的前身为IBatis,是JAVA版MyBatis在.NET平台上的翻版,相对NHibernate、EntityFramework等重量级ORM框架而言,MyBatis.NET必须由开发人员手动写SQL,相对灵活性更大,更容易保证DB访问的性能,适用开发团队里有SQL熟手的场景。

下面是使用步骤:

1、到官网http://code.google.com/p/mybatisnet/ 下载相关dll和文档

Doc-DataAccess-1.9.2.zip
Doc-DataMapper-1.6.2.zip
IBatis.DataAccess.1.9.2.bin.zip
IBatis.DataMapper.1.6.2.bin.zip

一共有4个zip包

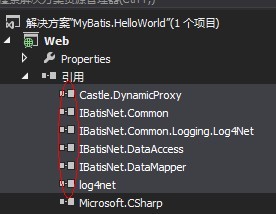
2、创建一个Web应用,参考下图添加程序集引用

3、修改web.config,主要是配置log4net,参考下面的内容:

复制代码
 1 <?xml version="1.0"?>
 2 <configuration>
 3     <configSections>
 4         <sectionGroup name="iBATIS">
 5             <section name="logging" type="IBatisNet.Common.Logging.ConfigurationSectionHandler, IBatisNet.Common"/>
 6         </sectionGroup>
 7         <section name="log4net" type="log4net.Config.Log4NetConfigurationSectionHandler, log4net"/>
 8     </configSections>
 9     <system.web>
10         <compilation debug="true" targetFramework="4.0"/>
11     </system.web>
12     <iBATIS>
13         <logging>
14             <logFactoryAdapter type="IBatisNet.Common.Logging.Impl.Log4NetLoggerFA, IBatisNet.Common.Logging.Log4Net">
15                 <arg key="configType" value="inline"/>
16                 <arg key="showLogName" value="true"/>
17                 <arg key="showDataTime" value="true"/>
18                 <arg key="level" value="ALL"/>
19                 <arg key="dateTimeFormat" value="yyyy/MM/dd HH:mm:ss:SSS"/>
20             </logFactoryAdapter>
21         </logging>
22     </iBATIS>
23     <log4net>
24         <!-- Define some output appenders -->
25         <appender name="RollingLogFileAppender" type="log4net.Appender.RollingFileAppender">
26             <param name="File" value="mybatis.log"/>
27             <param name="AppendToFile" value="true"/>
28             <param name="MaxSizeRollBackups" value="2"/>
29             <param name="MaximumFileSize" value="100KB"/>
30             <param name="RollingStyle" value="Size"/>
31             <param name="StaticLogFileName" value="true"/>
32             <layout type="log4net.Layout.PatternLayout">
33                 <param name="Header" value="[Header]\r\n"/>
34                 <param name="Footer" value="[Footer]\r\n"/>
35                 <param name="ConversionPattern" value="%d [%t] %-5p %c [%x] - %m%n"/>
36             </layout>
37         </appender>
38         <appender name="ConsoleAppender" type="log4net.Appender.ConsoleAppender">
39             <layout type="log4net.Layout.PatternLayout">
40                 <param name="ConversionPattern" value="%d [%t] %-5p %c [%x] &lt;%X{auth}&gt; - %m%n"/>
41             </layout>
42         </appender>
43         <!-- Set root logger level to ERROR and its appenders -->
44         <root>
45             <level value="DEBUG"/>
46             <appender-ref ref="RollingLogFileAppender"/>
47             <appender-ref ref="ConsoleAppender"/>
48         </root>
49         <!-- Print only messages of level DEBUG or above in the packages -->
50         <logger name="IBatisNet.DataMapper.Configuration.Cache.CacheModel">
51             <level value="DEBUG"/>
52         </logger>
53         <logger name="IBatisNet.DataMapper.Configuration.Statements.PreparedStatementFactory">
54             <level value="DEBUG"/>
55         </logger>
56         <logger name="IBatisNet.DataMapper.LazyLoadList">
57             <level value="DEBUG"/>
58         </logger>
59         <logger name="IBatisNet.DataAccess.DaoSession">
60             <level value="DEBUG"/>
61         </logger>
62         <logger name="IBatisNet.DataMapper.SqlMapSession">
63             <level value="DEBUG"/>
64         </logger>
65         <logger name="IBatisNet.Common.Transaction.TransactionScope">
66             <level value="DEBUG"/>
67         </logger>
68         <logger name="IBatisNet.DataAccess.Configuration.DaoProxy">
69             <level value="DEBUG"/>
70         </logger>
71     </log4net>
72 </configuration>
复制代码

4、添加Providers.config

把从官方下载的压缩包解开,就能找到providers.config文件,里面定义了MyBatis.Net支持的各种数据库驱动,本例以oracle为例,把其它不用的db provider全删掉,只保留下oracleClient1.0,同时把enabled属性设置成true,参考下面这样:

复制代码
 1 <?xml version="1.0"?>
 2 <providers xmlns="http://ibatis.apache.org/providers"
 3     xmlns:xsi="http://www.w3.org/2001/XMLSchema-instance">
 4 
 5     <clear/>    
 6     
 7     <!--Oracle Support-->
 8     <provider
 9       name="oracleClient1.0"
10       description="Oracle, Microsoft provider V1.0.5000.0"
11       enabled="true"
12       assemblyName="System.Data.OracleClient, Version=1.0.5000.0, Culture=neutral, PublicKeyToken=b77a5c561934e089" connectionClass="System.Data.OracleClient.OracleConnection"
13       commandClass="System.Data.OracleClient.OracleCommand"
14       parameterClass="System.Data.OracleClient.OracleParameter"
15       parameterDbTypeClass="System.Data.OracleClient.OracleType"
16       parameterDbTypeProperty="OracleType"
17       dataAdapterClass="System.Data.OracleClient.OracleDataAdapter"
18       commandBuilderClass="System.Data.OracleClient.OracleCommandBuilder"
19       usePositionalParameters="false"
20       useParameterPrefixInSql="true"
21       useParameterPrefixInParameter="false"
22       parameterPrefix=":"
23       allowMARS="false"
24   />
25     
26 </providers>
复制代码

把这个文件复制到Web项目根目录下

5、添加SqlMap.config,内容如下:

复制代码
 1 <?xml version="1.0" encoding="utf-8"?>
 2 <sqlMapConfig xmlns="http://ibatis.apache.org/dataMapper"
 3               xmlns:xsi="http://www.w3.org/2001/XMLSchema-instance">
 4 
 5     <settings>
 6         <setting useStatementNamespaces="false"/>
 7         <setting cacheModelsEnabled="true"/>
 8     </settings>
 9 
10     <!--db provider配置文件路径-->
11     <providers resource="providers.config"/>
12 
13     <!--db provider类型及连接串-->
14     <database>
15         <provider name="oracleClient1.0" />
16         <dataSource name="oracle" connectionString="Data Source=ORCL;Persist Security Info=True;User ID=scott;Password=tiger;Unicode=True" />
17     </database>
18 
19     <!--db与Entity的映射文件-->
20     <sqlMaps>
21         <sqlMap resource="Maps/ProductMap.xml"/>
22     </sqlMaps>
23 
24 </sqlMapConfig>
复制代码

这个文件也复制到Web项目根目录下,它的作用主要是指定db连接串,告诉系统providers.config在哪? 以及db与entity的映射文件在哪?(映射文件后面会讲到,这里先不管)

6、在Oraccle中先建表Product以及Sequence,方便接下来测试

复制代码
 1 -- CREATE TABLE
 2 CREATE TABLE PRODUCT
 3 (
 4   PRODUCTID      NUMBER NOT NULL,
 5   PRODUCTNAME    VARCHAR2(100),
 6   PRODUCTCOMPANY VARCHAR2(100),
 7   SIGNDATE       DATE,
 8   UPDATEDATE     DATE
 9 );
10 -- CREATE/RECREATE PRIMARY, UNIQUE AND FOREIGN KEY CONSTRAINTS 
11 ALTER TABLE PRODUCT
12   ADD CONSTRAINT PK_PRODUCT_ID PRIMARY KEY (PRODUCTID);
13 
14 -- CREATE SEQUENCE 
15 CREATE SEQUENCE SQ_PRODUCT
16 MINVALUE 1
17 MAXVALUE 9999999999999999999999999
18 START WITH 1
19 INCREMENT BY 1
20 CACHE 20;
复制代码

7、创建Maps目录,并在该目录下,添加映射文件ProductMap.xml,内容如下:

复制代码
 1 <?xml version="1.0" encoding="utf-8" ?>
 2 <sqlMap namespace="EntityModel" xmlns="http://ibatis.apache.org/mapping"
 3         xmlns:xsi="http://www.w3.org/2001/XMLSchema-instance">
 4 
 5     <alias>
 6         <!--类的别名-->
 7         <typeAlias alias="Product" type="Web.Product,Web"/>
 8     </alias>
 9 
10     <resultMaps>
11         <!--Product类与db表的映射-->
12         <resultMap id="SelectAllResult" class="Product">
13             <result property="ProductId" column="ProductId"/>
14             <result property="ProductName" column="ProductName"/>
15             <result property="ProductCompany" column="ProductCompany" />
16             <result property="SignDate" column="SignDate"  />
17             <result property="UpdateDate" column="UpdateDate" />
18         </resultMap>
19     </resultMaps>
20 
21     <statements>
22 
23         <!--查询所有记录-->
24         <select id="SelectAllProduct" resultMap="SelectAllResult">
25             <![CDATA[SELECT ProductId,ProductName,ProductCompany,SignDate,UpdateDate FROM Product]]>
26         </select>
27 
28         <!--查询单条记录-->
29         <select id="SelectByProductId" parameterClass="int" resultMap="SelectAllResult" extends="SelectAllProduct">
30             <![CDATA[ where ProductId = #value#  ]]>
31         </select>
32 
33         <!--插入新记录-->
34         <insert id="InsertProduct" parameterClass="Product">    
35             <!--oracle sequence的示例用法-->
36             <selectKey property="ProductId" type="pre" resultClass="int">
37                 select SQ_Product.nextval as ProductId from dual
38             </selectKey>
39             <![CDATA[INSERT into Product(ProductId,ProductCompany,ProductName,SignDate,UpdateDate)
40             VALUES(#ProductId#,#ProductCompany#, #ProductName# , #SignDate# , #UpdateDate#)]]>
41         </insert>
42 
43         <!--更新单条记录-->
44         <update id="UpdateProduct" parameterClass="Product">
45             <![CDATA[Update Product SET ProductName=#ProductName#,
46             ProductCompany=#ProductCompany#,            
47             SignDate=#SignDate#,
48             UpdateDate=#UpdateDate#
49             Where ProductId=#ProductId#]]>
50         </update>
51 
52         <!--根据主键删除单条记录-->
53         <delete id="DeleteProductById" parameterClass="int">
54             <![CDATA[Delete From Product Where ProductId=#value#]]>
55         </delete>
56 
57 
58     </statements>
59 
60 </sqlMap>
复制代码

它的作用就是指定各种sql,以及db表与entity的映射规则,注意下insert中Sequence的用法!

8、创建实体类Product

复制代码
 1 using System;
 2 
 3 namespace Web
 4 {
 5    public class Product
 6     {
 7        public int ProductId { get; set; }
 8        public string ProductName { get; set; }
 9        public string ProductCompany { get; set; }
10        public DateTime SignDate { get; set; }
11        public DateTime UpdateDate { get; set; }
12 
13        public Product() { }
14     }
15 }
复制代码

9、写一个通用的BaseDA类,对MyBatis.Net做些基本的封装

复制代码
 1 using IBatisNet.DataMapper;
 2 using System.Collections.Generic;
 3 
 4 namespace Web
 5 {
 6     public static class BaseDA
 7     {
 8         public static int Insert<T>(string statementName, T t)
 9         {
10             ISqlMapper iSqlMapper = Mapper.Instance();
11             if (iSqlMapper != null)
12             {
13                 return (int)iSqlMapper.Insert(statementName, t);
14             }
15             return 0;
16         }
17 
18         public static int Update<T>(string statementName, T t)
19         {
20             ISqlMapper iSqlMapper = Mapper.Instance();
21             if (iSqlMapper != null)
22             {
23                 return iSqlMapper.Update(statementName, t);
24             }
25             return 0;
26         }
27 
28         public static int Delete(string statementName, int primaryKeyId)
29         {
30             ISqlMapper iSqlMapper = Mapper.Instance();
31             if (iSqlMapper != null)
32             {
33                 return iSqlMapper.Delete(statementName, primaryKeyId);
34             }
35             return 0;
36         }
37 
38         public static T Get<T>(string statementName, int primaryKeyId) where T : class
39         {
40             ISqlMapper iSqlMapper = Mapper.Instance();
41             if (iSqlMapper != null)
42             {
43                 return iSqlMapper.QueryForObject<T>(statementName, primaryKeyId);
44             }
45             return null;
46         }
47 
48         public static IList<T> QueryForList<T>(string statementName, object parameterObject = null)
49         {
50             ISqlMapper iSqlMapper = Mapper.Instance();
51             if (iSqlMapper != null)
52             {
53                 return iSqlMapper.QueryForList<T>(statementName, parameterObject);
54             }
55             return null;
56         }
57     }
58 }
复制代码

10、然后就可以在Default.aspx.cs上测试了,参考下面的代码:

复制代码
using System;
using System.Web.UI;


namespace Web
{
    public partial class Default : Page
    {
        protected void Page_Load(object sender, EventArgs e)
        {
            //插入
            var insertProductId = BaseDA.Insert<Product>("InsertProduct", new Product()
            {
                ProductCompany = "INFOSKY",
                ProductName = "iGSA2",
                SignDate = DateTime.Now,
                UpdateDate = DateTime.Now
            });

            //查单条记录
            var model = BaseDA.Get<Product>("SelectByProductId", insertProductId);
            ShowProduct(model);

            Response.Write("<hr/>");

            //修改记录
            if (model != null)
            {
                model.ProductName = (new Random().Next(0, 99999999)).ToString().PadLeft(10, '0');
                int updateResult = BaseDA.Update<Product>("UpdateProduct", model);
                Response.Write("update影响行数:" + updateResult + "<br/><hr/>");
            }

            //查列表
            var products = BaseDA.QueryForList<Product>("SelectAllProduct");

            foreach (var pro in products)
            {
                ShowProduct(pro);
            }

            Response.Write("<hr/>");

            //删除记录
            int deleteResult = BaseDA.Delete("DeleteProductById", insertProductId);
            Response.Write("delete影响行数:" + deleteResult + "<br/><hr/>");

        }

        void ShowProduct(Product pro)
        {
            if (pro == null) return;
            Response.Write(string.Format("{0}&nbsp;,&nbsp;{1}&nbsp;,&nbsp;{2}&nbsp;,&nbsp;{3}&nbsp;,&nbsp;{4}<br/>",
                pro.ProductId, pro.ProductName, pro.ProductCompany, pro.SignDate, pro.UpdateDate));
        }
    }
}
复制代码

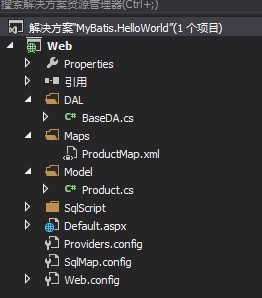
整个项目的目录结构如下:

示例源代码下载:http://files.cnblogs.com/yjmyzz/MyBatisSample.zip