详解k8s组件Ingress边缘路由器并落地到微服务 - kubernetes - justmine - 博客园

mikel阅读(1122)

来源: 详解k8s组件Ingress边缘路由器并落地到微服务 – kubernetes – justmine – 博客园

写在前面

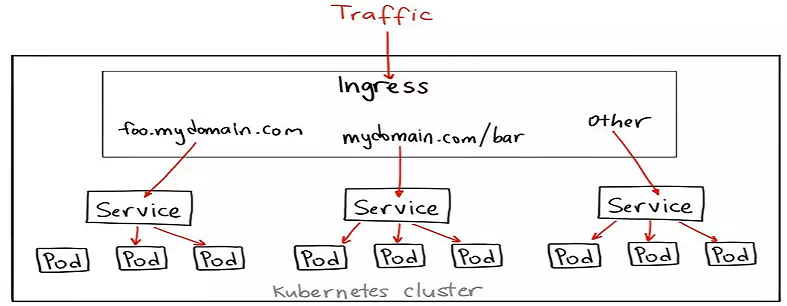
Ingress 英文翻译 进入;进入权;进食,更准确的讲就是入口,即外部流量进入k8s集群必经之口。这道大门到底有什么作用?我们如何使用Ingressk8s又是如何进行服务发现的呢?先看一张图:

备注:此图来源我转载的一篇博客NodePort,LoadBalancer还是Ingress?我该如何选择 – kubernetes,特此说明。

原理

虽然k8s集群内部署的podserver都有自己的IP,但是却无法提供外网访问,以前我们可以通过监听NodePort的方式暴露服务,但是这种方式并不灵活,生产环境也不建议使用。Ingresssk8s集群中的一个API资源对象,扮演边缘路由器(edge router)的角色,也可以理解为集群防火墙集群网关,我们可以自定义路由规则来转发、管理、暴露服务(一组pod),非常灵活,生产环境建议使用这种方式。另外LoadBlancer也可以暴露服务,不过这种方式需要向云平台申请负债均衡器;虽然目前很多云平台都支持,但是这种方式深度耦合了云平台,所以你懂的。

首先我们来思考用传统的web服务器,比如Nginx,如何处理这种场景?
Nginx充当一个反向代理服务器拦截外部请求,读取路由规则配置,转发相应的请求到后端服务。

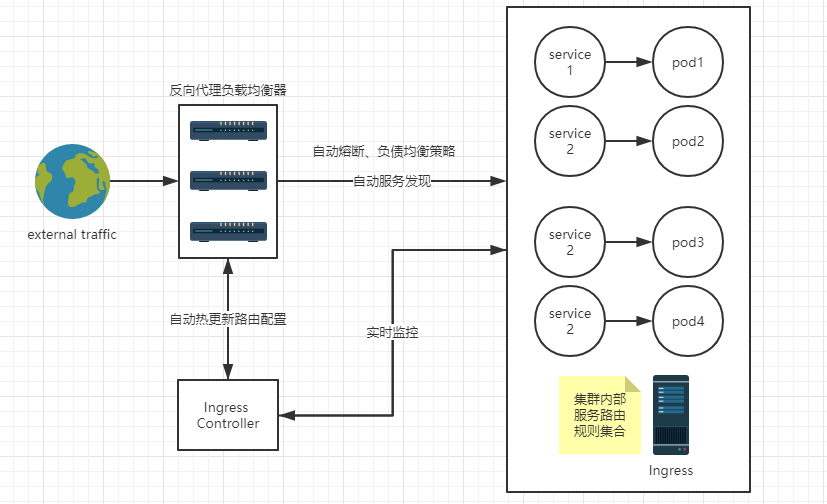
kubernetes处理这种场景时,涉及到三个组件

  1. 反向代理web服务器
    负责拦截外部请求,比如NginxApachetraefik等等。我一般以Deployment方式部署到kubernetes集群中,当然也可以用DeamonSet方式部署;这两种部署方式个人觉得有利有弊,感兴趣的请参考这篇文章,这里就不敖述了。
  2. Ingress controller
    k8s中的controller有很多,比如CronJobDeamonSetDeploymentReplicationSetStatefulSet等等,大家最熟悉的应该是Deployment(嘿嘿,我也是),它的作用就是监控集群的变化,使集群始终保持我们期望的最终状态(yml文件)。同理,Ingress controller的作用就是实时感知Ingress路由规则集合的变化,再与Api Server交互,获取ServicePod在集群中的 IP等信息,然后发送给反向代理web服务器,刷新其路由配置信息,这就是它的服务发现机制。
  3. Ingress
    定义路由规则集合,上面已经详细介绍,这里就不再敖述了。

经过上面的剖析,知道了吧,如果我们仅仅创建Ingress对象,只是定义了一系列路由规则集合而已,没有任何作用,不要想得太简单了,嘿嘿

Ingress 选型

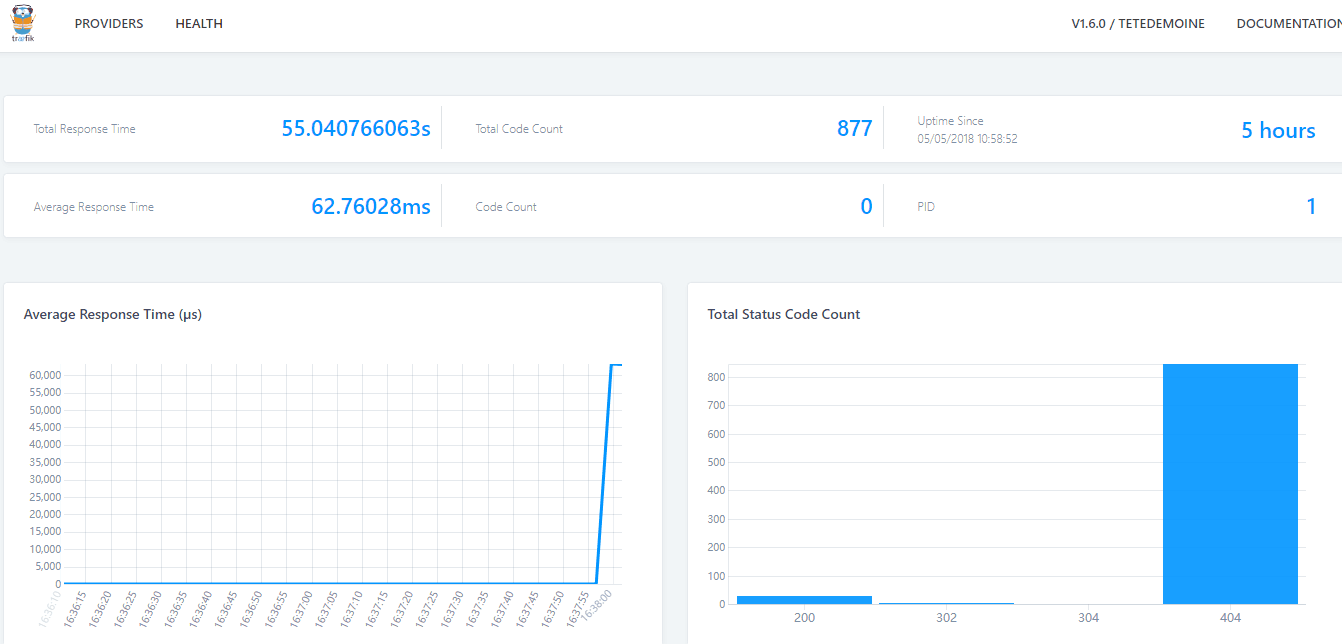
这个我花费了不少时间,最终选用的是Traefik,它是一个用Golang开发的轻量级的Http反向代理和负载均衡器,虽然相比于Nginx,它是后起之秀,但是它天然拥抱kubernetes,直接与集群k8s的Api Server通信,反应非常迅速,实时感知集群中Ingress定义的路由规则集合和后端ServicePod的变化,自动热更新Traefik后端配置,根本不用创建Ingress controller对象,同时还提供了友好的控制面板和监控界面,不仅可以方便地查看Traefik根据Ingress生成的路由配置信息,还可以查看统计的一些性能指标数据,如:总响应时间、平均响应时间、不同的响应码返回的总次数等,Traefik部署请参考官网用户示例Kubernetes Ingress Controller。不仅如此,Traefik还支持丰富的annotations配置,可配置众多出色的特性,例如:自动熔断负载均衡策略黑名单白名单;还支持许多后端存储,如:zookeeper、eureka、consul、rancher、docker等,它会自动感知这些统一配置中心的变化,热更新自己的路由配置,所以Traefik对于微服务来说简直就是一神器啊,嘿嘿。那么Traefik性能又如何呢?容器化部署,还担心性能,不要这么搞笑,好吗。而Nginx在拥抱kubernetes这方面比较后知后觉,详情请参考官方网站和开源项目ingress-nginx ;另外微软开源的微服务示例项目 eShopOnContainers 采用了ingress-nginx,大家可以下去自行研究。

**Traefik **:
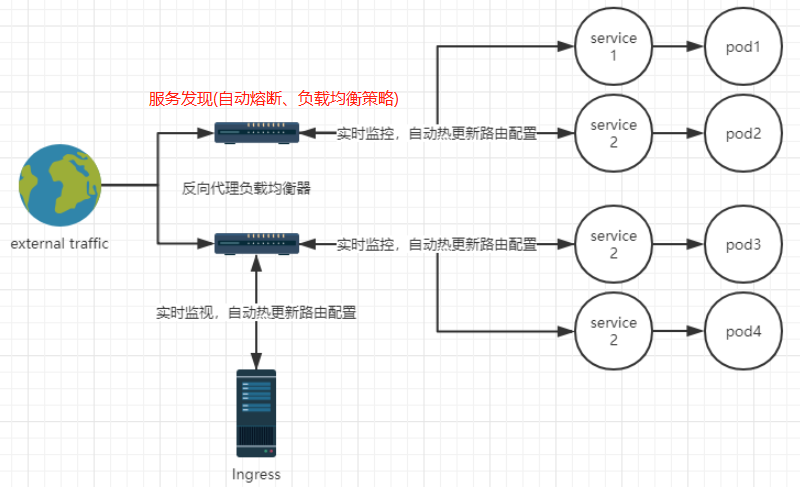
示例说明

使用Ingress暴露微服务

apiVersion: extensions/v1beta1
kind: Ingress
metadata:
  labels:
    app: light
    component: frontend
  name: light-edge-router
  namespace: geekbuying-light
  annotations:
    kubernetes.io/ingress.class: "traefik"
    ingress.kubernetes.io/ssl-redirect: "false"  
    traefik.frontend.rule.type: "PathPrefixStrip"
    traefik.ingress.kubernetes.io/frontend-entry-points: "http,https"
    traefik.ingress.kubernetes.io/priority: "3"
spec:
  rules:
  - host: <hostdomain literal>
    http:
      paths:
      - path: /api/v1/light
        backend: 
          serviceName: aggregation-light-api
          servicePort: 80
      - path: /api/v1/identity
        backend: 
          serviceName: identity-api
          servicePort: 80

非常重要

  1. 当我们定义额外的路由时,比如这里的/api/vi/identity,必须添加这个traefik.ingress.kubernetes.io/rule-type: PathPrefixStrip注解传递路径,否则会看不到任何效果;ingress.kubernetes.io/ssl-redirect: "false"是否强制使用https,其他的配置信息,请查看详情。另外,不同的Ingress选型,请参照各自的组件说明。
  2. 其他命名空间下的服务发现规则为:[serviceName].[namespace]:[port],如:exceptionless-ui.geekbuying-light-addons:80(备注:端口80可以省略,其他端口不能省略),表示查找geekbuying-light-addons命名空间下的exceptionless-ui服务,并匹配端口。

特性配置

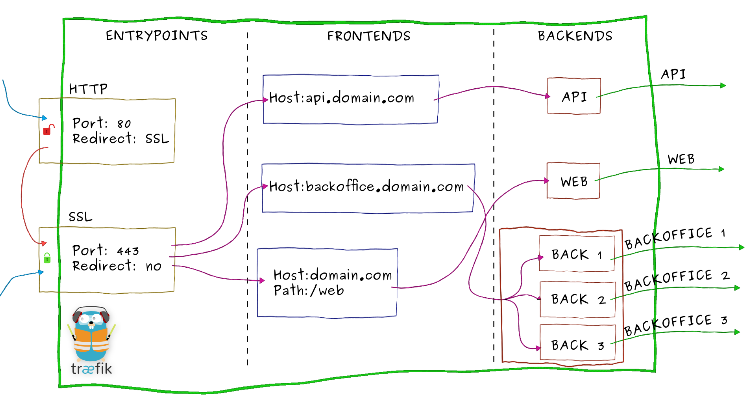
traefik支持强大的annotations配置,需要添加到kubernetes相应资源对象的annotations下面。至于具体配置到的哪个对象,先弄清楚三个概念:

  • EntryPoint(入口点)
    顾名思义,这是外部网络进入traefik的入口,我们上面就是通过监听主机端口拦截请求。
  • FrontEnd(前端)
    traefik拦截请求后,会转发给FrontEnd。前端定义EntryPoint映射到BackEnd的路由规则集,字段包括HostPathHeaders 等,匹配请求后,默认通过加权轮询负载算法路由到一个可用的BackEnd,然后进入指定的微服务,这就是服务发现。

备注:这些路由规则可以来自不同的后端存储,如Kubernetes、zookeeper、eureka、consul等,Kubernetes使用的Ingress资源对象定义路由规则集。建议大家自行去官网学习Kubernetes Ingress Backend

  • BackEnd(后端)
    一组http服务集,kubernetes中对应一个service对象下的一组pod地址。对于后端的服务发现,可配置负载均衡策略熔断器等特性。

一个后端service对象的配置例子

apiVersion: v1
kind: Service
metadata:
  annotations:
    traefik.backend.circuitbreaker: NetworkErrorRatio() > 0.5
    traefik.backend.loadbalancer.method: drr
  labels:
    app: light
    component: identity
  name: identity-api
  namespace: geekbuying-light
spec:
  ports:
  - port: 80
  selector:
    app: light
    component: identity
    type: webapi

效果图

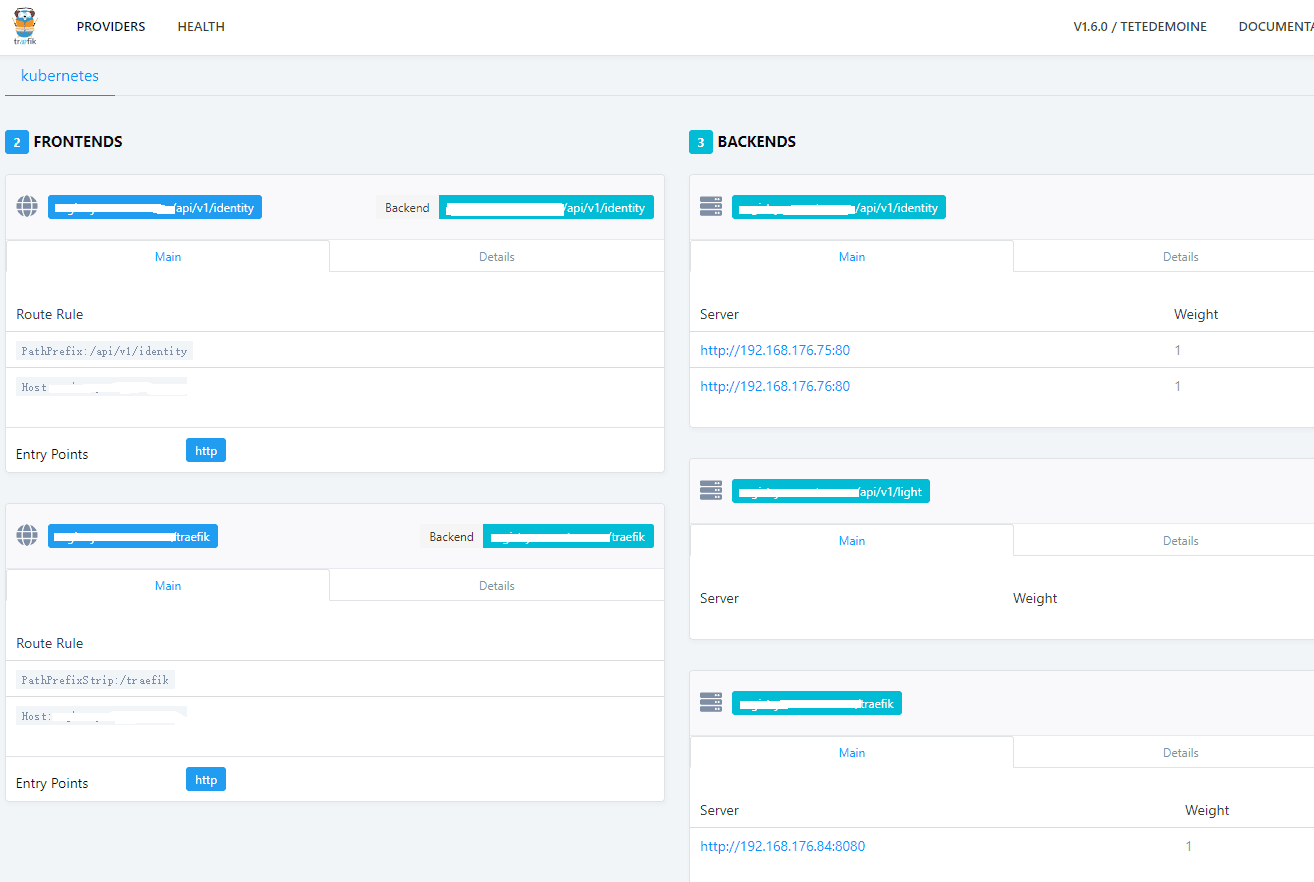
控制面板

前端优先级、后端熔断器和负载均衡策略

监控界面

总结

综上所述,首先部署拥抱k8s的反向代理服务器(treafik、nginx等)拦截请求,然后拦截的请求会根据Ingress定义的路由规则集,转发到集群内部对应的Service

延伸阅读

https://docs.traefik.io/
https://github.com/containous/traefik
https://docs.traefik.io/user-guide/kubernetes/
https://docs.traefik.io/configuration/backends/kubernetes/
https://kubernetes.io/docs/concepts/services-networking/ingress/
https://kubernetes.io/docs/admin/authorization/rbac/
https://github.com/kubernetes/ingress-nginx/blob/master/README.md
https://kubernetes.github.io/ingress-nginx/development/
https://www.kubernetes.org.cn/1237.html
https://github.com/kubernetes/ingress-nginx
https://blog.csdn.net/hxpjava1/article/details/79459489
https://blog.csdn.net/hxpjava1/article/details/79375452

如果你觉得本篇文章对您有帮助的话,感谢您的【推荐】
如果你对 kubernets 感兴趣的话可以关注我,我会定期的在博客分享我的学习心得

做一个有底蕴的软件工作者

[Java 开源项目]一款无需写任何代码,即可一键生成前后端代码的工具 - 削微寒 - 博客园

mikel阅读(818)

来源: [Java 开源项目]一款无需写任何代码,即可一键生成前后端代码的工具 – 削微寒 – 博客园


作者:HelloGitHub-小鱼干

JeecgBoot 是一款基于代码生成器的低代码开发平台,零代码开发。JeecgBoot 采用开发模式:Online Coding 模式-> 代码生成器模式-> 手工 MERGE 智能开发,帮助解决 Java 项目 70% 的重复工作,让开发更多关注业务逻辑。

它引入了 No Coding 概念:在线表单配置(表单设计器)、移动配置能力、工作流配置(在线设计流程)、报表配置能力、在线图表配置、插件能力(可插拔)…

技术架构

开发环境

  • 语言:Java 8
  • IDE(JAVA): IDEA/Eclipse 安装 lombok 插件
  • IDE(前端): WebStorm 或者 IDEA
  • 依赖管理:Maven
  • 数据库:MySQL 5.7+ & Oracle 11g & SQLServer 2017
  • 缓存:Redis

后端

  • 基础框架:Spring Boot 2.1.3.RELEASE
  • 持久层框架:Mybatis-plus_3.1.2
  • 安全框架:Apache Shiro 1.4.0,Jwt_3.7.0
  • 数据库连接池:阿里巴巴 Druid 1.1.10
  • 缓存框架:Redis
  • 日志打印:logback
  • 其他:fastjson、poi、Swagger-ui、quartz、lombok(简化代码)等

前端

功能模块

├─系统管理
│  ├─用户管理
│  ├─角色管理
│  ├─菜单管理
│  ├─权限设置(支持按钮权限、数据权限)
│  ├─表单权限(控制字段禁用、隐藏)
│  ├─部门管理
│  ├─我的部门(二级管理员)
│  └─字典管理
│  └─分类字典
│  └─系统公告
│  └─职务管理
│  └─通讯录
│  └─多租户管理
├─消息中心
│  ├─消息管理
│  ├─模板管理
├─智能化功能
│  ├─代码生成器功能(一键生成前后端代码,生成后无需修改直接用,绝对是后端开发福音)
│  ├─代码生成器模板(提供4套模板,分别支持单表和一对多模型,不同风格选择)
│  ├─代码生成器模板(生成代码,自带excel导入导出)
│  ├─查询过滤器(查询逻辑无需编码,系统根据页面配置自动生成)
│  ├─高级查询器(弹窗自动组合查询条件)
│  ├─Excel导入导出工具集成(支持单表,一对多 导入导出)
│  ├─平台移动自适应支持
├─系统监控
│  ├─Gateway路由网关
│  ├─性能扫描监控
│  │  ├─监控 Redis
│  │  ├─Tomcat
│  │  ├─jvm
│  │  ├─服务器信息
│  │  ├─请求追踪
│  │  ├─磁盘监控
│  ├─定时任务
│  ├─系统日志
│  ├─消息中心(支持短信、邮件、微信推送等等)
│  ├─数据日志(记录数据快照,可对比快照,查看数据变更情况)
│  ├─系统通知
│  ├─SQL监控
│  ├─swagger-ui(在线接口文档)
│─报表示例
│  ├─曲线图
│  └─饼状图
│  └─柱状图
│  └─折线图
│  └─面积图
│  └─雷达图
│  └─仪表图
│  └─进度条
│  └─排名列表
│  └─等等
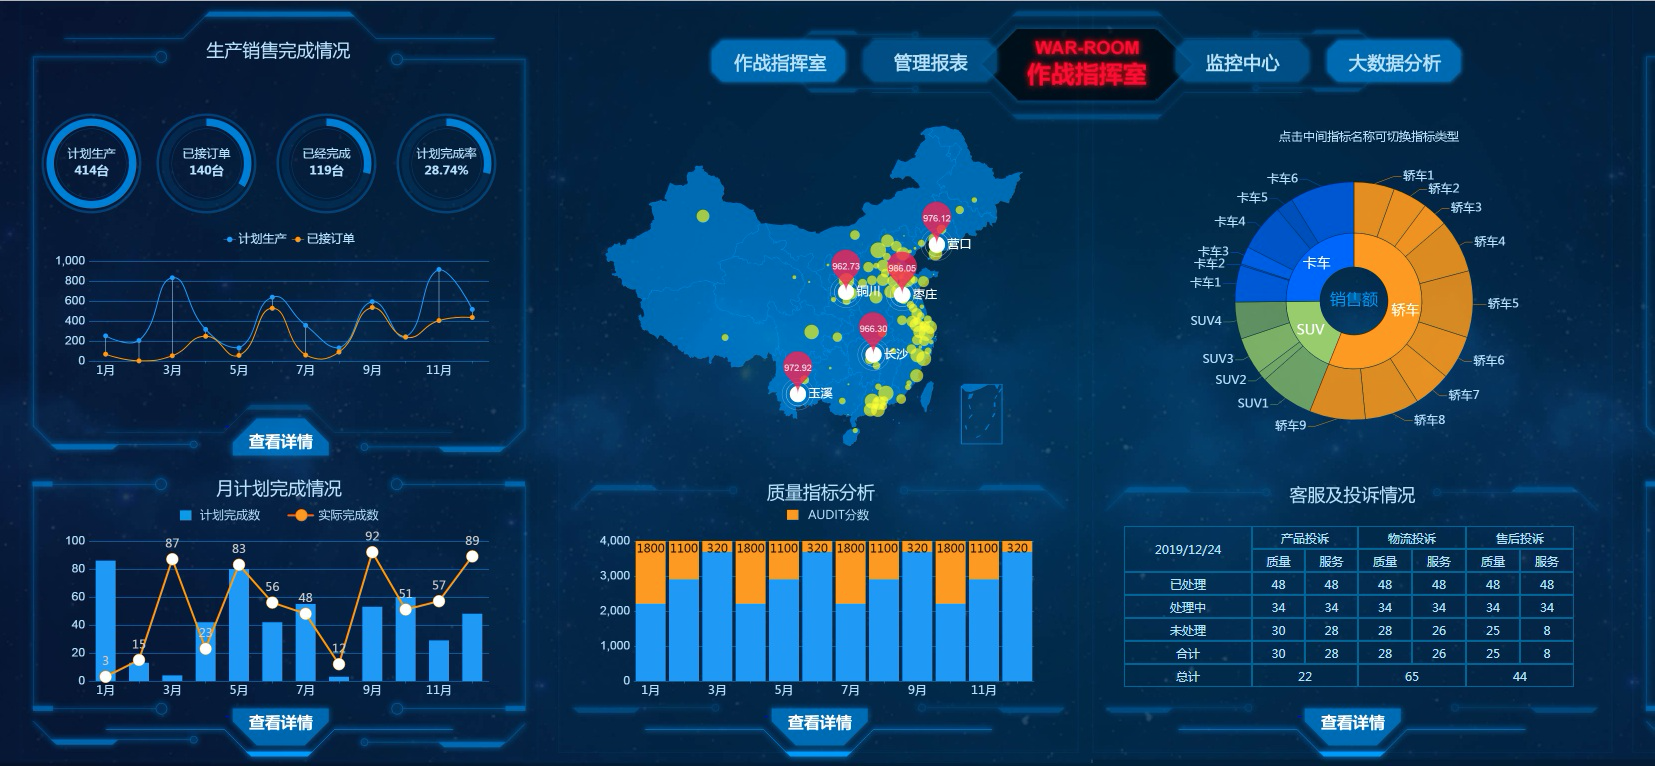
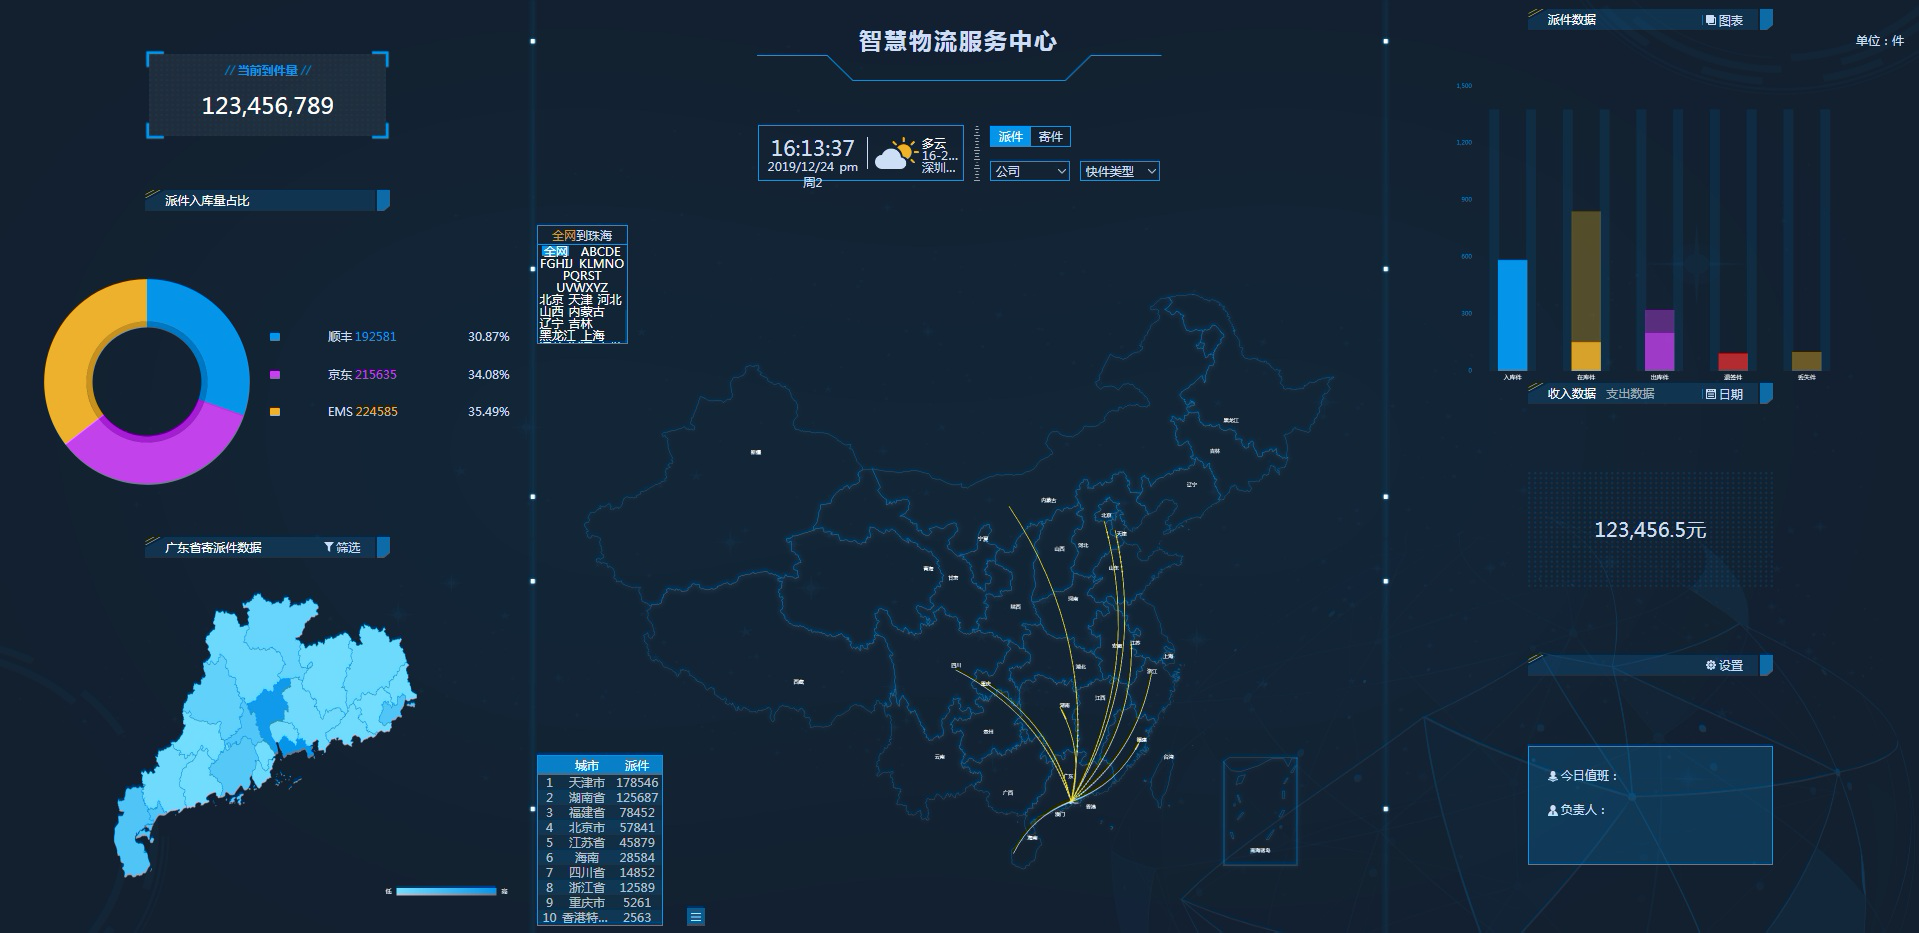
│─大屏模板
│  ├─作战指挥中心大屏
│  └─物流服务中心大屏
│─常用示例
│  ├─自定义组件
│  ├─对象存储(对接阿里云)
│  ├─JVXETable示例(各种复杂ERP布局示例)
│  ├─单表模型例子
│  └─一对多模型例子
│  └─打印例子
│  └─一对多TAB例子
│  └─内嵌table例子
│  └─常用选择组件
│  └─异步树table
│  └─接口模拟测试
│  └─表格合计示例
│  └─异步树列表示例
│  └─一对多JEditable
│  └─JEditable组件示例
│  └─图片拖拽排序
│  └─图片翻页
│  └─图片预览
│  └─PDF预览
│  └─分屏功能
│─封装通用组件	
│  ├─行编辑表格JEditableTable
│  └─省略显示组件
│  └─时间控件
│  └─高级查询
│  └─用户选择组件
│  └─报表组件封装
│  └─字典组件
│  └─下拉多选组件
│  └─选人组件
│  └─选部门组件
│  └─通过部门选人组件
│  └─封装曲线、柱状图、饼状图、折线图等等报表的组件(经过封装,使用简单)
│  └─在线code编辑器
│  └─上传文件组件
│  └─验证码组件
│  └─树列表组件
│  └─表单禁用组件
│  └─等等
│─更多页面模板
│  ├─各种高级表单
│  ├─各种列表效果
│  └─结果页面
│  └─异常页面
│  └─个人页面
├─高级功能
│  ├─系统编码规则
│  ├─提供单点登录CAS集成方案
│  ├─提供APP发布方案
│  ├─集成Websocket消息通知机制
├─Online在线低代码开发(暂未开源)
│  ├─Online在线表单 - 功能已开放
│  ├─在线代码生成器 - 功能已开放
│  ├─Online在线报表 - 功能已开放
│  ├─多数据源管理
│  ├─Online在线图表
│  ├─Online图表模板配置
│  ├─高级表单设计器
│─流程模块功能 (暂不开源)
│  ├─流程设计器
│  ├─在线表单设计
│  └─我的任务
│  └─历史流程
│  └─历史流程
│  └─流程实例管理
│  └─流程监听管理
│  └─流程表达式
│  └─我发起的流程
│  └─我的抄送
│  └─流程委派、抄送、跳转
│  └─。。。
└─其他模块
   └─更多功能开发中。。
   

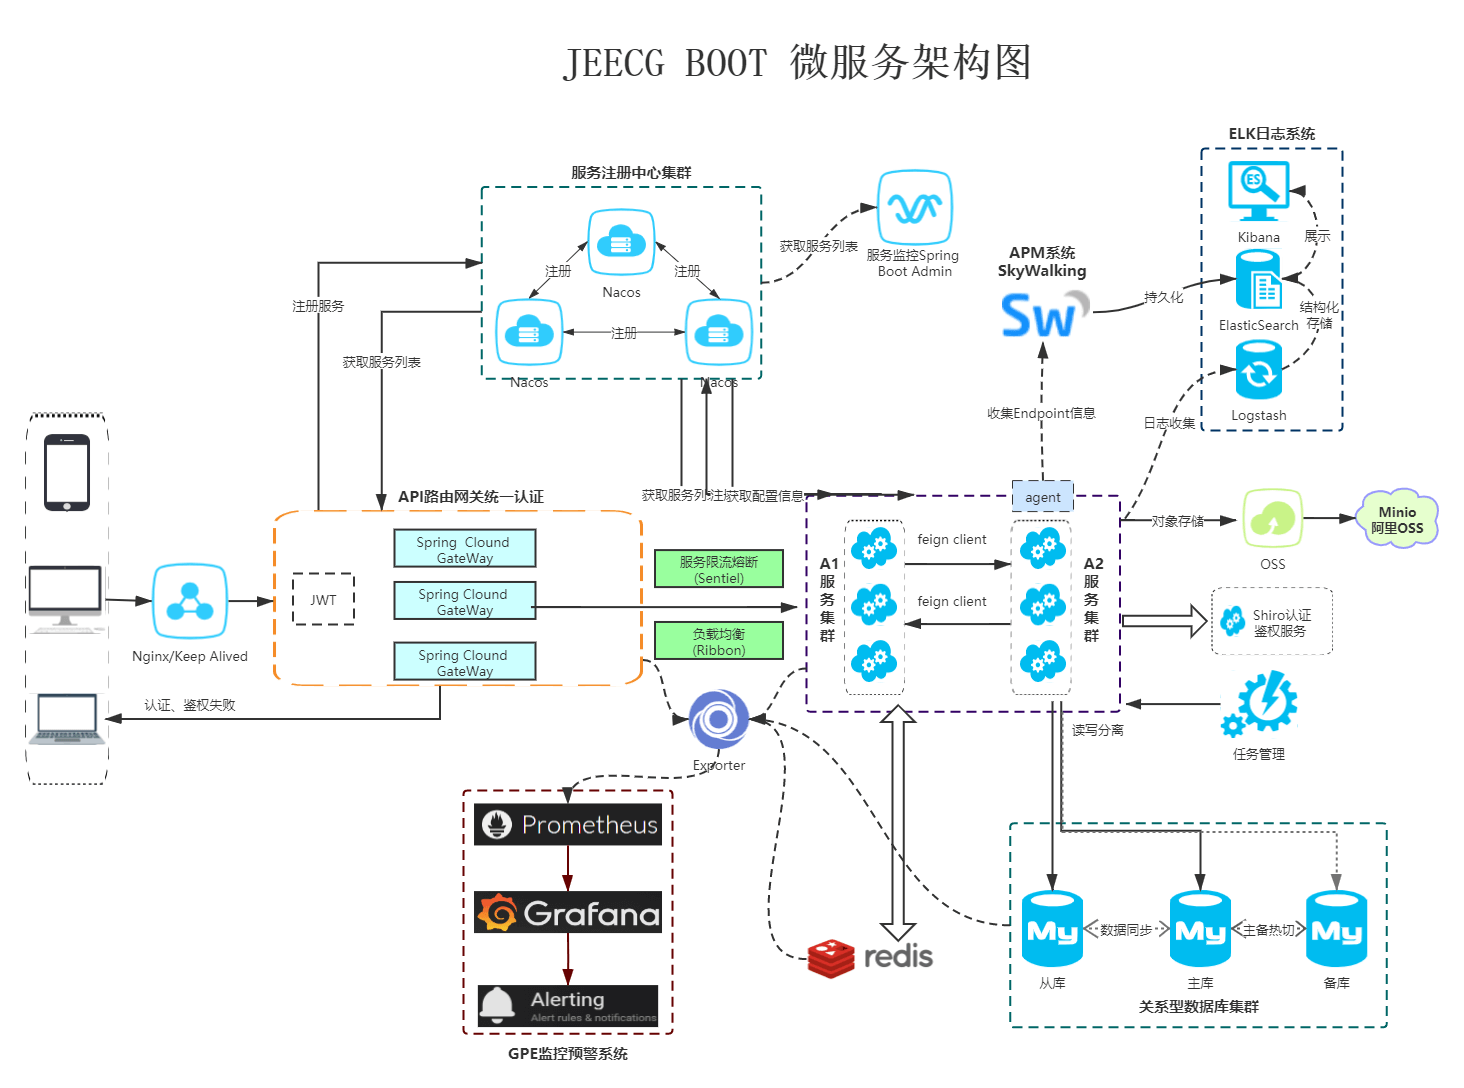
微服务架构图

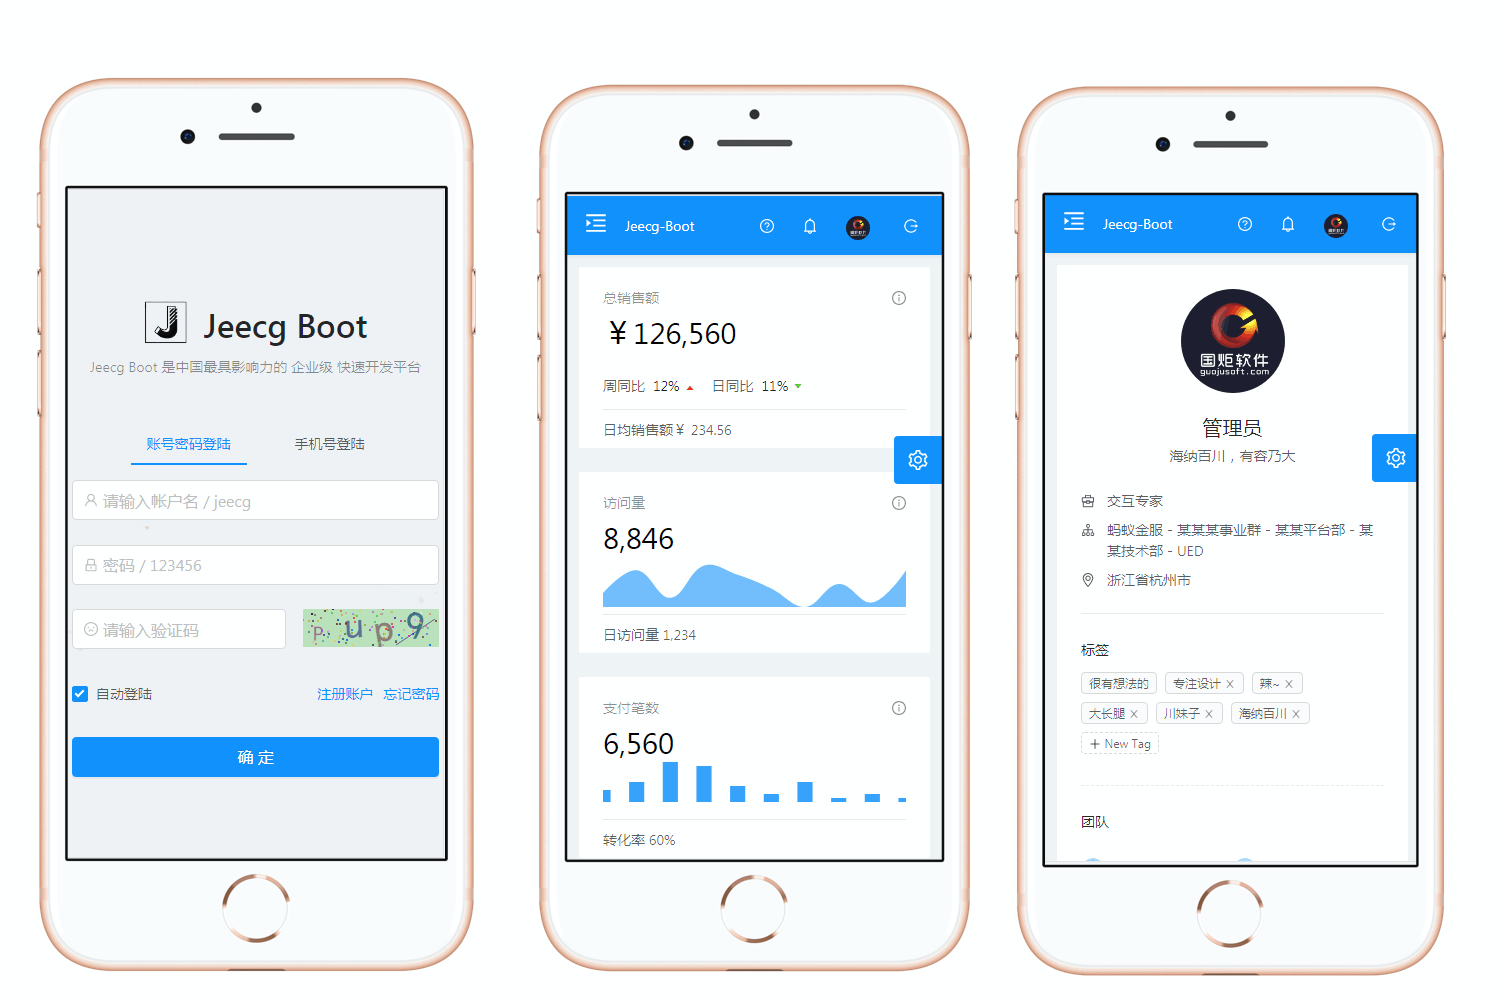
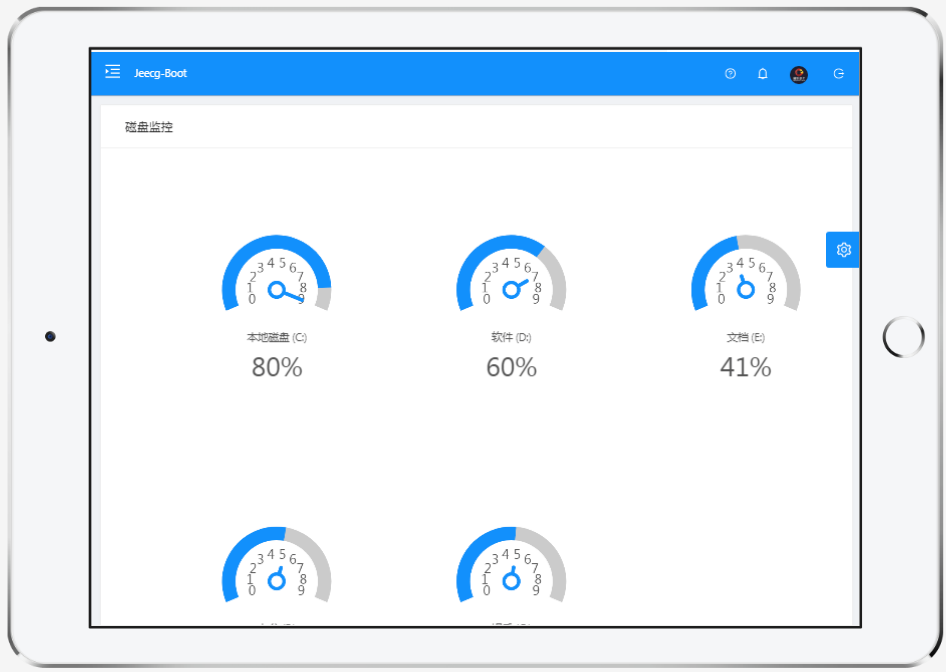
项目截图

大屏

PC 端

手机端

iPad 端

项目地址

源码和项目地址:https://github.com/zhangdaiscott/jeecg-boot

最后,这里是不变的结束语,如果你有更好的 Repo 在手,记得和 HelloGitHub 资源共享下哟:https://github.com/521xueweihan/HelloGitHub/issues ~~

AngularJs版本升级项目build后报错Error: [$injector:unpr] Unknown provider: e

mikel阅读(1325)

错误提示:

Uncaught Error: [$injector:modulerr] Failed to instantiate module mulan due to:
Error: [$injector:modulerr] Failed to instantiate module login due to:
Error: [$injector:unpr] Unknown provider: e

原因是因为AngularJs升级了,现有项目是meteor的build后提示这个错误,是因为angular声明module的时候需要用array数组声明$stateProvider,这样build后就能初始化module了

修改方法:

报错代码:

export default angular.module(‘member’, [
angularMeteor,
uiRouter,
‘header_search’,
])
.config(function ($stateProvider) { //这么声明老版本的支持,新版本不支持了
‘ngInject’;

。。。。

});

修改后的代码:

export default angular.module(‘member’, [
angularMeteor,
uiRouter,
‘header_search’,
])
.config([‘$stateProvider’,function ($stateProvider) {
‘ngInject’;

。。。。

]});

引申问题:Controller的声明也需要按数组式声明,官方文档参考:

https://docs.angularjs.org/guide/di#dependency-annotation

Using Dependency Injection

Dependency Injection is pervasive throughout AngularJS. You can use it when defining components or when providing run and config blocks for a module.

  • Servicesdirectivesfilters, and animations are defined by an injectable factory method or constructor function, and can be injected with “services”, “values”, and “constants” as dependencies.
  • Controllers are defined by a constructor function, which can be injected with any of the “service” and “value” as dependencies, but they can also be provided with “special dependencies”. See Controllers below for a list of these special dependencies.
  • The run method accepts a function, which can be injected with “services”, “values” and, “constants” as dependencies. Note that you cannot inject “providers” into run blocks.
  • The config method accepts a function, which can be injected with “providers” and “constants” as dependencies. Note that you cannot inject “services” or “values” into configuration.
  • The provider method can only be injected with other “providers”. However, only those that have been registered beforehand can be injected. This is different from services, where the order of registration does not matter.

See Modules for more details about run and config blocks and Providers for more information about the different provider types.

Factory Methods

The way you define a directive, service, or filter is with a factory function. The factory methods are registered with modules. The recommended way of declaring factories is:

angular.module('myModule', [])
.factory('serviceId', ['depService', function(depService) {
  // ...
}])
.directive('directiveName', ['depService', function(depService) {
  // ...
}])
.filter('filterName', ['depService', function(depService) {
  // ...
}]);

Module Methods

We can specify functions to run at configuration and run time for a module by calling the config and run methods. These functions are injectable with dependencies just like the factory functions above.

angular.module('myModule', [])
.config(['depProvider', function(depProvider) {
  // ...
}])
.run(['depService', function(depService) {
  // ...
}]);

Controllers

Controllers are “classes” or “constructor functions” that are responsible for providing the application behavior that supports the declarative markup in the template. The recommended way of declaring Controllers is using the array notation:

someModule.controller('MyController', ['$scope', 'dep1', 'dep2', function($scope, dep1, dep2) {
  ...
  $scope.aMethod = function() {
    ...
  }
  ...
}]);

Unlike services, there can be many instances of the same type of controller in an application.

Moreover, additional dependencies are made available to Controllers:

  • $scope: Controllers are associated with an element in the DOM and so are provided with access to the scope. Other components (like services) only have access to the $rootScope service.
  • resolves: If a controller is instantiated as part of a route, then any values that are resolved as part of the route are made available for injection into the controller.

Dependency Annotation

AngularJS invokes certain functions (like service factories and controllers) via the injector. You need to annotate these functions so that the injector knows what services to inject into the function. There are three ways of annotating your code with service name information:

  • Using the inline array annotation (preferred)
  • Using the $inject property annotation
  • Implicitly from the function parameter names (has caveats)

Inline Array Annotation

This is the preferred way to annotate application components. This is how the examples in the documentation are written.

For example:

someModule.controller('MyController', ['$scope', 'greeter', function($scope, greeter) {
  // ...
}]);

Here we pass an array whose elements consist of a list of strings (the names of the dependencies) followed by the function itself.

When using this type of annotation, take care to keep the annotation array in sync with the parameters in the function declaration.

$inject Property Annotation

To allow the minifiers to rename the function parameters and still be able to inject the right services, the function needs to be annotated with the $inject property. The $inject property is an array of service names to inject.

var MyController = function($scope, greeter) {
  // ...
}
MyController.$inject = ['$scope', 'greeter'];
someModule.controller('MyController', MyController);

In this scenario the ordering of the values in the $inject array must match the ordering of the parameters in MyController.

Just like with the array annotation, you’ll need to take care to keep the $inject in sync with the parameters in the function declaration.

Implicit Annotation

Careful: If you plan to minify your code, your service names will get renamed and break your app.

The simplest way to get hold of the dependencies is to assume that the function parameter names are the names of the dependencies.

someModule.controller('MyController', function($scope, greeter) {
  // ...
});

Given a function, the injector can infer the names of the services to inject by examining the function declaration and extracting the parameter names. In the above example, $scope and greeter are two services which need to be injected into the function.

One advantage of this approach is that there’s no array of names to keep in sync with the function parameters. You can also freely reorder dependencies.

However this method will not work with JavaScript minifiers/obfuscators because of how they rename parameters.

Tools like ng-annotate let you use implicit dependency annotations in your app and automatically add inline array annotations prior to minifying. If you decide to take this approach, you probably want to use ng-strict-di.

Because of these caveats, we recommend avoiding this style of annotation.

参考资料:

https://www.blacksandsolutions.co/blog/posts/debug-unknown-provider-error-with-ng-strict/

https://github.com/brandon-barker/angular-floatThead/issues/14

https://stackoverflow.com/questions/32467677/angularjs-debugging-of-injectorunpr-unknown-provider-e

https://docs.angularjs.org/guide/di#dependency-annotation

https://segmentfault.com/q/1010000005020067

MongoDB for .Net Core 查询条件之 Builders类 - hahaMan - 博客园

mikel阅读(943)

来源: MongoDB for .Net Core 查询条件之 Builders类 – hahaMan – 博客园

使用MongoDB有段时间了 今天终于有用总结下

UpdateDefinitionBuilder,SortDefinitionBuilder,ProjectionDefinitionBuilder,IndexKeysDefinitionBuilder,FilterDefinitionBuilder应用


Builders

复制代码
//
// 摘要:
// A static helper class containing various builders.
//
// 类型参数:
// TDocument:
// The type of the document.
public static class Builders<TDocument>
{
//
// 摘要:
// Gets a MongoDB.Driver.FilterDefinitionBuilder`1.
public static FilterDefinitionBuilder<TDocument> Filter { get; }
//
// 摘要:
// Gets an MongoDB.Driver.IndexKeysDefinitionBuilder`1.
public static IndexKeysDefinitionBuilder<TDocument> IndexKeys { get; }
//
// 摘要:
// Gets a MongoDB.Driver.ProjectionDefinitionBuilder`1.
public static ProjectionDefinitionBuilder<TDocument> Projection { get; }
//
// 摘要:
// Gets a MongoDB.Driver.SortDefinitionBuilder`1.
public static SortDefinitionBuilder<TDocument> Sort { get; }
//
// 摘要:
// Gets an MongoDB.Driver.UpdateDefinitionBuilder`1.
public static UpdateDefinitionBuilder<TDocument> Update { get; }
}
复制代码


案例:

FilterDefinitionBuilder这个一般用作查询条件

复制代码
var builderlist = new List<FilterDefinition<BsonDocument>>();
builderlist.Add(Builders<BsonDocument>.Filter.Gte("EndTime", DateTime.UtcNow));
builderlist.Add(Builders<BsonDocument>.Filter.Eq("Type", BanType.Freeze));
builderlist.Add(Builders<BsonDocument>.Filter.Eq("RoleId", form.RoleId));
var filter = Builders<BsonDocument>.Filter.And(builderlist);

//同步

_mongoDbContext.Collection<BsonDocument>().Find(filter).SortByDescending(n => n.EndTime).ToList();

//异步
await _mongoDbContext.Collection<BsonDocument>().Find(filter).SortByDescending(n => n.EndTime).ToListAsync();
复制代码
UpdateDefinitionBuilder 此类用在修改数据的时候
复制代码
FilterDefinition<BsonDocument> filter = Builders<BsonDocument>.Filter.Eq("_id", id);
var list = new List<UpdateDefinition<BsonDocument>>();
list.Add(Builders<BsonDocument>.Update.Set("EndTime", DateTime.UtcNow.AddDays(day)));
list.Add(Builders<BsonDocument>.Update.Set("Operator", new UserSnapshot { Id = UserId, Name = UserName }));
list.Add(Builders<BsonDocument>.Update.Set("Remark", Remark));
list.Add(Builders<BsonDocument>.Update.Set("Category", Category));
var setfilter = Builders<BsonDocument>.Update.Combine(list);

//同步调用

_mongoDbContext.Collection<BsonDocument>().UpdateOne(filter , setfilter);

//异步调用
await _mongoDbContext.Collection<BsonDocument>().UpdateOneAsync(filter , setfilter);

复制代码


ProjectionDefinitionBuilder  查询指定的值

复制代码
//创建约束生成器
FilterDefinitionBuilder<BsonDocument> builderFilter = Builders<BsonDocument>.Filter;
ProjectionDefinitionBuilder<BsonDocument> builderProjection = Builders<BsonDocument>.Projection;
//Include 包含某元素 Exclude 不包含某元素
ProjectionDefinition<BsonDocument> projection = builderProjection.Include("RoleId");

var list = await _mongoDbContext.Collection<BsonDocument>().Find(builderFilter.Empty).Project(projection).ToListAsync();


//创建约束生成器
FilterDefinitionBuilder<BsonDocument> builderFilter = Builders<BsonDocument>.Filter;
ProjectionDefinitionBuilder<BsonDocument> builderProjection = Builders<BsonDocument>.Projection;
//Include 包含某元素 Exclude 不包含某元素
ProjectionDefinition<BsonDocument> projection = builderProjection.Exclude("RoleId");

_mongoDbContext.Collection<BsonDocument>().Find(builderFilter.Empty).Project(projection).ToListAsync();
复制代码


SortDefinitionBuilder 排序

复制代码
FilterDefinitionBuilder<BsonDocument> builderFilter = Builders<BsonDocument>.Filter;

SortDefinitionBuilder<BsonDocument> builderSort = Builders<BsonDocument>.Sort;

//排序约束 Ascending 正序 Descending 倒序
SortDefinition<BsonDocument> sort = builderSort.Ascending("RoleId");

SortDefinition<BsonDocument> sort2 = builderSort.Descending("RoleId");

var list = await _mongoDbContext.Collection<BsonDocument>().Find(builderFilter.Empty).Sort(sort).ToListAsync();
复制代码


Angular 1.5+ with dependency injection and uglifyjs | Maxime Rouiller

mikel阅读(632)

来源: Angular 1.5+ with dependency injection and uglifyjs | Maxime Rouiller

Here’s a problem that doesn’t come too often.

You build your own build pipeline with AngularJS and you end-up going in production with your development version. Everything runs fine.

Then you try your uglified version and… it fails. For the fix, skip to the end of the article. Otherwise? Keep on reading.

The Problem

Here’s some Stack Trace you might have in your console.

Failed to instantiate module myApp due to:

Error: [$injector:unpr] http://errors.angularjs.org/1.5.8/$injector/unpr?p0=e

and this link shows you this:

Unknown provider: e

Our Context

Now… in a sample app, it’s easy. You have few dependencies and finding them will make you go through a few files at most.

My scenario was in an application with multiple developers after many months of development. Things got a bit sloppy and we made decisions to go faster.

We already had practices in place to require developers to use explicit dependency injection instead of implicit. However, we didn’t have anything but good faith in place. Nothing against human mistake or laziness.

Implicit vs Explicit

Here’s an implicit injection

1
2
3
4
angular.module('myApp')
    .run(function($rootScope){
        //TODO: write code
    });

Here’s what it looks like explicitly (inline version)

1
2
3
4
angular.module('myApp')
    .run(['$rootScope', function($rootScope){
        //TODO: write code
    }]);

Why is it a problem?

When UglifyJS will minify your code, it will change variable names. Names that AngularJS won’t be able to match to a specific provider/injectable. That will cause the problem we have where it can’t find the right thing to inject. One thing that UglifyJS won’t touch however is strings. so the '$rootScope' present in the previous tidbit of code will stay. Angular will be able to find the proper dependency to inject. And that, even after the variable names get mangled.

The Fix

ng-strict-di will basically fails anytime it finds an implicit declaration. Make sure to put that into your main Angular template. It will save you tons of trouble.

1
2
3
<html ng-app="myApp" ng-strict-di>
...
</html>

Instead of receiving the cryptic error from before, we’ll receive something similar to this:

Uncaught Error: [$injector:modulerr] Failed to instantiate module myApp due to:

Error: [$injector:strictdi] function(injectables) is not using explicit annotation and cannot be invoked in strict mode

function(e) is not using explicit annotation and cannot be invoked in strict mode

mikel阅读(1035)

来源: Black Sand Solutions

Angular is awesome; but sometimes it can be difficult to decipher error messages it raises, particularly when you are just starting out.

USING NG-STRICT-DI TO Debug ANGULARJS UNKNOWN PROVIDER ERROR – OR, HOW TO FIX A MISSING $INJECTOR ERROR

A common error for the newbie and sometimes even the seasoned pro is the Unknown Provider, or $injector error. I know I fell foul of this a lot in my early days – And normally, after the site was deployed.

Here is the typical error message and associated output in the console.

Error An error has occurred. Please try again. Error: [$injector:strictdi] > http://errors.angularjs.org/1.3.16/$injector/strictdi?p0=function(n%2Ct)

injectError.pngInject Error

NG-STRICT-DI

The easiest way to Debug these errors is to catch them before the code is minified – i.e. during development. As of Angular 1.3 there is a directive called ng-strict-di which will help you find these issues.

From the documenation:

if this attribute is present on the app element, the injector will be created in “strict-di” mode. This means that the application will fail to invoke functions which do not use explicit function annotation (and are thus unsuitable for minification), as described in the Dependency Injection guide, and useful Debugging info will assist in tracking down the root of these bugs.

Using this directive is simple. Add it where you declare your app.

<div ng-app=“some-angular-app” ng-strict-di=“”></div>

Then, when you forget to inject your dependencies you’ll now get an error like this:

Error: [$injector:strictdi] function($scope, > $stateParams) is not using explicit annotation and cannot be invoked in strict mode
http://errors.angularjs.org/1.3.16/$injector/strictdi?p0=function(%24scope%2C %24stateParams)

angularStrictDiMessage.pngStrict Message

CORRECTING SOME TYPICAL SCENARIOS

OK, so you forgotten to inject your dependencies, how do you resolve this?
Some common scenarios are shown below.

CONTROLLER

Probably the most common scenario, or at least the first time you are likely to see this.

angular.module(‘app’) .controller(‘AppController’, AppController); function AppController($rootScope, $scope, AppService) { }

You can prevent these errors by using the either the array notation or explicit injection. Both can be applied to controllers, services and directives alike.

My personal preference is the explicit injection which I found easier to read and follows John Papa’s StyleGuide. If you have not read this yet I strongly recommend you do.

/// array notation angular.module(‘app’) .controller(‘AppController’, [‘$rootScope’, ‘$scope’, ‘$AppService’, function AppController($rootScope, $scope, AppService){ controller code here }]);
/// explicit injection angular.module(‘app’) .controller(‘AppController’, AppController); AppController.$inject = [‘$rootScope’, ‘$scope’, ‘$AppService’]; function AppController($rootScope, $scope, AppService) { controller code here }

UIROUTER STATE CONTROLLER

The following code will generate the $inject error.

$stateProvider .state(‘someState’, { templateUrl: ‘/someTemplate’, controller: function ($scope, $stateParams) { $scope.imagePath = $stateParams.param; } })

This can be resolved either by using the array notation.

$stateProvider .state(‘someState’, { templateUrl: ‘/someTemplate’, controller: [‘$scope’, ‘$stateParams’, function($scope, $stateParams){ $scope.imagePath = $stateParams.param; } ]} })

UIROUTER STATE RESOLVE

Similarly this use of the state’s resolve property will raise the error.

$stateProvider .state(‘someState’, { templateUrl: ‘/someTemplate’, controller: someController, resolve: { someDependency: function(someService){ return someService.getData(); } }; } })

Again, use array notation to solve.

$stateProvider .state(‘someState’, { templateUrl: ‘/someTemplate’, controller: someController, { someDependency: [‘someService’, function(someService){ return someService.getData(); } ]} })

ALTERNATIVELY

An alternative approach is to not worry about this and simply let your build tools sort it out.
If you are using Grunt or Gulp it might be worth looking at ng-annotate. This task will:

add and remove AngularJS dependency injection annotations. It is non-intrusive so your source code stays exactly the same otherwise. No lost comments or moved lines. Annotations are useful because with them you’re able to minify your source code using your favorite JS minifier.
https://www.npmjs.com/package/ng-annotate

SEE ALSO

Angular DI Guide

angularjs 用uglifyJS合并压缩过程中遇见的坑_junli110的博客-CSDN博客

mikel阅读(663)

来源: angularjs 用uglifyJS合并压缩过程中遇见的坑_junli110的博客-CSDN博客

用现在很火的 nodejs 写了一个压缩 js 文件的脚本。没有用glup,webpack,而选用的uglifyJS。

不过 一开始就遇到了问题。

没有压缩合并前正常运行,可是一压缩就报错。

查找原因 ,结果是angularjs 依赖注入到Controller 中的 变量 $scope,$timeout 什么的是根据变量名匹配的,

可是压缩后 这些局部变量 的名字就变了。所以会报依赖注入错误。

  1. .controller(‘controller’, [‘$scope’, ‘$rootScope’, ‘$http’, ,
  2. function ($scope, $rootScope, $http) {
})

后来百度。在 注入的变量 前面加对应的 字符串,这样 即使 $scope 会被压缩成 E 这样的变量 ,angular 也可以按照 前面的字符串正确的注入$scope等变量。

这才是第一个 坑。后来改用了新版的 uglifyJS 后 就有 好的 使用的JS 包 ,报错了。

还以为压缩有问题,后来 百度 报的错误 才知道是因为 uglifyJS 在压缩文件的开头 加了“use strick”。

可能是 有些包不支持 所以才报错

删除压缩文件中 的 “use strick”

一切OK

AngularJs中的$scope与$rootScope_Ethan Mr.的博客-CSDN博客

mikel阅读(706)

来源: AngularJs中的$scope与$rootScope_Ethan Mr.的博客-CSDN博客

作为初次接触 AngularJS的新手,想要深层理解里面的内容短时间还是不可能的,所以标题写了浅谈字样,以下内容是参考各位大神以及相关书籍整理加个人理解,出现错误的地方请大家指正。


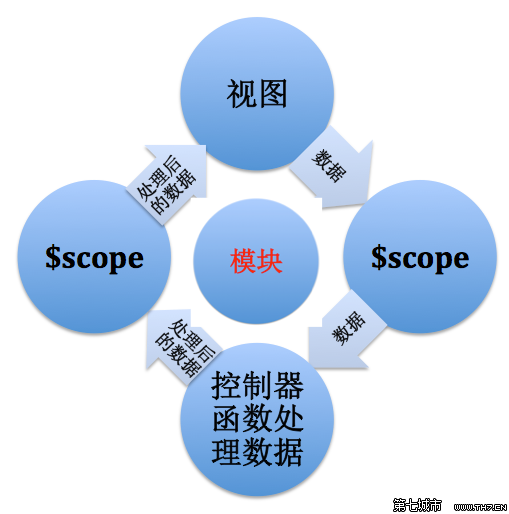
$scope(作用域),为AngularJS中MVC的核心,整理起来很麻烦, 看着大神们发的一些文章对于$scope的理解,有些方面还是看不懂,作为新手,应该站在新手的位置上去思考,所以这篇文章的目的,就是让我们这些新手初步理解$scope,懂得会用就可以了。

一、$scope概念及用法。

什么是作用域。

作用域是一个指向应用模型的对象。作用域有层次结构,有根作用域,多个子作用域,位置不同,作用不同。作用域能监控表达式和传递事件。应用在 HTML (视图) 和 JavaScript (控制器)之间的纽带。

谈到AngularJS作用域之前,先熟悉下js中全局变量跟局部变量的差别。看下图


 var too="test";

        if(true){//这是在块中的定义,此时还是全局变量
            var too="new test";
        }
        alert(too=="new test");//return true;
        function test()
        {
            var too="old test";//这是在函数中的定义,此时是局部变量

        }

        test();

        alert(too=="new test");//return true;too并没有改变

这里说明,全局变量可以在方法,或者闭包内引入,而局部变量只能在定义的方法内使用,其他方法引用不到,angular作用域跟变量性质相似。想深入了解js作用域链或者全局、局部变量关系,请参考汤姆大叔博客

http://www.cnblogs.com/TomXu/archive/2011/12/15/2288411.html   接下来看angular全局作用域和局部作用域区别用法:

angular中的$scope作用域可以根据需求,定义成一个变量或者是一个对象。


    myApp.controller('myAppCtrl', function($scope){
        //定义成变量
        $scope.book = "Angular开发指南";

        //定义成对象
        $scope.book ={
            name :'',
            author:'',
            pubTime:''
        }
    })


全局作用域:

var myApp = angular.module('myApp', []);

    /*
     *run方法用于初始化全局的数据,仅对全局作用域起作用。
     *这里的run方法只会在angular启动的时候运行一次。
     */
    myApp.run(function($rootScope){
        $rootScope.people ={
            name:'小明',
            age:'12',
            tel:'12233333333'
        };    
    });

全局作用域是各个 controller 中 scope 的桥梁。用 rootscope 定义的值,可以在各个 controller 中使用。经常用于的场景在多个页面切换,数据随时绑定。(若是把数据绑定在$scope局部作用域是行不通的)。

局部作用域:

myApp.controller('myAppCtrl', function($scope){
        $scope.book ={
            name :'',
            author:'',
            pubTime:''
        }
    })

    myApp.controller('myAppCtrl1',function($scope,$rootScope){
        console.log($scope.book.name);//undefined
        console.log($rootScope.people.name)  //小明                           
    })


二、$scope(作用域)特点

1.$scope提供了一些工具方法$watch()、$apply()

$watch()用于监听模型变化,当模型发生变化,它会提示你的。

表达式: $watch(watchExpression, listener, objectEquality);

其参数:

watchExpression:监听的对象,它可以是一个angular表达式如’name’,或函数如function(){return $scope.name}。

 listener:当watchExpression变化时会被调用的函数或者表达式,它接收3个参数:newValue(新值), oldValue(旧值), scope(作用域的引用)。

objectEquality:是否深度监听,如果设置为true,它告诉Angular检查所监控的对象中每一个属性的变化. 如果你希望监控数组的个别元素或者对象的属性而不是一个普通的值, 那么你应该使用它。

举例说明:

$scope.name = 'hello';

var watch = $scope.$watch('name',function(newValue,oldValue, scope){

        console.log(newValue);

        console.log(oldValue);

});

$timeout(function(){

        $scope.name = "world";

},1000);

$apply()用于传播模型的变化。AngularJS 外部的控制器(DOM 事件、外部的回调函数如 JQuery UI 空间等)调用了AngularJS 函数之后,必须调用$apply。

比如:

myApp.controller('myAppCtrl', function($scope){
         $scope.user = '';  
         $scope.test = function() {  
             setTimeout(function () {  
                 $scope.user = "hello";  
             }, 2000);  
         }  
      
         $scope.test1 = function() {  
              $scope.user = 'world';  
         }  
      
         $scope.test1();  
         $scope.test();  
      
         console.log($scope.user); 
    })

上例解释:

         正常理解是:在后台显示world,2秒后,会变成hello。

         实际情况是:在后台显示world,2秒后,不会成hello。

怎么才能让user自动变化呢?修改一下。

$scope.test = function() {  
    setTimeout(function () {  
        $scope.$apply(function () {  
            $scope.user = "hello";  
        });  
    }, 2000);  
}  

这样就可以了。。。。。。

2.$scope可以为一个对象传播事件,类似DOM事件。举例说明:

<!DOCTYPE html>
<html lang="en" ng-app="myApp">
<head>
    <meta charset="UTF-8">
    <title>demo</title>
    <script src="dist/angular-1.3.0.14/angular.js"></script>
</head>
<body>
    <div class="form" ng-controller="myAppCtrl">
        <input type="button" value="提交" ng-click="submit()">
    </div>

    <script type="text/javascript">
        var myApp = angular.module('myApp', []);

        myApp.controller('myAppCtrl',function($scope){

            $scope.submit = function(){
                alert("提交成功!");
            }
        })
    </script>
</body>
</html>

3.$scope不仅是MVC的基础,也是实现双向数据绑定的基础。作用域提供表达式执行上下文,比如说表达式{{username}}本身是无意义的。要与作用域$scope指定的username属性中才有意义。举个栗子:

<!DOCTYPE html>
<html lang="en" ng-app="myApp">
<head>
    <meta charset="UTF-8">
    <title>demo</title>
    <script src="dist/angular-1.3.0.14/angular.js"></script>
</head>
<body>
    <div class="form" ng-controller="myAppCtrl">
        <input type="text" name="username" ng-model="username">{{username}}
        <input type="button" value="提交" ng-click="submit()">
    </div>

    <script type="text/javascript">
        var myApp = angular.module('myApp', []);

        myApp.controller('myAppCtrl',function($scope){

            $scope.username = '小明同学';

            $scope.submit = function(){
                alert("提交成功!");
            }
        })
    </script>
</body>
</html>

其他几点就不一一举例说明了,做些实例应该就会理解了。

4.$scope是一个POJO(Plain Old JavaScript Object)。

5.$scope是一个树型结构,与DOM标签平行。

6.子$scope对象会继承父$scope上的属性和方法。


三、$scope(作用域)的作用。

在特点部分中,也明显的看出来它的作用是怎样的了,下面总结一下它的作用:

  1. 提供了观察者可以监听数据模型的变化
  2. 可以将数据模型的变化通知给整个 App
  3. 可以进行嵌套,隔离业务功能和数据
  4. 给表达式提供上下文执行环境


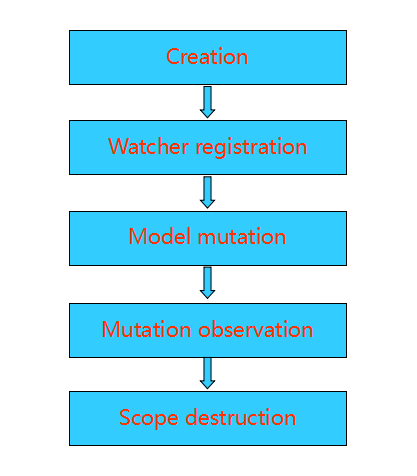
四、$scope(作用域)的生命周期。

1.  创建 – 更作用域会在应用启动时通过注入器创建并注入。在模板连接阶段,一些指令会创建自己的作用域。

2.  注册观察者 – 在模板连接阶段,将会注册作用域的监听器。这也监听器被用来识别模型状态改变并更新视图。

3.  模型状态改变 – 更新模型状态必须发生在scope.$apply方法中才会被观察到。Angular框架封装了$apply过程,无需我们操心。

4.  观察模型状态 – 在$apply结束阶段,angular会从根作用域执行$digest过程并扩散到子作用域。在这个过程中被观察的表达式或方法会检查模型状态是否变更及执行更新。

5.  销毁作用域 – 当不再需要子作用域时,通过scope.$destroy()销毁作用域,回收资源。


接下来,$scope(作用域)与控制器、指令等之间的联系,在以后关于控制器、指令整理的文章解析,敬请期待。

(九)通过几段代码,理清angularJS中的$injector、$rootScope和$scope的概念和关联关系 - zfyouxi - 开发者的网上家园

mikel阅读(639)

来源: (九)通过几段代码,理清angularJS中的$injector、$rootScope和$scope的概念和关联关系 – zfyouxi – 开发者的网上家园

$injector、$rootScope和$scope是angularJS框架中比較重要的东西,理清它们之间的关系,对我们兴许学习和理解angularJS框架都很实用。

1、$injector事实上是一个IOC容器。包括了非常多服务(类似于spring框架中的bean),其他代码可以通过       $injector.get(“serviceName”)的方式。从injector中获取所须要的服务。

详情參考这篇文章

2、scope是angularJS中的作用域(事实上就是存储数据的地方),非常类似JavaScript的原型链。搜索的时候。优先找自己的scope,假设没有找到就沿着作用域链向上搜索。直至到达根作用域rootScope。

3、$rootScope是由angularJS载入模块的时候自己主动创建的。每一个模块仅仅会有1个rootScope。rootScope创建好会以服务的形式增加到$injector中。

也就是说通过$injector.get(“$rootScope”);可以获取到某个模块的根作用域。更准确的来说。$rootScope是由angularJS的核心模块ng创建的。

演示样例1:

// 新建一个模块
var module = angular.module("app",[]);

// true说明$rootScope确实以服务的形式包括在模块的injector中
var hasNgInjector = angular.injector(['app','ng']);  
console.log("has $rootScope=" + hasNgInjector.has("$rootScope"));//true

// 获取模块对应的injector对象,不获取ng模块中的服务
// 不依赖于ng模块,无法获取$rootScope服务
var noNgInjector = angular.injector(['app']);
console.log("no $rootScope=" + noNgInjector.has("$rootScope"));//false

// 获取angular核心的ng模块
var ngInjector = angular.injector(['ng']);  
console.log("ng $rootScope=" + ngInjector.has("$rootScope"));//true

上面的代码的确能够说明:$rootScope的确是由核心模块ng创建的,并以服务的形式存在于injector中

假设创建injector的时候,指定了ng模块,那么该injector中就会包括$rootScope服务;否则就不包括$rootScope。

演示样例2:

<!doctype html>
<html lang="en">
	<head>
	   <meta charset="utf-8">
	   <script src="angular-1.2.25.js"></script>
	   <script>
	  
		var module = angular.module("app",[]);
		// 控制器里的$injector,是由angular框架自己主动创建的
		function FirstController($scope,$injector,$rootScope)
		{
			$rootScope.name="aty";
		}
		
		//自己创建了个injector,依赖于app和ng模块
		var myInjector = angular.injector(["app","ng"]);
		var rootScope = myInjector.get("$rootScope");
		alert(rootScope.name);//udefined
				
	   </script> 

	</head>
	
	<body ng-app="app">
		<div id="first" ng-controller="FirstController">
			<input type="text" ng-model="name">
			<br>
			{{name}}
		</div>	
	</body>
	
</html>

angular.injector()能够调用多次。每次都返回新建的injector对象。所以我们自己创建的myInjector和angular自己主动创建的$injector不是同一个对象,那么得到的rootScope也就不是同一个。更具体的能够看还有一篇文章中的

angular.injector()章节。

演示样例3:

<!doctype html>
<html lang="en">
	<head>
	   <script src="angular-1.2.25.js"></script>
	   <script>
	  
		function FirstController($scope,$injector,$rootScope)
		{
			// true
			console.log("scope parent :" + ($scope.$parent ==$rootScope));
		}
	
	   </script> 
	</head>
	
	<body ng-app>
		<div id="first" ng-controller="FirstController">
			<input type="text" ng-model="name">
			<br>
			{{name}}
		</div>	
	</body>
	
</html>

ng-controller指令给所在的DOM元素创建了一个新的$scope对象,并作为rootScope的子作用域

$scope是由$rootScope创建的,$scope不会包括在$injector中。

演示样例4:

<!doctype html>
<html lang="en">
	<head>
	   <meta charset="utf-8">
	   <title>scope()</title>
	   <script src="jquery-1.11.1.js"></script>
	   <script src="angular-1.2.25.js"></script>
	   
	   <script>
	    
		//记住rootScope。用来推断跨控制器是否相等
		var first_rootScope = null;
		//记住scope,用来推断跨控制器是否相等
		var first_scope = null;
		//记住injector。用来推断跨控制器是否相等
		var first_injectot = null;
		
		// 第1个angular控制器
		function FirstController($scope,$injector,$rootScope)
		{
			$rootScope.name = "aty";
			first_rootScope = $rootScope;
			first_injectot = $injector;
			first_scope = $scope;	
		
		}
		
		// 第2个angular控制器,主要是来測试跨controller时injector和scope的表现
		function SecondController($scope,$injector,$rootScope)
		{
			console.log("first_rootScope==second_rootScope:" + (first_rootScope==$rootScope));//true
			console.log("first_injectot==second_injector:" + (first_injectot==$injector));//true
			console.log("first_scope==second_scope:" + (first_scope==$scope));//false
		}
	   
	   </script> 

	</head>
	
	<body ng-app>
		<div id="first" ng-controller="FirstController">
			<input type="text" ng-model="name">
			<br>
			<div id="tips"></div> 
		</div>
		
		<h2>outside of controller</h2>
		
		<br>
		<!--訪问每个应用(模块)的rootScope-->
		{{$root.name}}
		<div id="noControllerDiv"/>
		
		<div ng-controller="SecondController">
			
		</div>
		
		
	</body>
	
</html>

ng-app定义了一个angular模块,每个模块仅仅有一个$rootScope,仅仅有一个$injector,但能够有多个$scope


弄清了$injector、$rootScope和$scope这3者之间的关系。我们看下angular提供的2个API。一个是scope(),一个是injector()。

使用angular.element()返回的DOM对象,都会包括这2个方法,用来获取与之关联的scope和injector。

因为每一个模块的injector是唯一的。所以angular.element().injector()直接返回元素所在模块的injector

angular.element().scope()能够获取到当前元素的scope或父scope。假设当前元素有scope,则返回自己的scope;假设没有则向父亲方向寻找,假设找不到返回rootScope。即返回作用域链上。距离该元素近期的scope

<!doctype html>
<html lang="en">
	<head>
	   <meta charset="utf-8">
	   <title>scope()</title>
	   <script src="jquery-1.11.1.js"></script>
	   <script src="angular-1.2.25.js"></script>
	   
	   <script>

		function FirstController($scope,$injector,$rootScope)
		{
			//获取body对象
			var domBody = document.getElementsByTagName('body')[0];
			
			// 通过ng-app指令所在的DOM元素获取rootScope
			var rtScope = angular.element(domBody).scope();	
			
			//当前元素没有新作用域,获取父作用域即rootScope
			var noScope = angular.element("#noControllerDiv").scope();	
			
			// true
			console.log("rtScope==noScope:" + (rtScope==noScope));
			
			//ng-controller所在的元素,返回的scope
			var scopeOnController = angular.element("#first").scope();
			
			// ng-controller内部的元素返回所在的scope
			var inController = angular.element("#tips").scope();
			
			//true
			console.log("scopeOnController==inController:" + (scopeOnController==inController));
			
			//验证通过DOM获取的scope是否与注入的$scope和$rootScope一致
			//true
			console.log("result1:" + (rtScope==$rootScope));
			//true
			console.log("result2:" + (inController==$scope));

		}
	   
	   </script> 

	</head>
	
	<body ng-app>
		<div id="first" ng-controller="FirstController">
			<input type="text" ng-model="name">
			<br>
			<div id="tips"></div> 
		</div>
		
		<h2>outside of controller</h2>
		
		<br>
		<!--訪问每个应用(模块)的rootScope-->
		{{$root.name}}
		<div id="noControllerDiv"/>	
		
	</body>
	
</html>

Webpack打包 - 简书

mikel阅读(676)

来源: Webpack打包 – 简书

image.png

一. 概述

什么是webpack

模块打包机:它做的事情是,分析你的项目结构,找到JavaScript模块以及其它的一些浏览器不能直接运行的拓展语言(Scss,TypeScript等),并将其转换和打包为合适的格式供浏览器使用。

为什么使用webpack

现在是网络时代,在我们的生活中网络成为了必不可少的,我们在网络上可以看到很多漂亮的功能丰富的页面,这些页面都是由复杂的JavaScript代码和各种依赖包组合形成的,那么这些都是怎么*组合在一起的呢,组合在一起需要花费多少精力呢,经过漫长发展时间现前端涌现出了很多实践方法来处理复杂的工作流程,让开发变得更加简便。

  • 模块化 可以使复杂的程序细化成为各个小的文件
  • 预处理器 可以对Scss,less等CSS预先进行处理
    ……

二. weback使用流程

1、创建项目

这里用的是命令创建项目,当然你也可以去鼠标右键创建项目

mkdir webpackDemo // 创建项目
cd webpackDemo // 进入项目
mkdir app // 在项目中创建app文件
mkdir common // 在项目中创建common文件
cd app // 进入app文件夹
touch app.js // 创建app.js文件
touch main.js // 创建main.js文件
cd .. //返回到webpackDemo项目根目录
cd common // 进入common文件
touch index.html // 创建index.html文件
  • mkdir:创建文件夹
  • cd ..:返回所在目录的上级目录
  • touch:创建文件
  • app:用来存放原始数据和我们将写的JavaScript模块
  • common:用来存放之后供浏览器读取的文件(包括使用webpack打包生成的js文件以及一个index.html文件)

目录结构

image.png

基础代码
index.html是主入口,需要设置根目录并且将打包后的文件导入

<!doctype html>
<html lang="en">
<head>
    <meta charset="UTF-8">
    <title>Document</title>
</head>
<body>
    <div id="root"></div>
    <script type="text/javascript" src="index.js"></script>
</body>
</html>

app.js是我们写的模块,并依据CommonJS规范导出这个模块,这里我们以输出welcome to use webpack为例

module.exports = function() {
  var greet = document.createElement('div');
  greet.textContent = "welcome to use webpack!";
  return greet;
}

main.js其实是一个组件,它的目的是将我们写的一些代码模块返回并插入到页面中

const greeter = require('./app.js');
document.querySelector("#root").appendChild(greeter());
2. 安装

因为安装webpack要用npm,所以安装之前我们首先要安装node
第一步 要在项目根目录用npm init初始化,生成package.json文件

npm init

初始化过程中会有好多提示,如果非正式项目下可以直接回车调过,括号里的都是默认的,正式项目下可以根据情况填写每一步

name: (webpackDemo) // 项目名称
version: (1.0.0) // 版本号
description: // 项目的描述
entry point: (index.js) // 入口文件
test command: // 测试命令
git repository: // git仓库
keywords: // 关键字
author: // 作者创始人
 license: (ISC) //许可:(ISC)
About to write to C:\Users\Administrator\Desktop\webpackDemo\package.json:

{
  "name": "webpackdemo",
  "version": "1.0.0",
  "description": "",
  "main": "index.js",
  "scripts": {
    "test": "echo \"Error: no test specified\" && exit 1"
  },
  "author": "",
  "license": "ISC"
}

Is this ok? (yes) // 这里直接输入yes就可以了

第二步 安装webpack

npm install webpack -g // 全局安装
npm install webpack --save-dev // 项目内安装

如果不想安装最新的版本那么得在webpack后面加一个@然后在填入你要安装的版本号,当然安装最新版本时可以加@版本号也可以不加@版本号

npm install webpack -g
npm install webpack --save-dev

webpack有两个版本分别是webpack2和webpack4,这两个版本安装配置有差异。
先来看看webpack2
本次安装的是3.5.6的版本,运行的是以下命令

npm install webpack@3.5 --save-dev

接下来看下我们创建的package.json文件,里面的都是我们刚配置的

{
  "name": "webpackdemo",
  "version": "1.0.0",
  "description": "",
  "main": "index.js",
  "scripts": {
    "test": "echo \"Error: no test specified\" && exit 1"
  },
  "author": "",
  "license": "ISC",
  "devDependencies": {
    "webpack": "^3.5.6"
  }
}

接下来看webpack4
webpack4版需要去额外安装webpack-cli

npm install webpack@4 --save-dev
npm install webpack@4 webpack-cli --save-dev

接下来看下配置文件

{
  "name": "webpackdemo",
  "version": "1.0.0",
  "description": "",
  "main": "index.js",
  "scripts": {
    "test": "echo \"Error: no test specified\" && exit 1"
  },
  "author": "",
  "license": "ISC",
  "devDependencies": {
    "webpack": "^4.29.5",
    "webpack-cli": "^3.2.3",
  }
}

注意:package.json文件中不能有注释,在运行的时候请将注释删除

第三步 使用Webpack打包
webpack可以在终端中使用,基本的使用方法如下:

// webpack2的命令
node_modules/.bin/webpack app/main.js common/index.js 
// webpack4的命令
node_modules/.bin/webpack app/main.js -o common/index.js
  • app/main.js:是入口文件的路径,本文中就是上述main.js的路径
  • common/index.js:是打包文件的存放路径

注意:是非全局安装情况
webpack2打包命令执行后

image.png

webpack4打包命令执行后
如果你的webpack是最新的版本webpack4那么就不能用webpack2的打包命令,如果用webpack2的命令会报错打包失败,如下:

image.png
  • 黄色部分:webpack4是需要指定打包为开发环境还是生产环境的,目前我们没有指定是什么环境所以就会有这个警告
  • 红色部分:因为webpack4的打包命令和webpack2的打包命令不同,所以用webpack2的打包命令时就会提示打包的路径找不到

如果你用webpack4的打包命令,打包如下

image.png

黄色警告下面会解决这个问题
从打包的结果可以看出webpack同时编译了main.js 和app,js,并且打包成功,现在打开编辑器,可以看到如下结果

image.png

webpack2的打包文件

image.png

webpack4的打包文件

image.png

接下来我们在看下页面

image.png

是不是很激动我们已经将welcome to use webpack!在页面打包生成,但是这种方式需要在终端运行复杂的命令而且容易出错很不方便,如果能更方便点就好了,那么接下来我们在看下它的升级版打包。

第四步 通过配置文件webpack.config.js来使用webpack
Webpack拥有很多其它的比较高级的功能,这些功能其实都可以通过命令行模式实现,但是在终端中进行复杂的操作,这样不太方便且容易出错的,更好的办法是定义一个配置文件,这个配置文件其实也是一个简单的JavaScript模块,我们可以把所有的与打包相关的信息放在里面。
在当前项目webpackDemo文件夹下新创建一个文件webpack.config.js,写入简单的配置代码,目前的配置主要涉及到的内容是入口文件路径和打包后文件的存放路径

// webpack2的配置
module.exports = {
    entry:  __dirname + "/app/main.js", // 之前提到的唯一入口文件
    output: {
        path: __dirname + "/common", // 打包后的文件存放的地方
        filename: "index.js" // 打包后输出文件的文件名
    }
}
// webpack4的配置
module.exports = {
    // webpack4需要添加这个配置,development为开发环境,production为生产环境
    mode: "development",
    entry:  __dirname + "/app/main.js", // 之前提到的唯一入口文件
    output: {
        path: __dirname + "/common", // 打包后的文件存放的地方
        filename: "index.js" // 打包后输出文件的文件名
    }
}

注:“__dirname”是node.js中的一个全局变量,它指向当前执行脚本所在的目录。
有了这个配置之后,再打包文件,只需在终端里运行webpack(全局情况下)或node_modules/.bin/webpack(非全局安装需使用)命令就可以了,不需要再命令行打入主入口和打包文件的路径了,这条命令会自动引用webpack.config.js文件中的配置选项。
示例如下:

image.png
image.png

是不是很简单这样我们就不用再终端输入那么多烦人的配置文件的路径了,那么如果node_modules/.bin/webpack这条命令都不用在终端输入,是不是更简单呢?,接下来接着往下看。
更加方便的打包操作
根据上面的方式来看我们只要配置了webpack.config.js就可以将打包的路径命令省去,那么我们想是否可以以这种方式将node_modules/.bin/webpack命令省去呢? 答案是可以,只不过不是在这个文件内配置,也不用去新建文件配置。
npm可以引导任务执行,对npm进行配置后可以在命令行中使用简单的npm start命令来替代上面略微繁琐的命令。在package.json中对scripts对象进行相关设置即可,设置方法如下。

{
  "name": "webpackdemo",
  "version": "1.0.0",
  "description": "",
  "main": "index.js",
  "scripts": {
    "test": "echo \"Error: no test specified\" && exit 1",
    "start": "webpack" // 修改的是这里,JSON文件不支持注释,引用时请清除
  },
  "author": "",
  "license": "ISC",
  "devDependencies": {
    "webpack": "^3.5.6"
  }
}

注:package.json中的script会安装一定顺序寻找命令对应位置,本地的node_modules/.bin路径就在这个寻找清单中,所以无论是全局还是局部安装的Webpack,你都不需要写前面那指明详细的路径了。
npm的start命令是一个特殊的脚本名称,其特殊性表现在,在命令行中使用npm start就可以执行其对于的命令,如果对应的此脚本名称不是start,想要在命令行中运行时,需要这样用npm run {script name}npm run build,我们在命令行中输入npm start,看看输出结果是什么,输出结果如下:

image.png
image.png

现在只需要使用npm start就可以打包文件了,有没有觉得webpack也不过如此嘛,不过不要太小瞧webpack,要充分发挥其强大的功能我们还需要配置很多。

其他配置可以查看以下文章

(一)Source Maps
(二)构建本地服务器
(三)Loaders
(四)Babel
(五)模块化处理
(六)插件(Plugins)
(七)产品阶段的构建

结尾

文章到这里就要和大家告一段落了,通过这篇文章大家可以初步的了解webpack的打包流程,以及webpack的一些工具和插件,并且可以简单的去打包一些demo。
其实webpack还有很多需要我们去学习和深入了解去探索的东西。
最后祝愿大家能够早日将webpack掌握并熟练的去运用,也祝大家事业有成,最重要的一点是:“一定要注意身体吆!”

作者:秉持本心
链接:https://www.jianshu.com/p/1192cfd4a012
来源:简书
著作权归作者所有。商业转载请联系作者获得授权,非商业转载请注明出处。