[转载]如何将XML与OBJECT进行相互转换(泛型以及通用方法) – JasenKin – 博客园.
过年的这段时间一直没有闲着,总体来说可以分为以下2个部分的学习。
1:ORMCodeHelper的参考与学习。
2:MVC3的学习。
对于ORMCodeHelper(Keny的),完全的采用插件式开发,即插即用,个人感觉还是比较爽的,架构不错。它包括了SQL SERVER 2000,SQL SERVER 2005以及ORACLE的相关C#代码的生成。比哥一年前写的那个牛多了,哈哈,哥去年乱写了个网页版的(http://www.cnblogs.com/jasenkin/archive/2010/02/11/1667511.html), 现在看一年前的代码,哥感叹,这个谁写的代码,TMD实在写的太烂了!!!当然,ORMCodeHelper与CodeSmith相比,还是有差距的哦。 霖哥以前给我的codesmith模板(N层的),哥一直没时间仔细看,哥知道那个模板可以把所有的代码全部生成,其中包括N层代码、存储过程、页面等 等。虽然时间就像乳沟,只要挤一挤总还是有的!但是,哥真的……本来9号哥都是请假休息的,唉,又要哥上班了….
还有就是对于MVC3,Razor实在太给力了,扔掉MVC2吧,哈哈,@确实挺不错的。
在ORMCodeHelper中,对于配置文件的使用的思路还是不错的,哥学以致用,提炼个泛型的出来(其实最主要的还是插件开发的架构)。对于 XML与OBJECT的转换来说,下面讲的是一种Serialize方法。其实哥还有另外一种通过反射将XML转换成对象的方法,不过,涉及到公 司****,那种方法还是不写了。当然,那种方法哥是可以横着写了(因为哥早就背在心里了),哈哈,通用的代码….
先看代码,如下:
{
public static void Serialize<T>(string filePath, T[] array) where T:new()
{
if (string.IsNullOrEmpty(filePath)||
array == null||array.Length==0)
{
return;
}
try
{
XmlSerializerFactory xmlSerializerFactory = new XmlSerializerFactory();
XmlSerializer xmlSerializer =
xmlSerializerFactory.CreateSerializer(array.GetType(), typeof(T).Name);
Stream stream = new FileStream(filePath, FileMode.Create);
xmlSerializer.Serialize(stream, array);
stream.Close();
}
catch
{
}
}
public static void Serialize(string filePath, object obj)
{
if (string.IsNullOrEmpty(filePath) || obj == null)
{
return;
}
try
{
XmlSerializerFactory xmlSerializerFactory = new XmlSerializerFactory();
XmlSerializer xmlSerializer =
xmlSerializerFactory.CreateSerializer(obj.GetType(), obj.GetType().Name);
Stream stream = new FileStream(filePath, FileMode.Create);
xmlSerializer.Serialize(stream, obj);
stream.Close();
}
catch
{
}
}
}
{
List<T> results=new List<T>();
if (string.IsNullOrEmpty(filePath)||!File.Exists(filePath))
{
return results;
}object obj = null;
try
{
XmlSerializerFactory xmlSerializerFactory = new XmlSerializerFactory();
XmlSerializer xmlSerializer =
xmlSerializerFactory.CreateSerializer(typeof(T[]), typeof(T).Name);
Stream stream = new FileStream(filePath, System.IO.FileMode.Open);
obj = xmlSerializer.Deserialize(stream);
stream.Close();
results.AddRange(obj as T[]);
}
catch
{
}
return results;
}
public static object Deserialize(string filePath, Type targetType)
{
if (string.IsNullOrEmpty(filePath)||!File.Exists(filePath)
|| targetType == null)
{
return null;
}
object obj = null;
try
{
XmlSerializerFactory xmlSerializerFactory = new XmlSerializerFactory();
XmlSerializer xmlSerializer =
xmlSerializerFactory.CreateSerializer(targetType, targetType.Name);
Stream stream = new FileStream(filePath, FileMode.Open);
obj = xmlSerializer.Deserialize(stream);
stream.Close();
}
catch
{
}
return obj;
}
从上面4个方法,可以看出主要是通过XmlSerializer将对象序列化为XML以及将XML反序列化为对象,这种方法比较简单,而且易用。
(一)Serialize<T>(string filePath, T[] array),Deserialize<T>(string filePath)
通过单元测试来看看Serialize<T>(string filePath, T[] array)方法生成的XML内容,先注释掉//DeleteFile(filePath);
{
AppSetting[] settings = inputs;
string filePath = @”d:\” + typeof(AppSetting).Name + “.config”;
Serializer.Serialize<AppSetting>(filePath, settings);
List<AppSetting> results = Serializer.Deserialize<AppSetting>(filePath);
int length = results.Count;
Assert.IsTrue(length == settings.Length);
for (int index = 0; index < length; index++)
{
Assert.IsTrue(results[index].Value == settings[index].Value);
Assert.IsTrue(results[index].Key == settings[index].Key);
Assert.IsTrue(results[index].Author == settings[index].Author);
}
//DeleteFile(filePath);
}
生成的XML如下:
<?xml version=”1.0″?>
<ArrayOfAppSetting xmlns:xsi=”http://www.w3.org/2001/XMLSchema-instance” xmlns:xsd=”http://www.w3.org/2001/XMLSchema” xmlns=”AppSetting”>
<AppSetting>
<Key>key0</Key>
<Value>value0</Value>
<Author>author0</Author>
</AppSetting>
<AppSetting>
<Key>key1</Key>
<Value>value1</Value>
<Author>author1</Author>
</AppSetting>
<AppSetting>
<Key>key2</Key>
<Value>value2</Value>
<Author>author2</Author>
</AppSetting>
</ArrayOfAppSetting>
从上面的单元测试可以看出:通过Serialize<T>(string filePath, T[] array)方法将对象数组生成XML内容,可以通过Deserialize<T>(string filePath)将XML内容转换成相应的对象数组,内容相一致。
(二)Serialize(string filePath, object obj),Deserialize(string filePath, Type targetType)
通过单元测试来看看Serialize(string filePath, object obj)方法生成的XML内容,先注释掉//DeleteFile(filePath);
{
AppSetting setting = new AppSetting()
{
Author = “AuthorTest”,
Key = “KeyTest”,
Value = “ValueTest”
};
string filePath = @”d:\” + typeof(AppSetting).Name + “.config”;
Serializer.Serialize(filePath, setting);
AppSetting result = Serializer.Deserialize(filePath, typeof(AppSetting)) as AppSetting;
Assert.IsTrue(result.Value == setting.Value);
Assert.IsTrue(result.Author == setting.Author);
Assert.IsTrue(result.Key == setting.Key);
//DeleteFile(filePath);
}
生成的XML如下:
<AppSetting xmlns:xsi=”http://www.w3.org/2001/XMLSchema-instance” xmlns:xsd=”http://www.w3.org/2001/XMLSchema” xmlns=”AppSetting”>
<Key>KeyTest</Key>
<Value>ValueTest</Value>
<Author>AuthorTest</Author>
</AppSetting>
从上面的单元测试可以看出:通过Serialize(string filePath, object obj)方法将对象生成XML内容,可以通过Deserialize(string filePath, Type targetType)将XML内容转换成相应的对象,内容相一致。其中,object也可以是对象数组的,这个留给读者自己去验证。
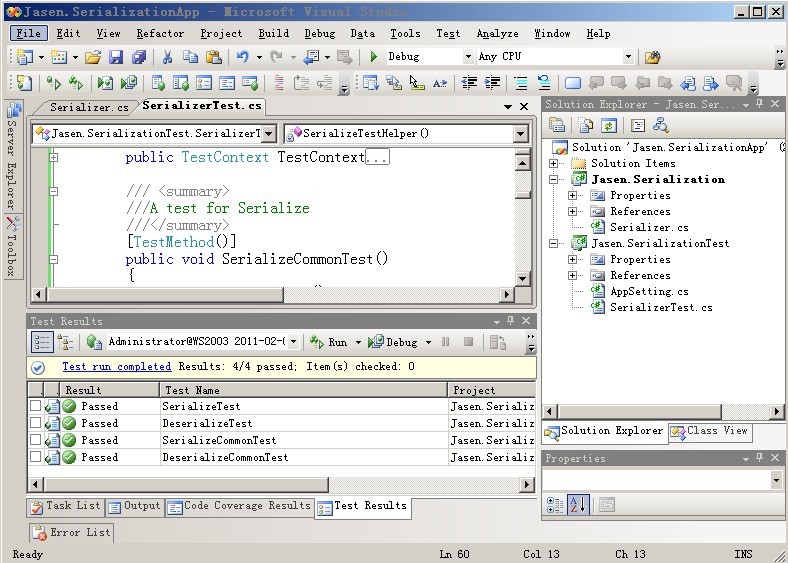
测试都是可以通过的,这里仅仅是验证正确的功能,如下图:

源代码(VS2008)下载:Jasen.SerializationApp.rar
 Mikel
Mikel

